> ## Documentation Index
> Fetch the complete documentation index at: https://docs.idemeum.com/llms.txt
> Use this file to discover all available pages before exploring further.
# ConnectWise PSA
> Ticketing integration with ConnectWise PSA.
## **ConnectWise configuration**
In order to allow 3rd party applications (like idemeum) to make calls on behalf of a user we need to create a `Member API` and an `API key` in ConnectWise.
### **Create custom role for idemeum API**
We need to create a custom role that would allow all the operation that idemeum has to perform.
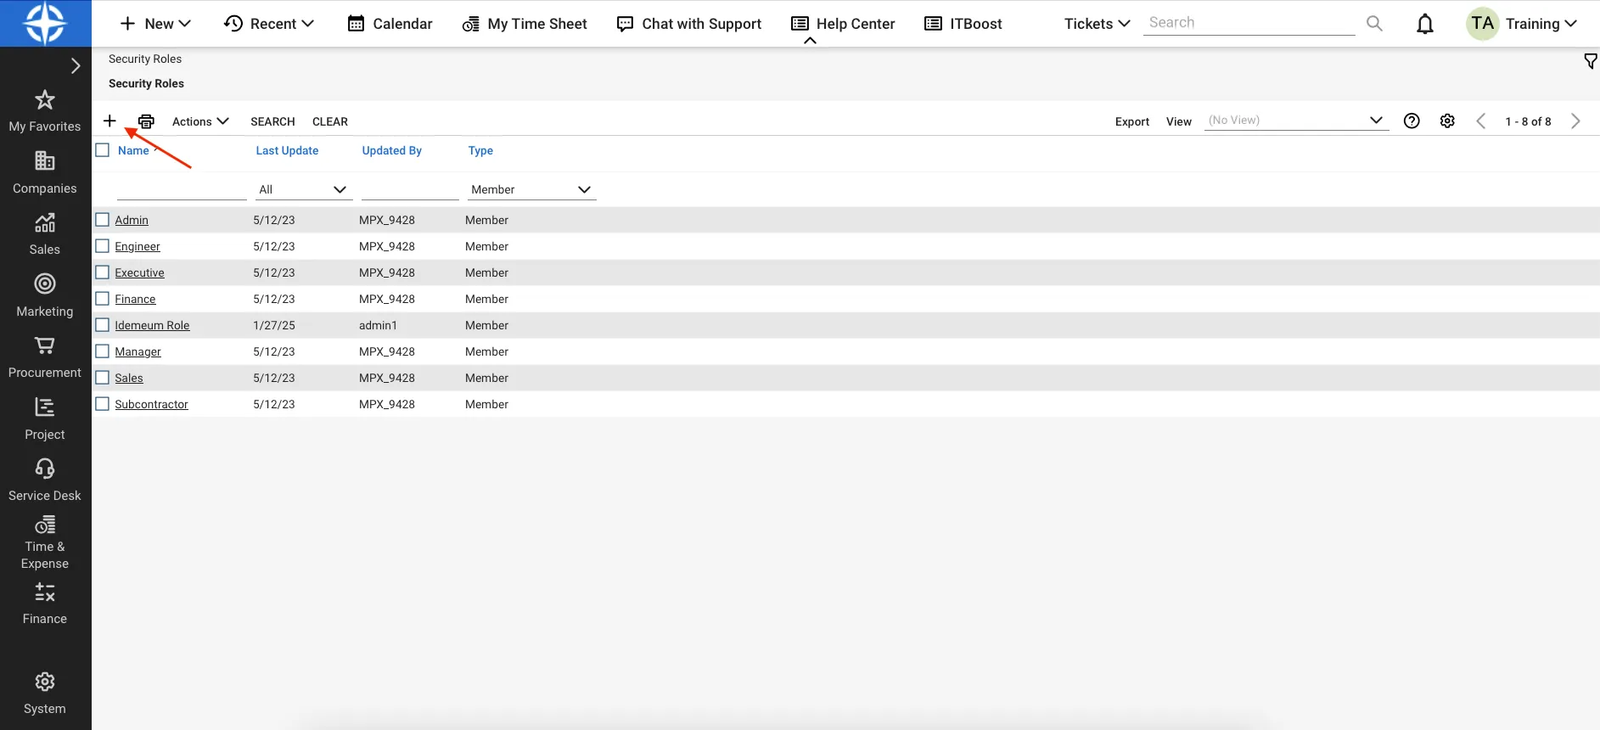
* In ConnectWise admin console navigate to: `System` → `Security Roles`
* Click the `+` sign to create a new security role and give a role a name (e.g: `Idemeum Role`)
 * Then add the following permissions
* **Companies**
* Company Maintenance: Inquire - All
* Configurations: Inquire - All
* **Service Desk**
* Close Service Tickets: Edit - All; Inquire - All
* Resource Scheduling: Add - All; Edit - All; Inquire - All
* Service Tickets: Add - My; Edit - All - Inquire - All
* **System**
* Member Maintenance: Inquire - All
* My Company: Inquire - All
* Table Setup: Add - All; Inquire - All
* **Time and expense**
* Time Entry: Add - All; Edit - All; Inquire - All
* Tim Entry Billable Option: Add - All; Inquire - All
### **Add an API member**
* From the ConnectWise admin console navigate to: `System` → `Members` → `API Members`
* Then add the following permissions
* **Companies**
* Company Maintenance: Inquire - All
* Configurations: Inquire - All
* **Service Desk**
* Close Service Tickets: Edit - All; Inquire - All
* Resource Scheduling: Add - All; Edit - All; Inquire - All
* Service Tickets: Add - My; Edit - All - Inquire - All
* **System**
* Member Maintenance: Inquire - All
* My Company: Inquire - All
* Table Setup: Add - All; Inquire - All
* **Time and expense**
* Time Entry: Add - All; Edit - All; Inquire - All
* Tim Entry Billable Option: Add - All; Inquire - All
### **Add an API member**
* From the ConnectWise admin console navigate to: `System` → `Members` → `API Members`
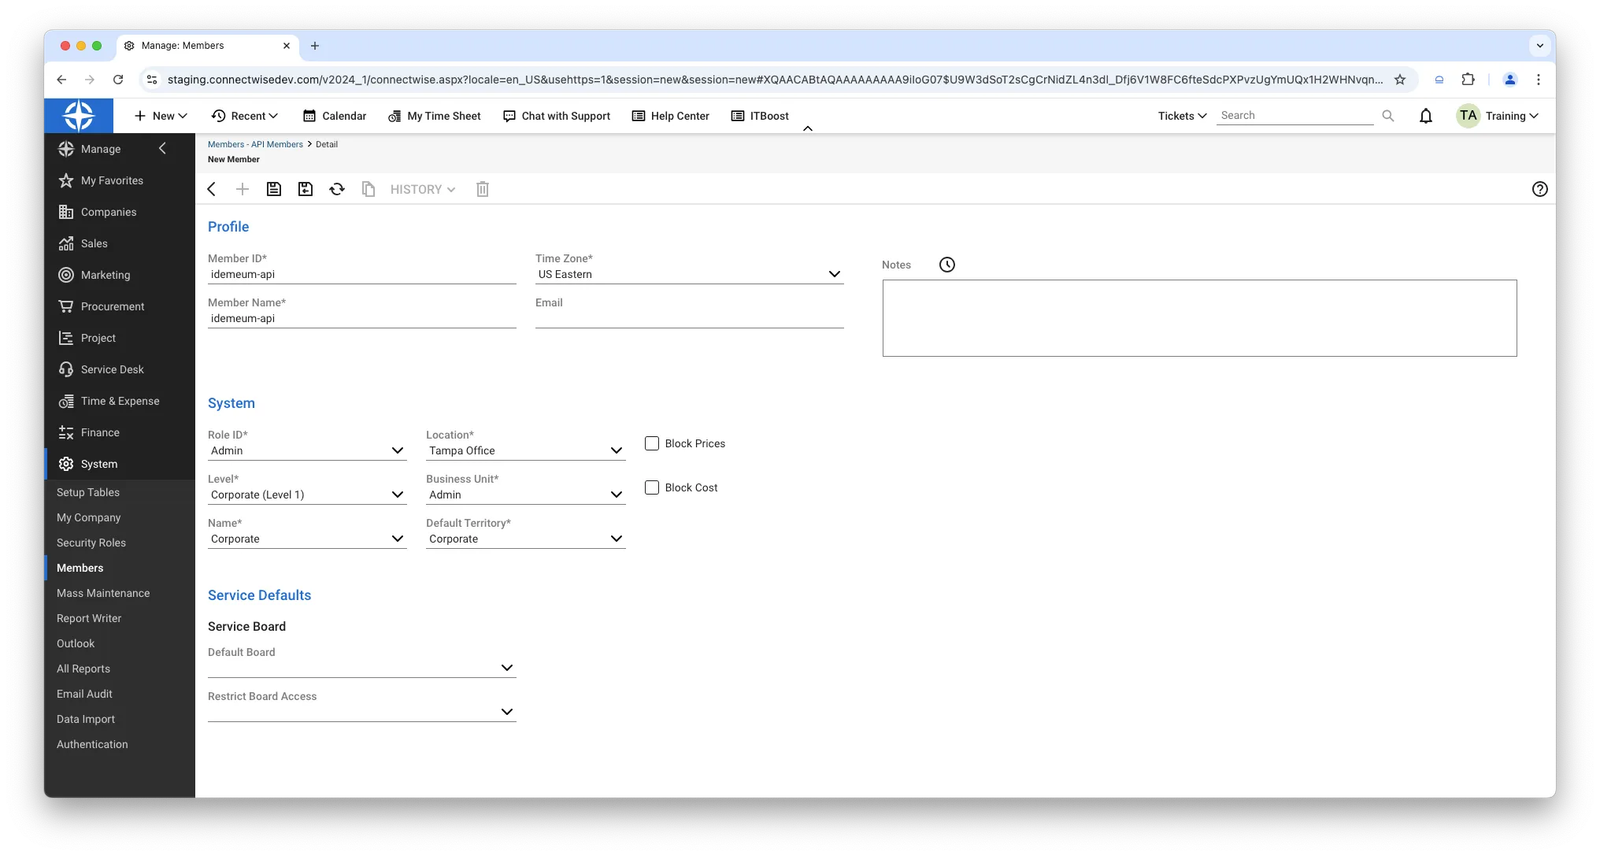
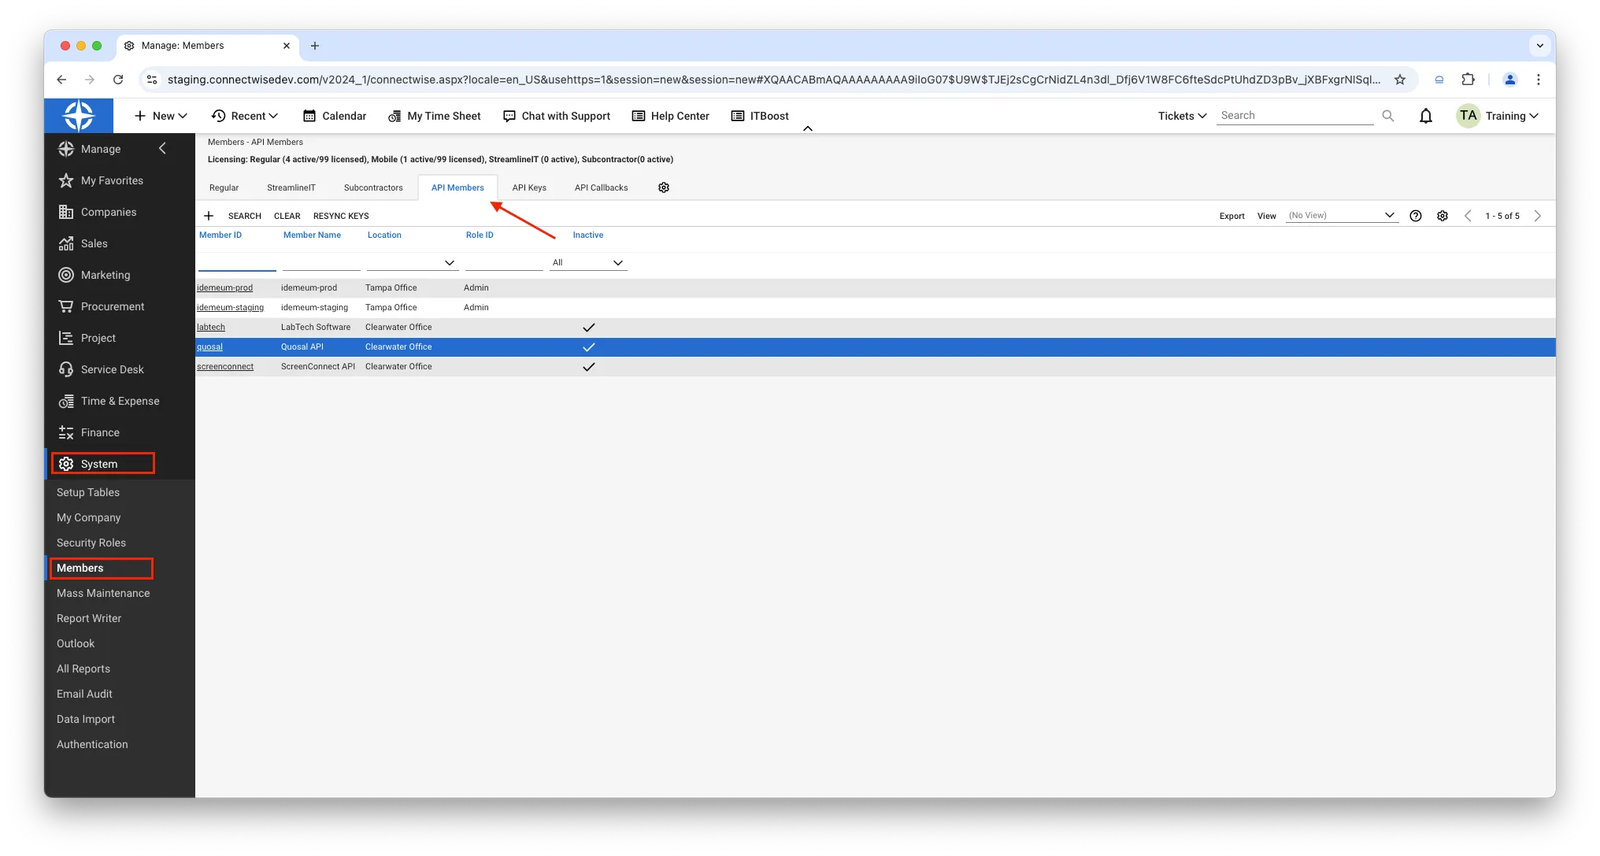 * Click the `+` sign and add a new API member. In the example below I have named it: `nikpot-api`.
* For the Role ID select `Idemeum Role` that we created. Fill out the rest of the required fields and click Save icon.
* Click the `+` sign and add a new API member. In the example below I have named it: `nikpot-api`.
* For the Role ID select `Idemeum Role` that we created. Fill out the rest of the required fields and click Save icon.
 ### **Add API key**
* After you have added the API member you can select it from the list and select API Keys tab and click the + sign to add a new API key.
### **Add API key**
* After you have added the API member you can select it from the list and select API Keys tab and click the + sign to add a new API key.
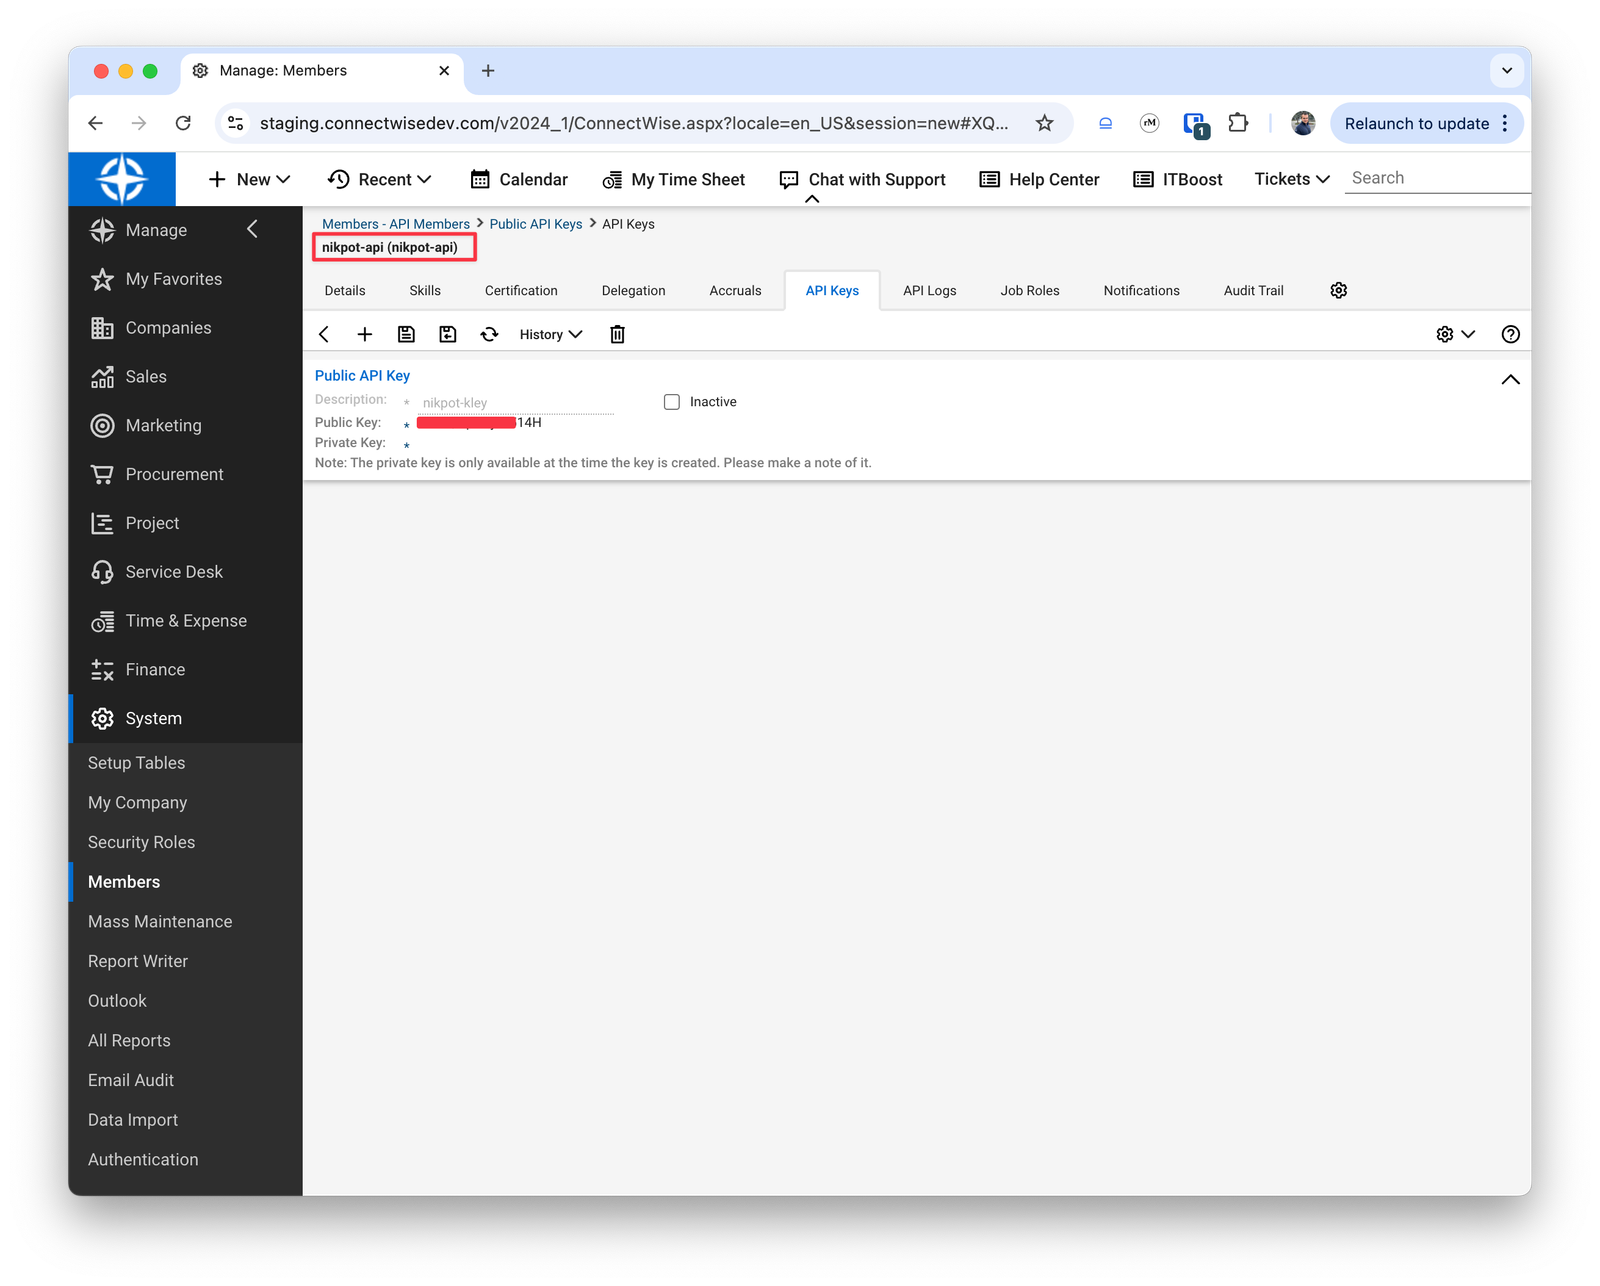
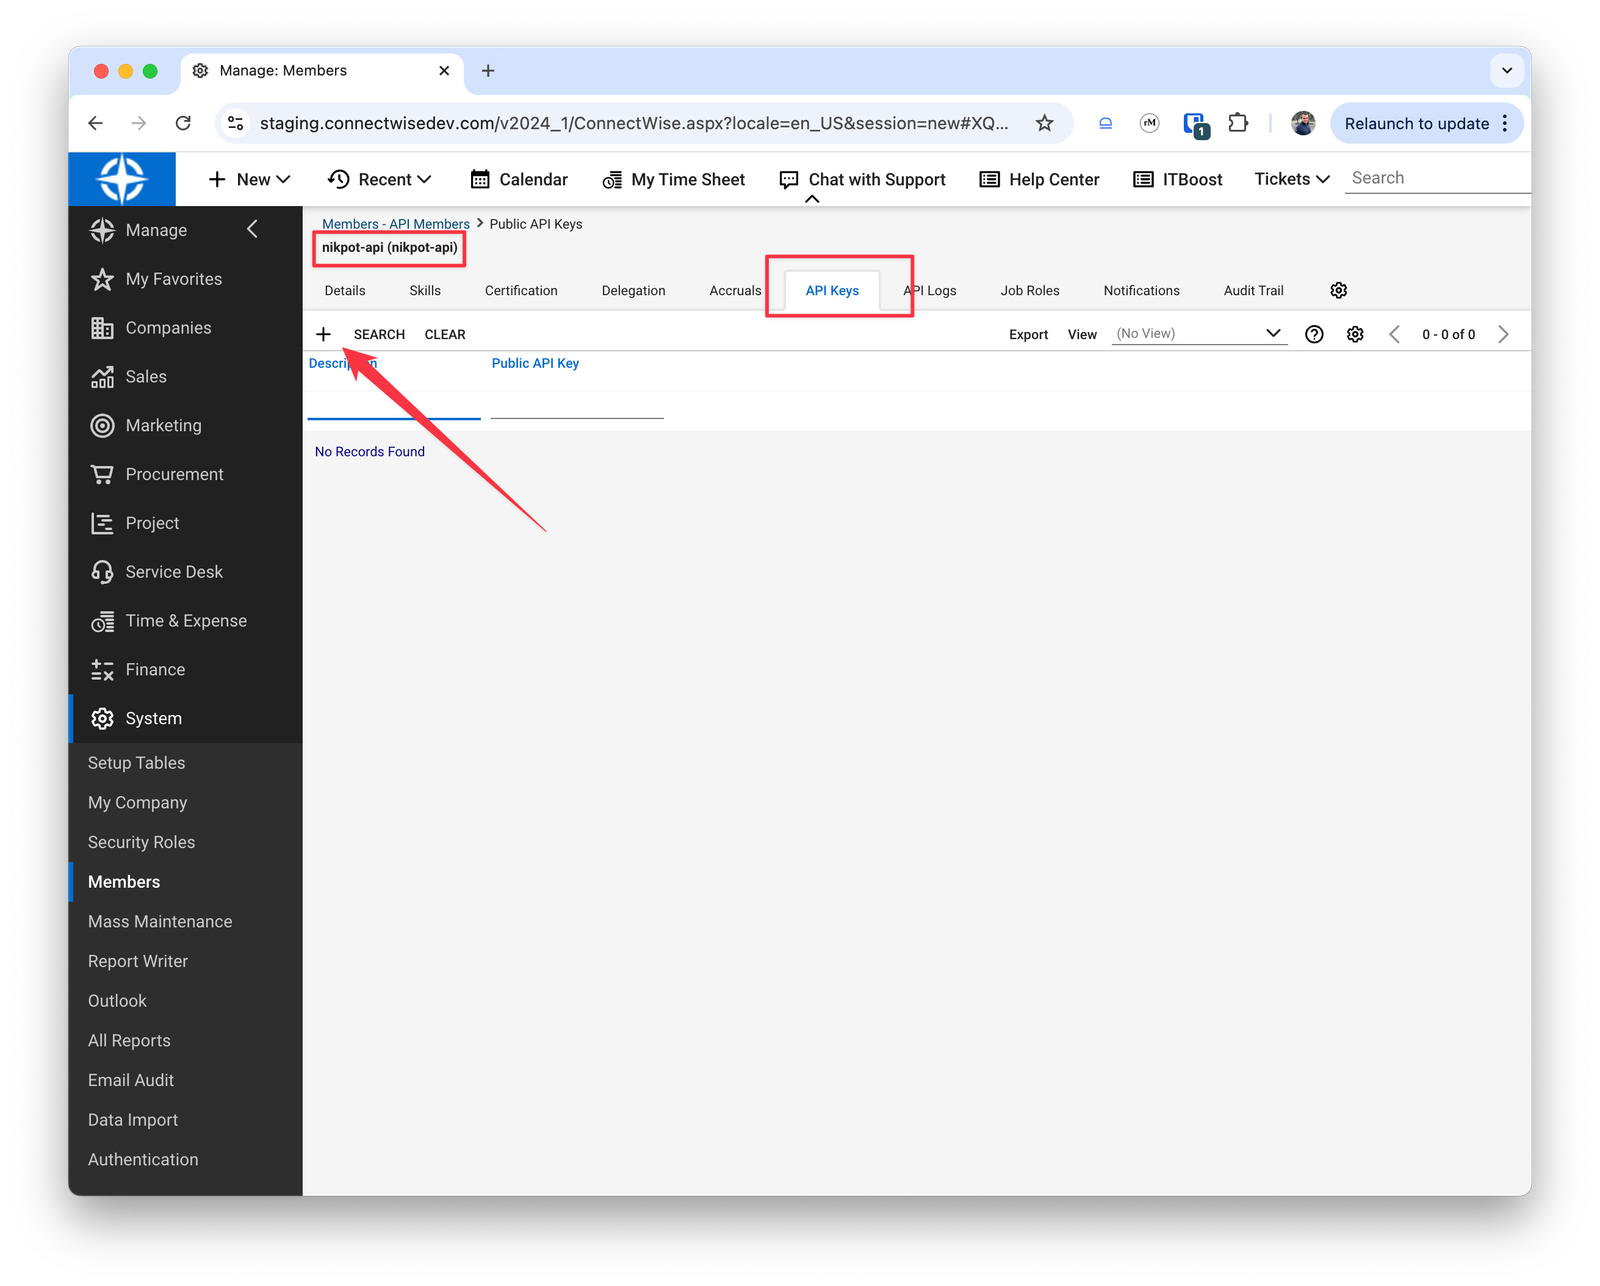 * In the example below I have named the key `nikpot-key`. Click Save.
* Make sure you save the `Private Key` somewhere safe as it is only displayed once when you create the API key. We will need both the `Public` and `Private` Keys to be configured in idemeum Admin portal.
* In the example below I have named the key `nikpot-key`. Click Save.
* Make sure you save the `Private Key` somewhere safe as it is only displayed once when you create the API key. We will need both the `Public` and `Private` Keys to be configured in idemeum Admin portal.
 ## **Idemeum configuration**
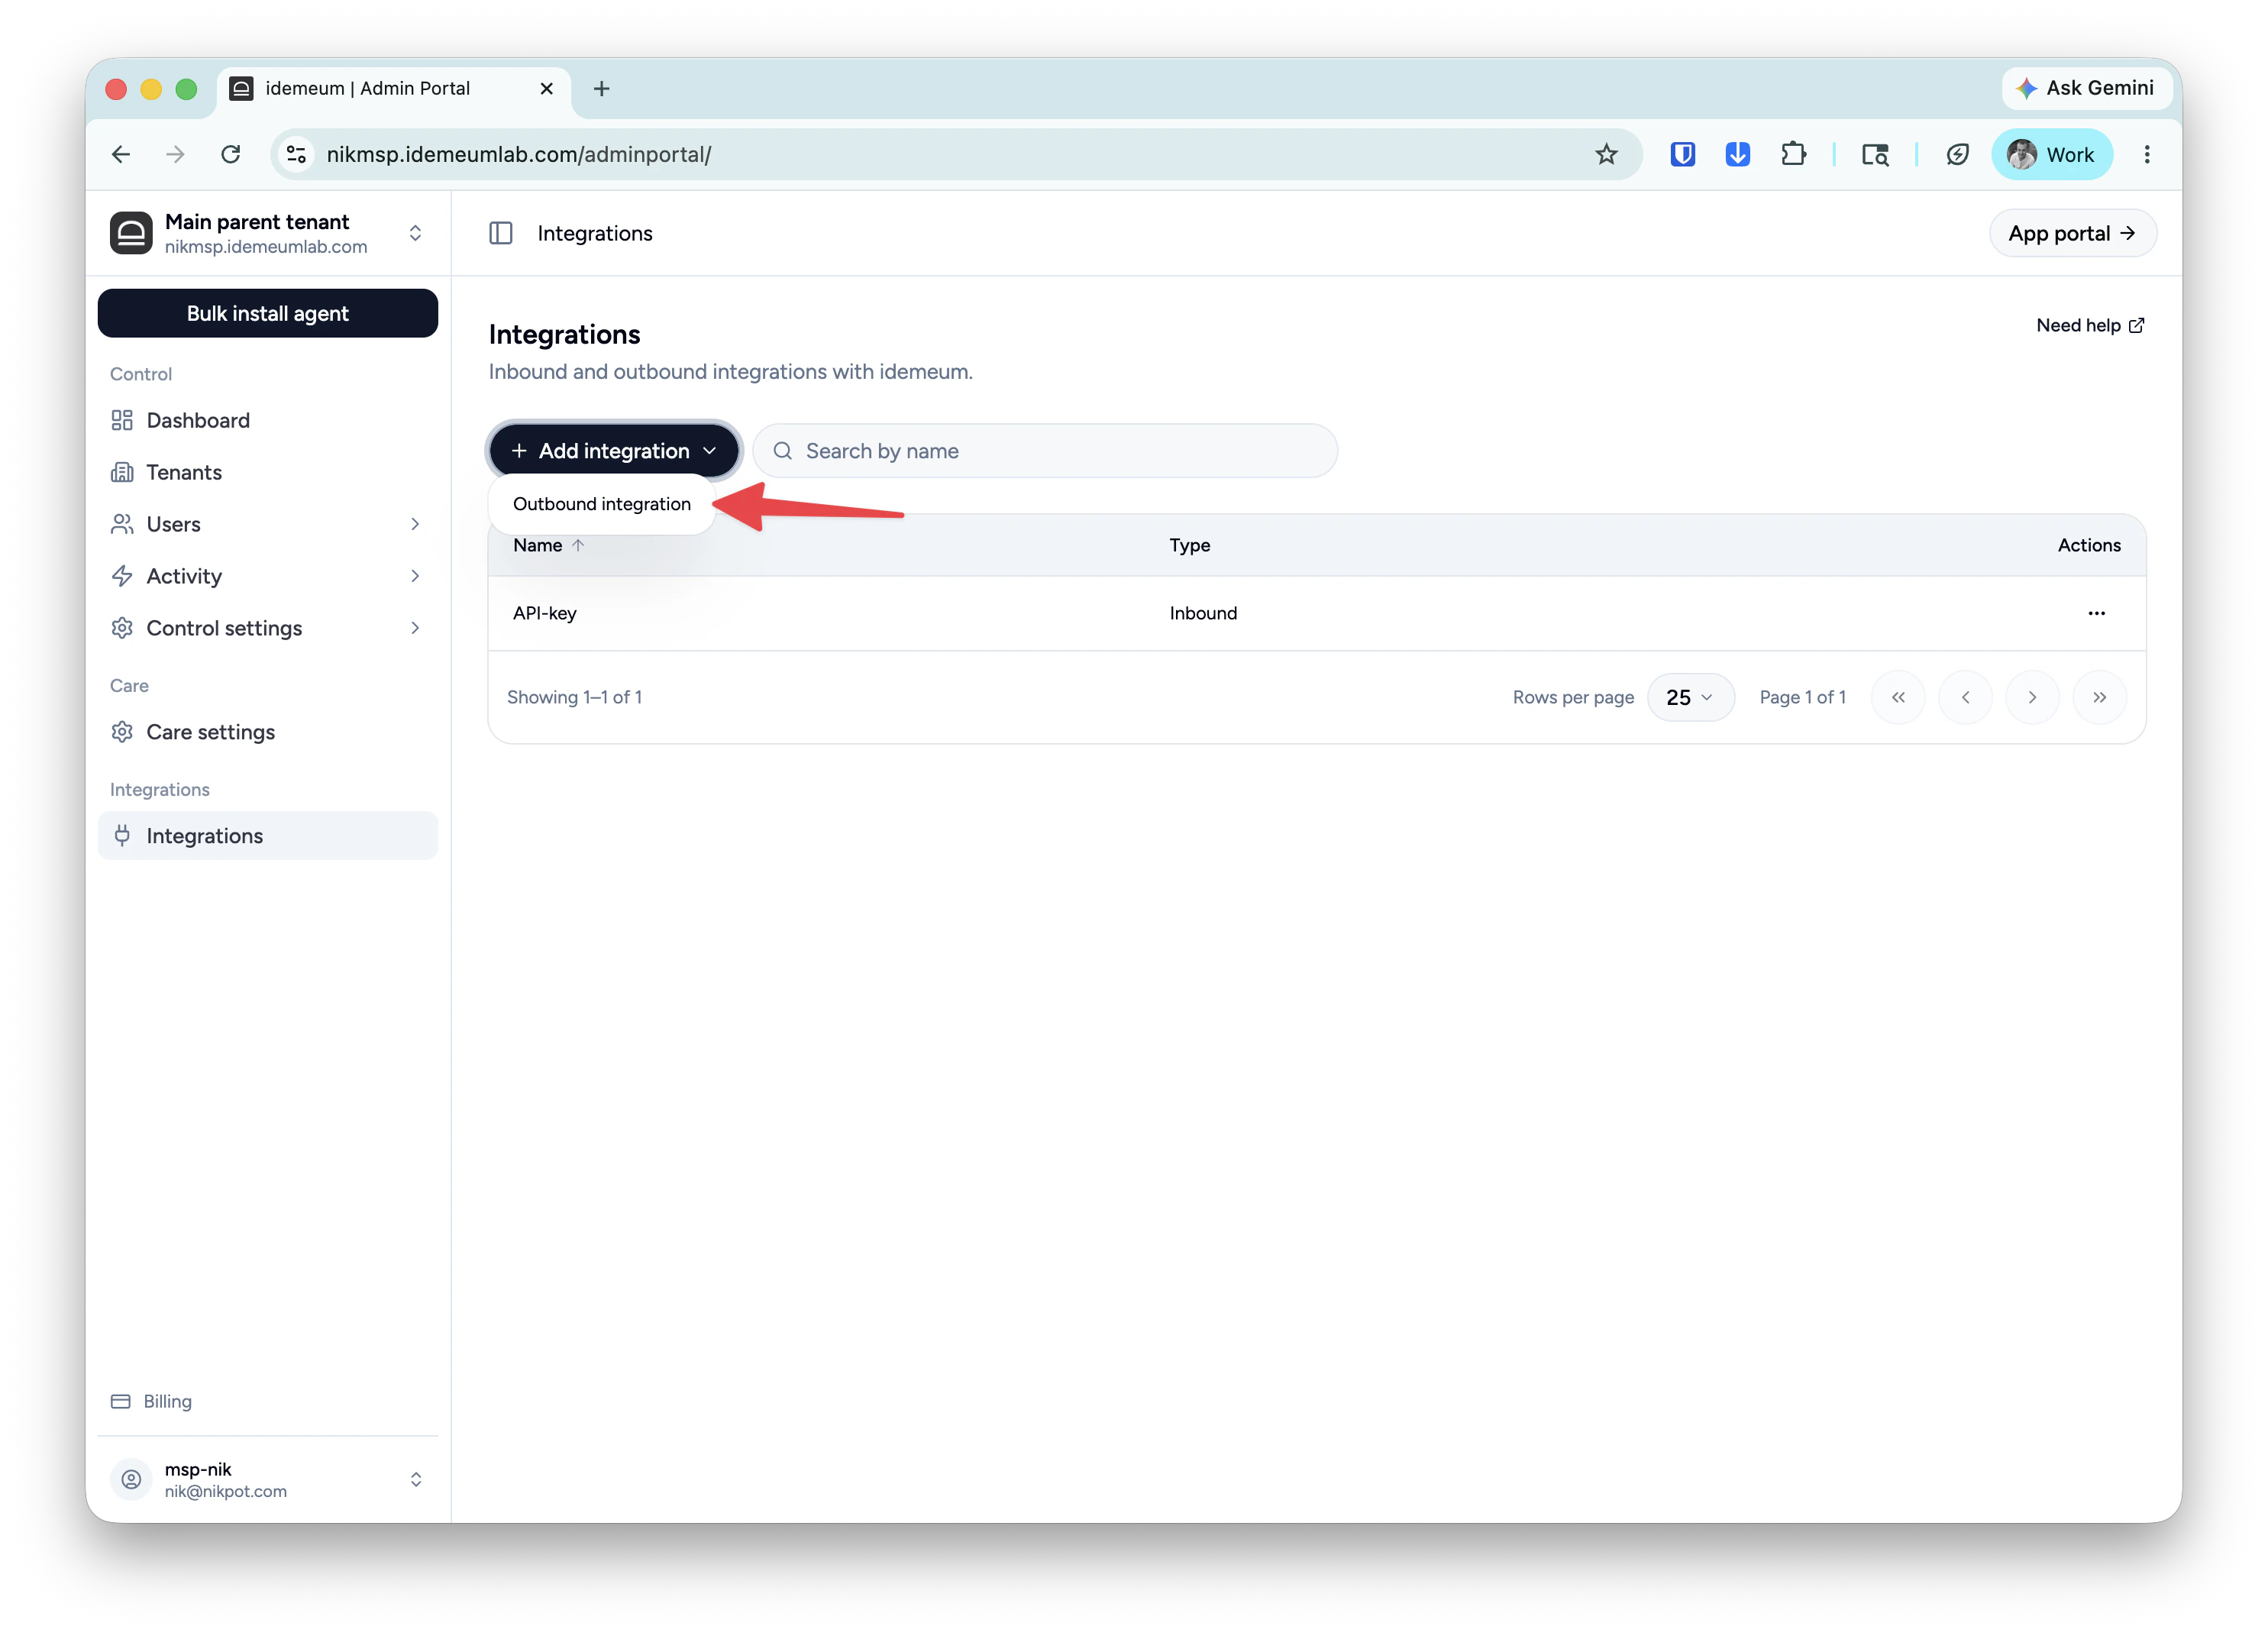
* Login to your idemeum admin portal
* Navigate to `Integrations` section
* Click `Add integration` → `Outbound integration`
## **Idemeum configuration**
* Login to your idemeum admin portal
* Navigate to `Integrations` section
* Click `Add integration` → `Outbound integration`
 * From the list of connectors select `ConnectWise`.
* Fill out the following information for the ConnectWise configuration:
* **API server URL** - needs to be one of the value from the list below
```text theme={null}
https://api-au.myconnectwise.net
https://api-eu.myconnectwise.net
https://api-na.myconnectwise.net
https://api-staging.connectwisedev.com
```
* **ConnectWise Company Name** - this is your company name in ConnectWise (the same one that you use to login to the Manage console for ConnectWise)
* **API public key** - the public key that you have created in ConnectWise
* **API private key** - the private key that you have created in ConnectWise
* You can also change the default values for ticket severity, ticket impact, board, closed status id, and time entry value.
* From the list of connectors select `ConnectWise`.
* Fill out the following information for the ConnectWise configuration:
* **API server URL** - needs to be one of the value from the list below
```text theme={null}
https://api-au.myconnectwise.net
https://api-eu.myconnectwise.net
https://api-na.myconnectwise.net
https://api-staging.connectwisedev.com
```
* **ConnectWise Company Name** - this is your company name in ConnectWise (the same one that you use to login to the Manage console for ConnectWise)
* **API public key** - the public key that you have created in ConnectWise
* **API private key** - the private key that you have created in ConnectWise
* You can also change the default values for ticket severity, ticket impact, board, closed status id, and time entry value.
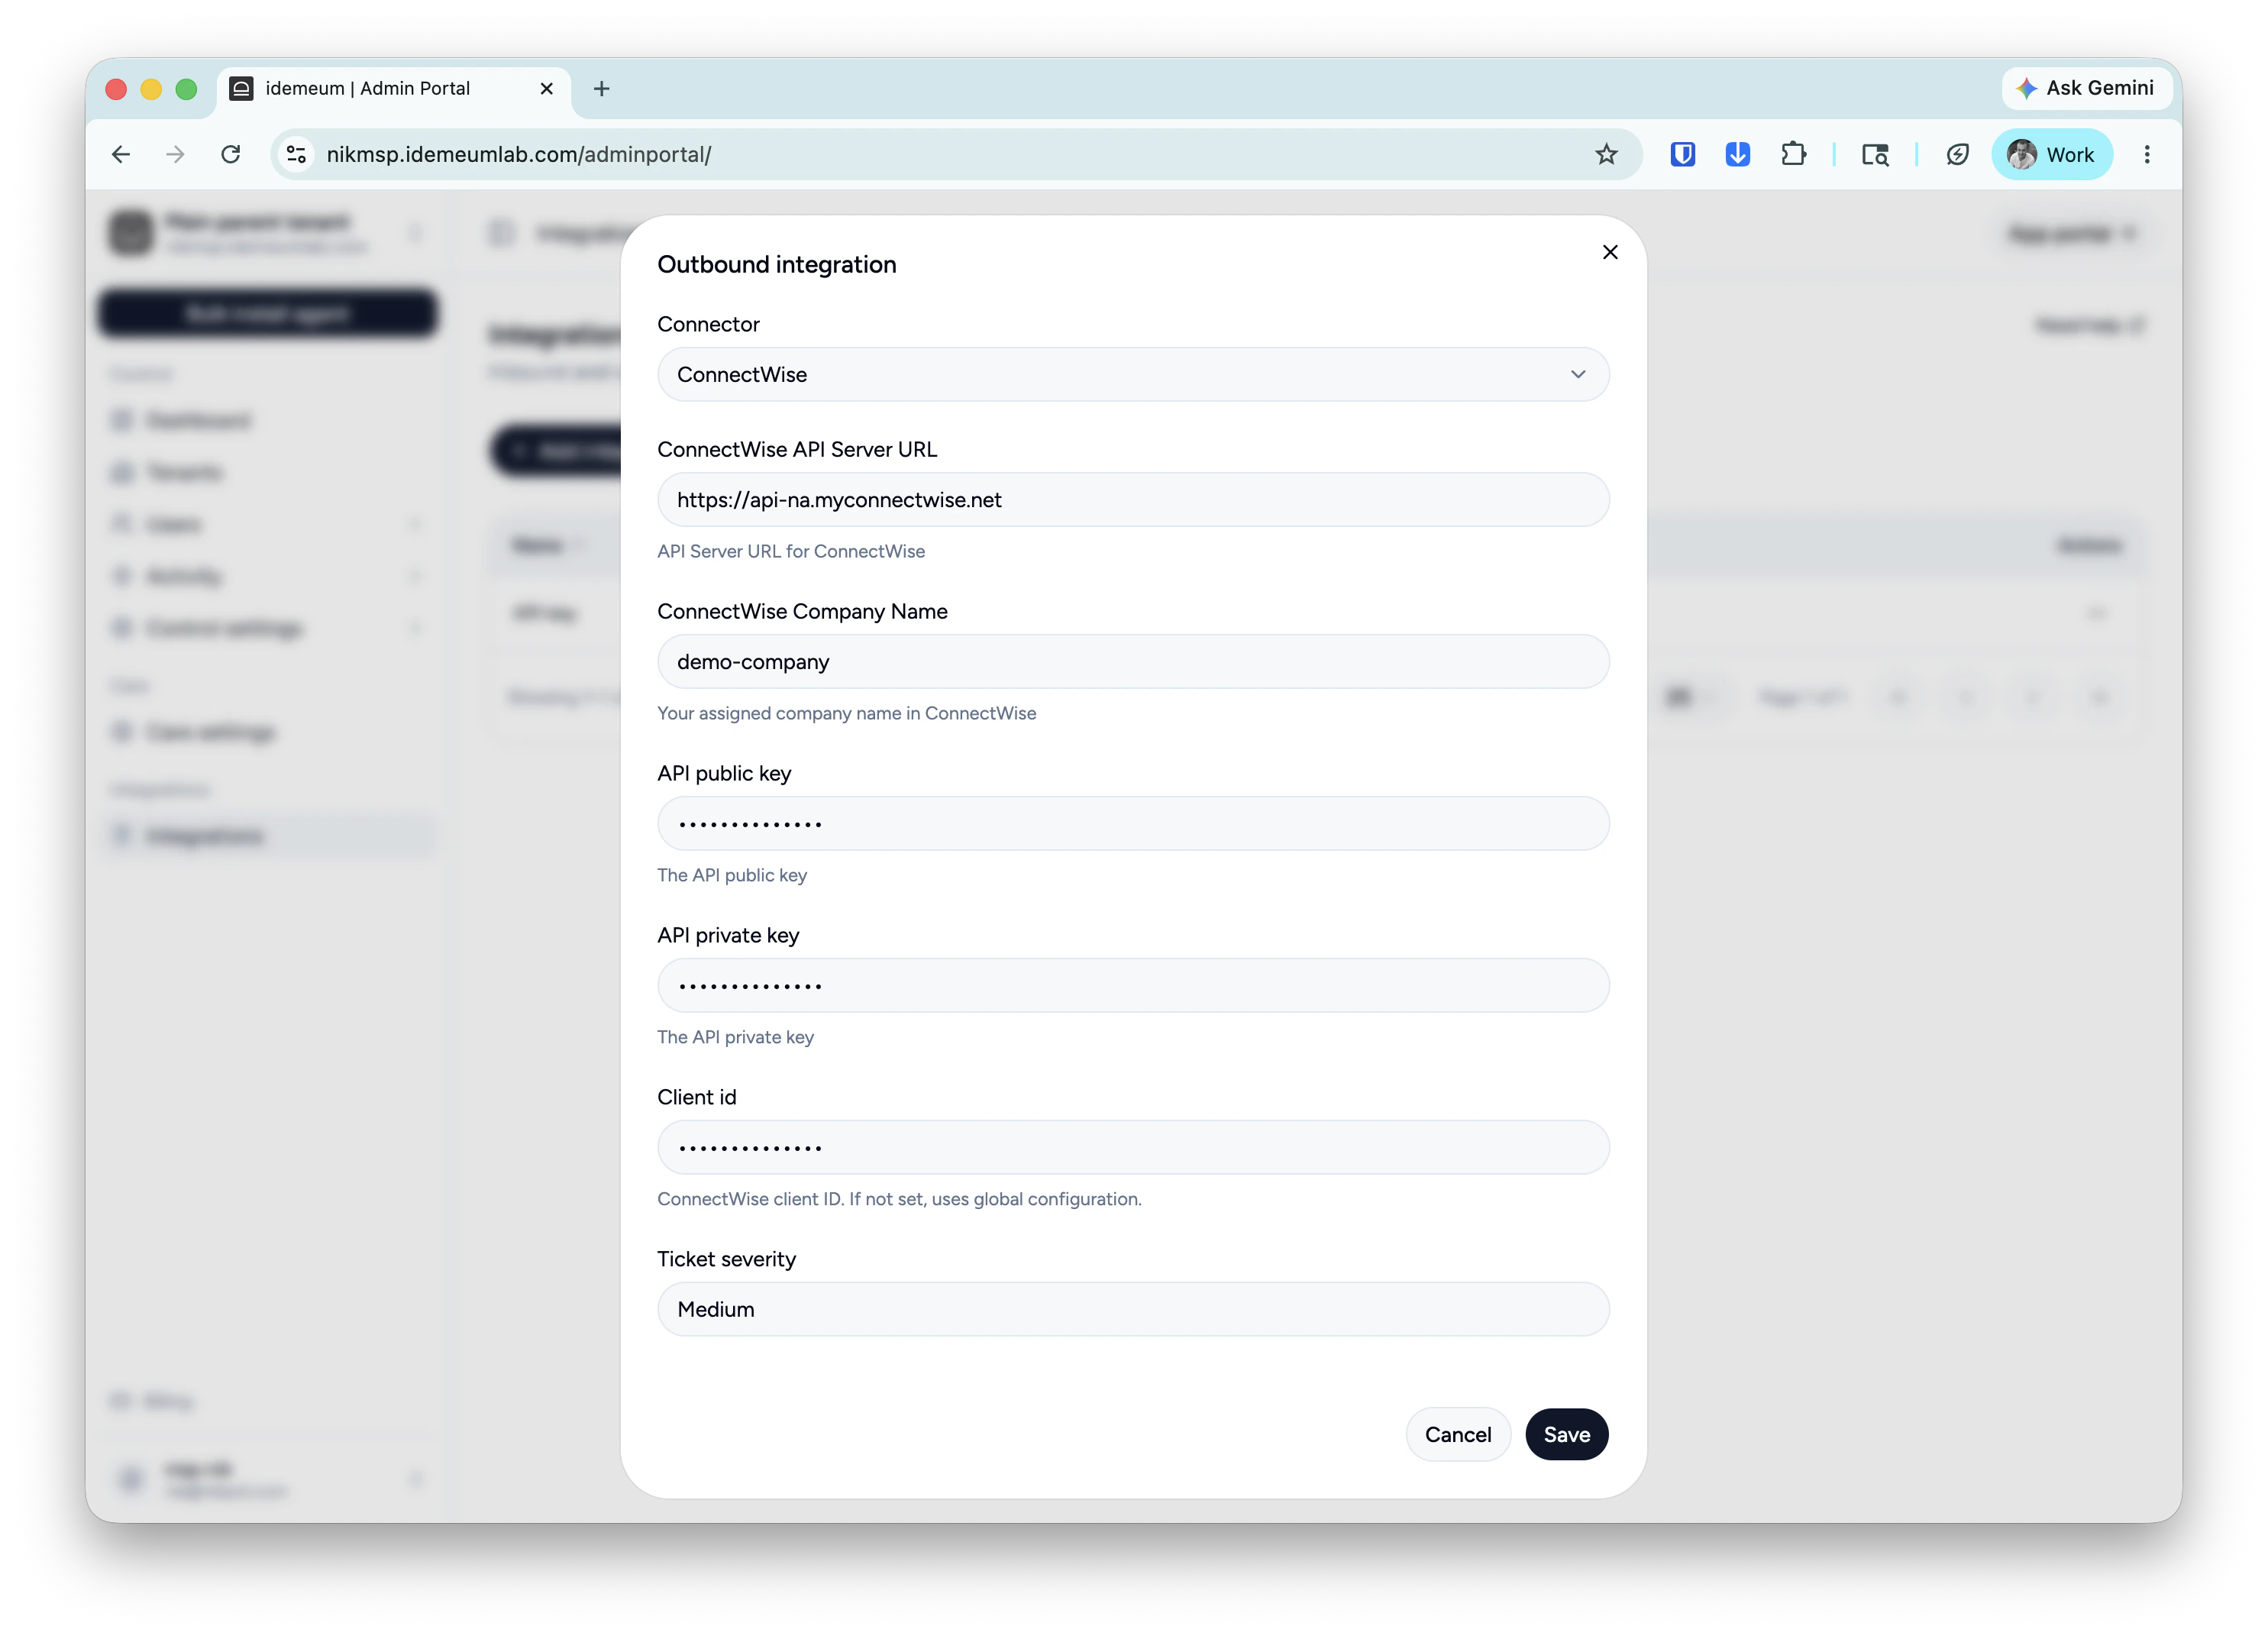 * Once you have added all the information click Save. During saving we will check if the information provided is correct by trying to make a call to the URL provided using the API public/private key.
* If the test passes, then the ConnectWise configuration will be saved.
## **Link idemeum and ConnectWise tenants**
When elevation events are created for one of your idemeum customers we need to know in which of your ConnectWise company to create the ticket.
* When saving the ConnectWise configuration, idemeum triggers an asynchronous request to match each of your idemeum customer names with your companies in ConnectWise. We will match first by `Customer Display Name` then by `Customer name`.
* If your idemeum customers are different than your ConnectWise companies then you can manually link them in the Customers tab in idemeum admin portal.
* Navigate to `Tenants` section, you will see the `ConnectWise` column where you can link the customers
## **Managing elevation requests**
In the example below we will show how a user requests access to the Microsoft Edge browse as an admin. As the elevation request is created in idemeum, a ticket is also created in ConnectWise.
* User tries to launch Edge browser on a Windows desktop with admin privileges.
* Since this requires admin privileges on the computer the user is asked if a request for approval to be sent to the system administrator.
* Upon clicking yes, an elevation request will be send to the system administrator.
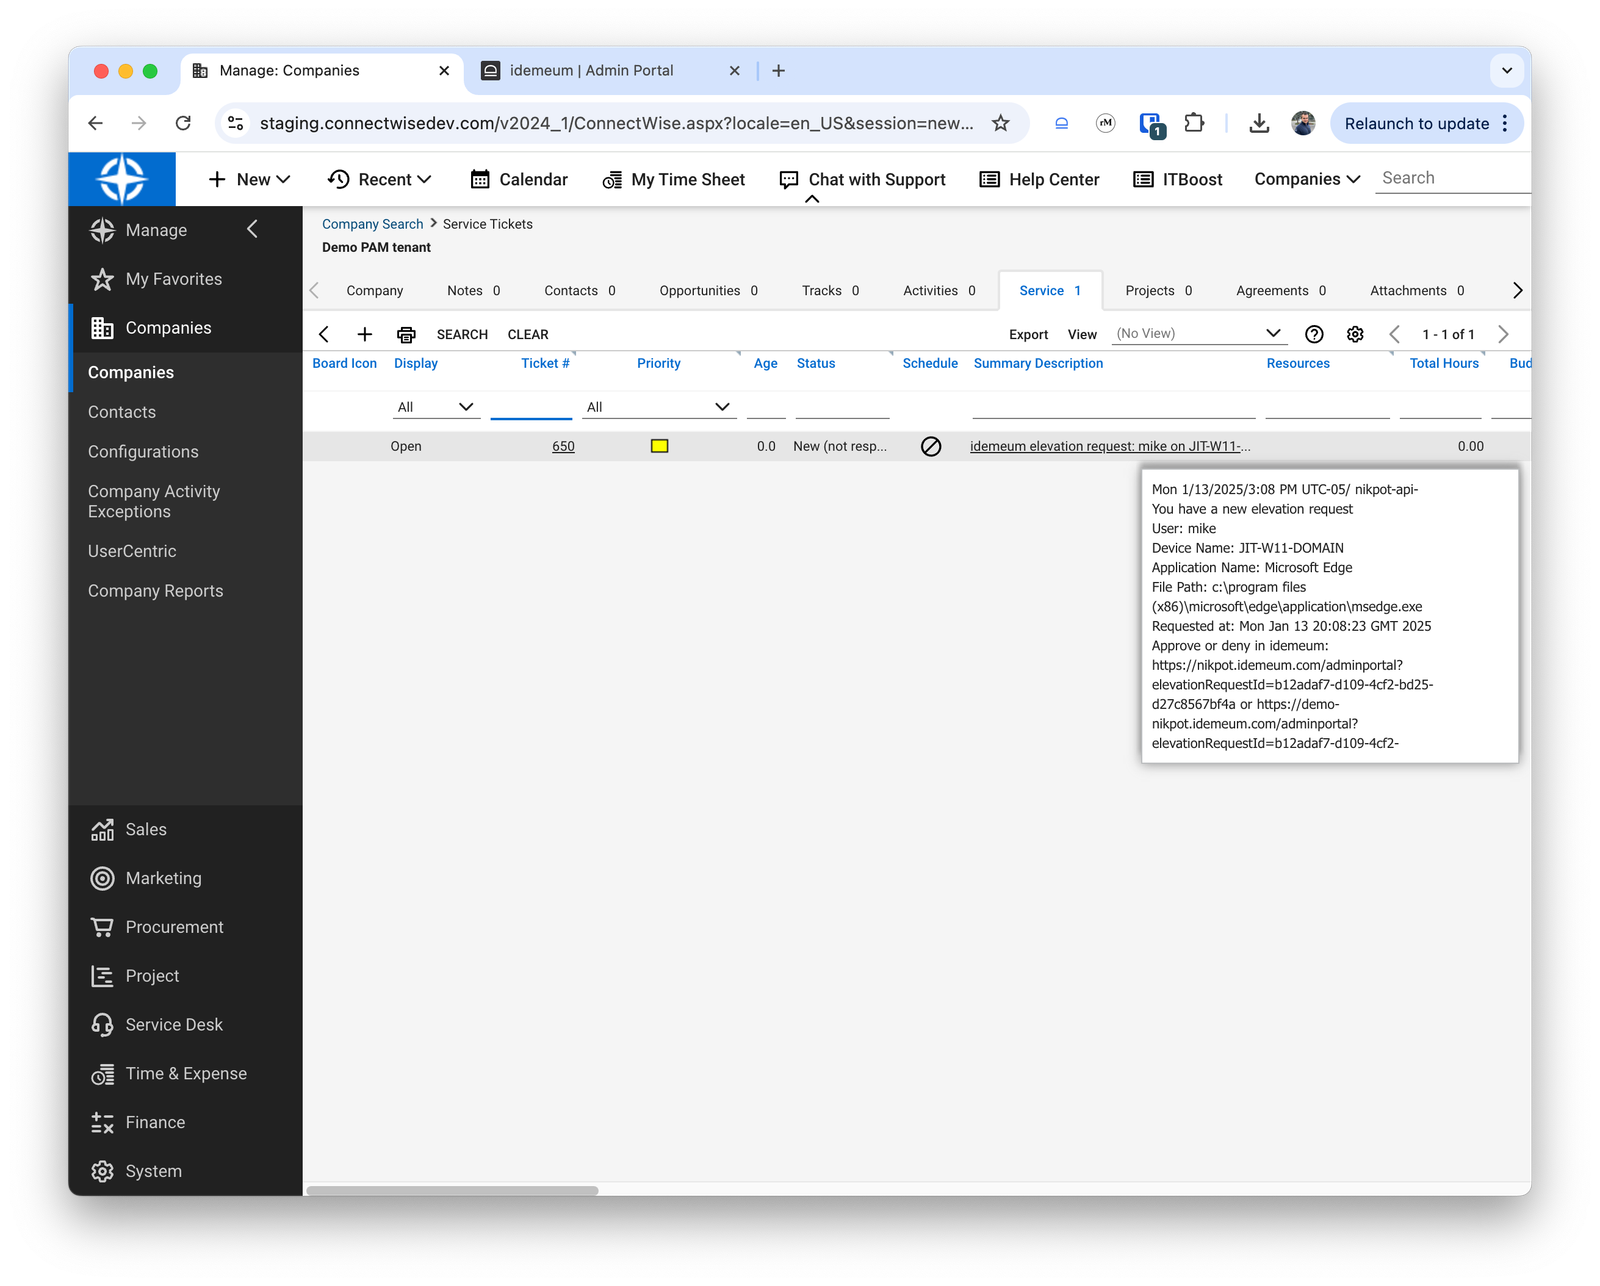
* If we go to ConnectWise console for this Company we can see that a ticket was created in New state:
* Once you have added all the information click Save. During saving we will check if the information provided is correct by trying to make a call to the URL provided using the API public/private key.
* If the test passes, then the ConnectWise configuration will be saved.
## **Link idemeum and ConnectWise tenants**
When elevation events are created for one of your idemeum customers we need to know in which of your ConnectWise company to create the ticket.
* When saving the ConnectWise configuration, idemeum triggers an asynchronous request to match each of your idemeum customer names with your companies in ConnectWise. We will match first by `Customer Display Name` then by `Customer name`.
* If your idemeum customers are different than your ConnectWise companies then you can manually link them in the Customers tab in idemeum admin portal.
* Navigate to `Tenants` section, you will see the `ConnectWise` column where you can link the customers
## **Managing elevation requests**
In the example below we will show how a user requests access to the Microsoft Edge browse as an admin. As the elevation request is created in idemeum, a ticket is also created in ConnectWise.
* User tries to launch Edge browser on a Windows desktop with admin privileges.
* Since this requires admin privileges on the computer the user is asked if a request for approval to be sent to the system administrator.
* Upon clicking yes, an elevation request will be send to the system administrator.
* If we go to ConnectWise console for this Company we can see that a ticket was created in New state:
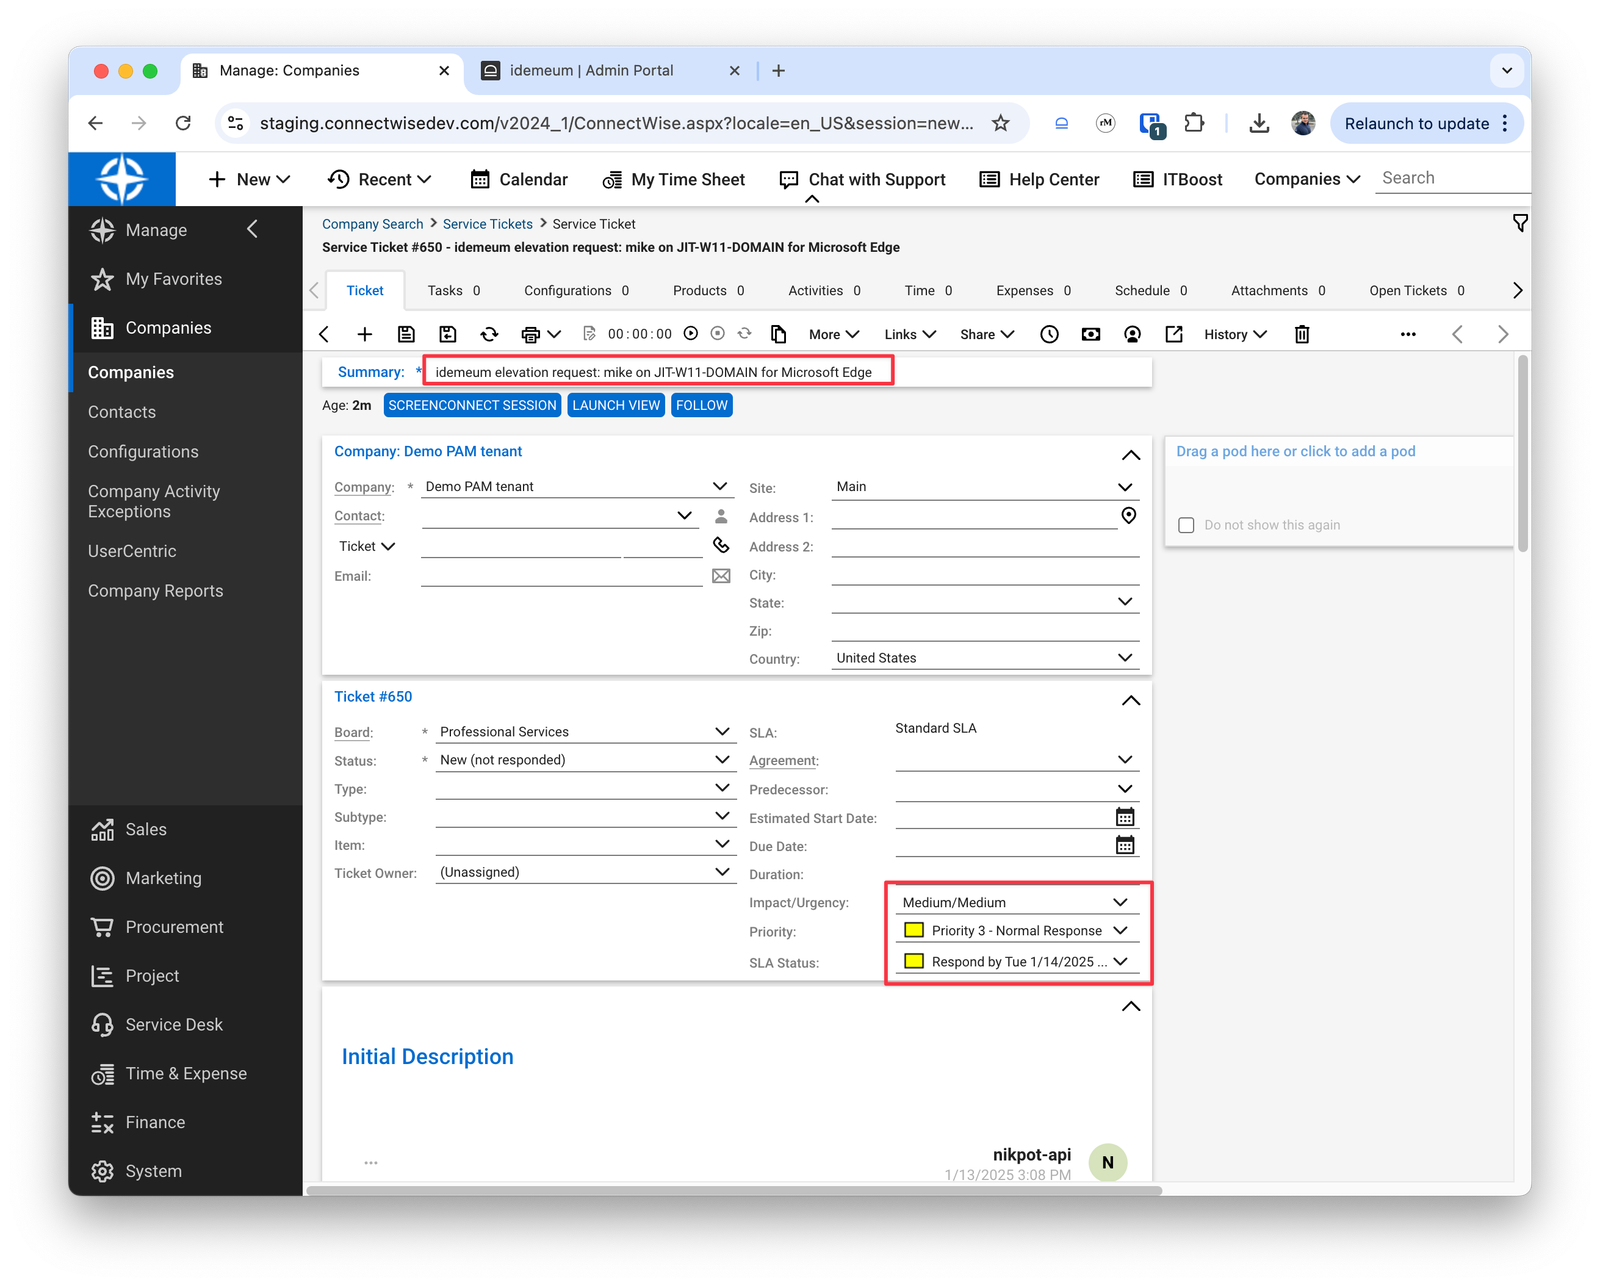
 * If we drill down into the ticket we can see more information about the ticket severity/impact. The summary of the ticket will contain the user that requested the elevation, on what device and which application
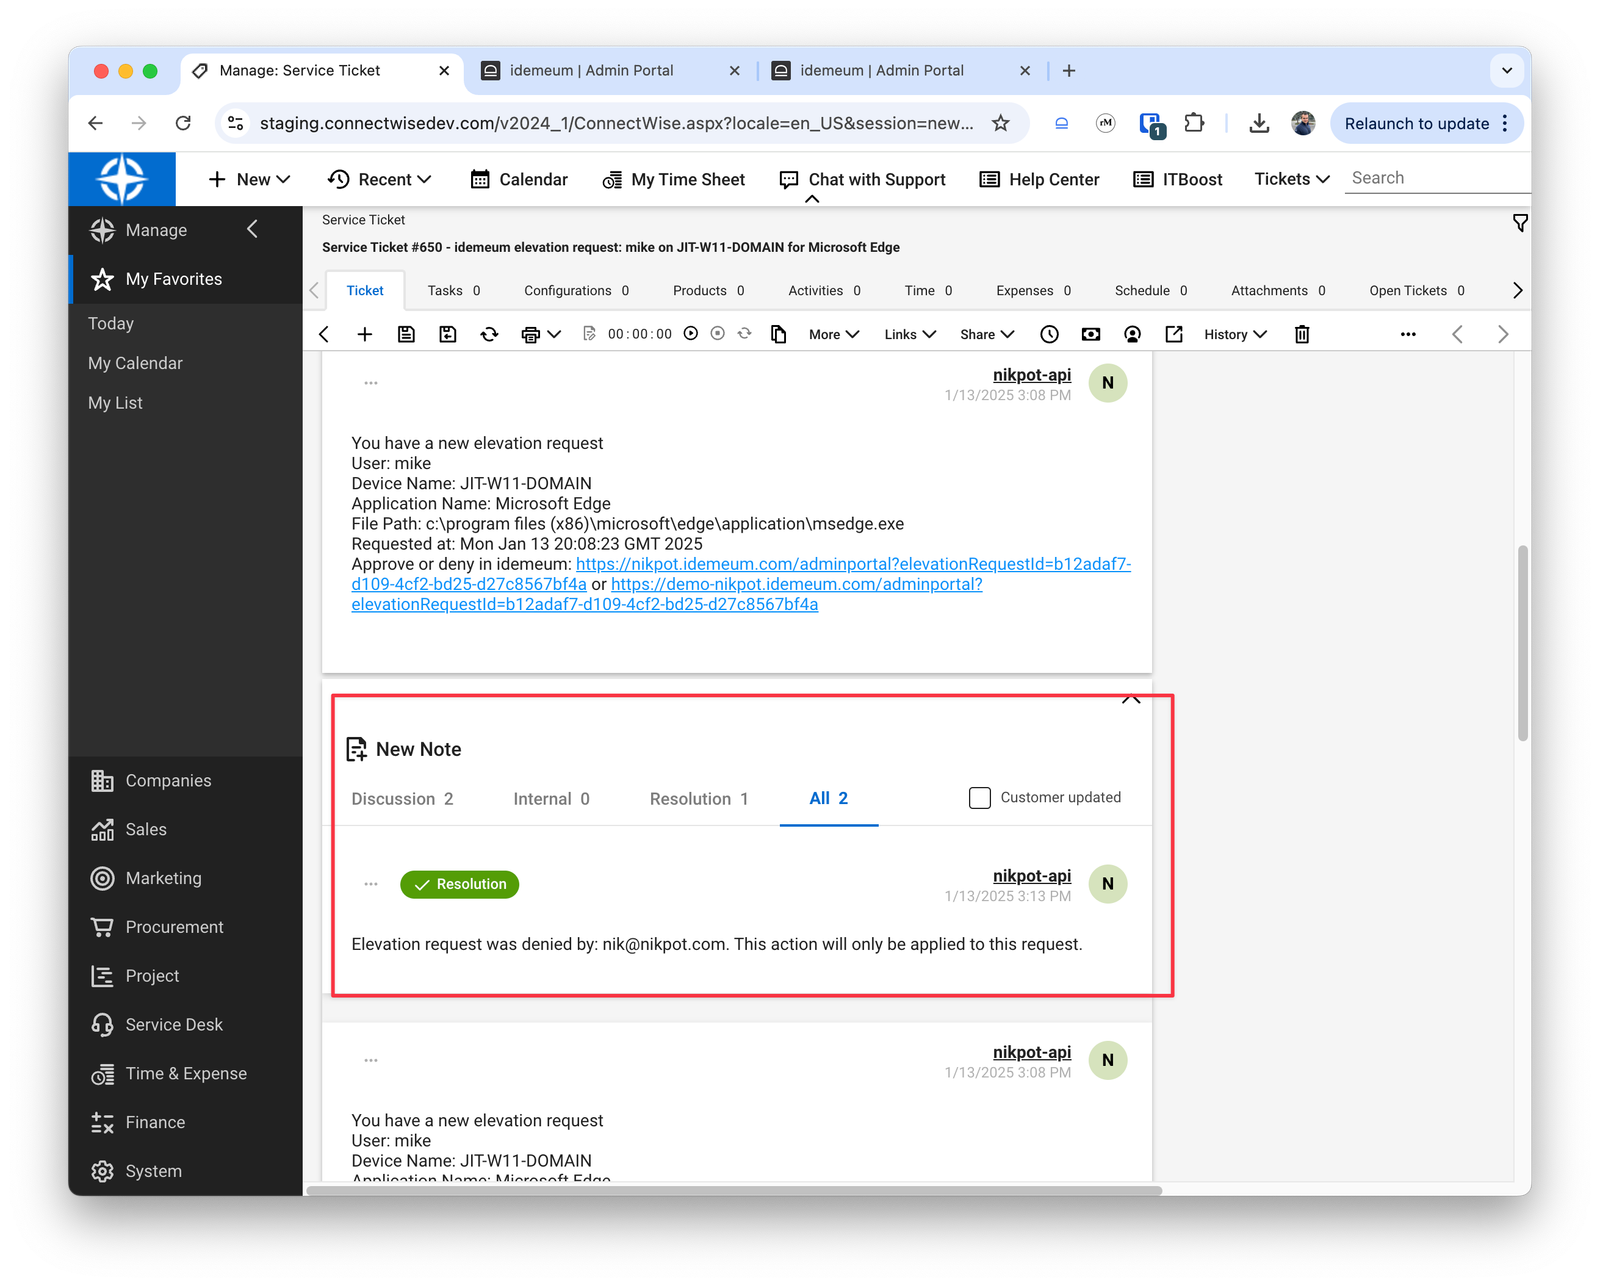
 * We can also see a description with more information about the elevation request. You can see that the user that created the description is `nikpot-api` (this is the name of the API member that we configured in the first step in ConnectWise).
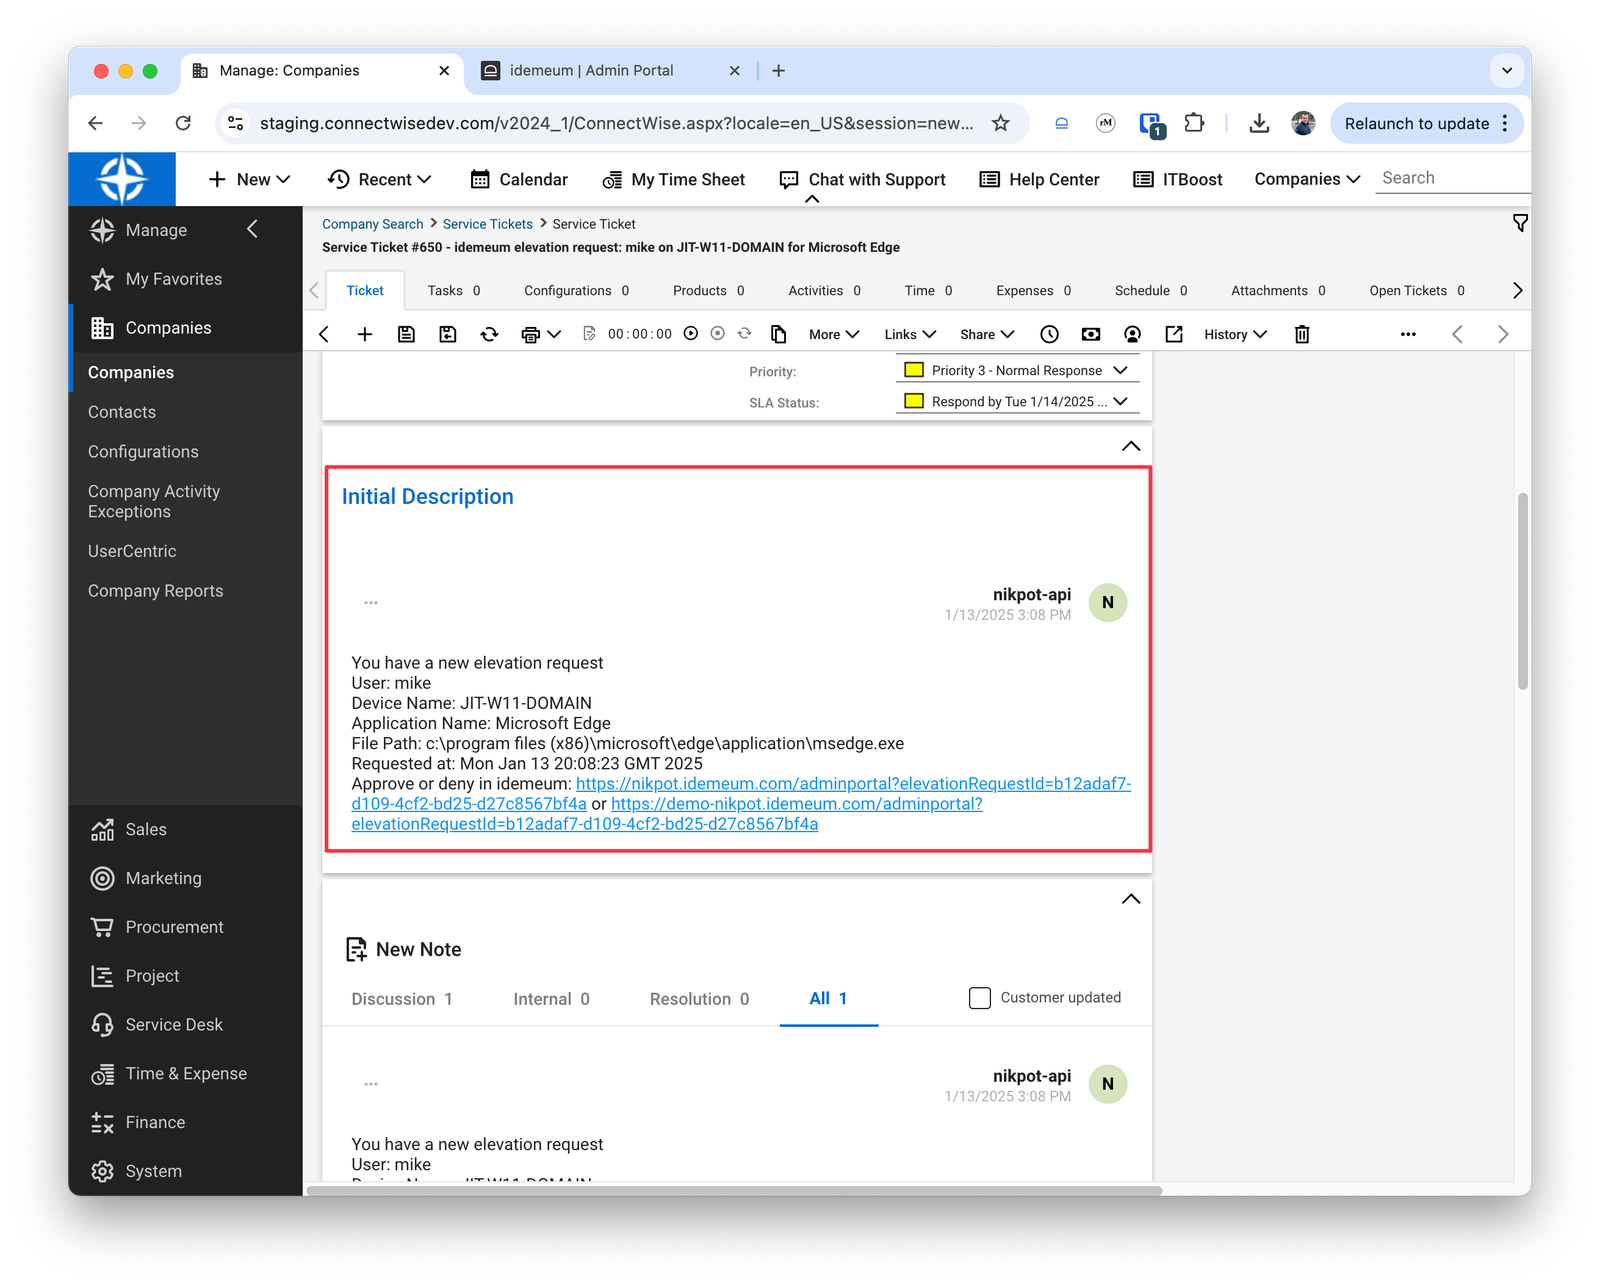 * There are also 2 links in the description that the user in ConnectWise can use to approve / deny the elevation request in either MSP tenant or customer tenant in idemeum.
* In case we find the device in one of the configurations in the ConnectWise company, we will also associated that configuration with the ticket created. When looking for the configuration we will search the configuration name or the tagNumber attributes.
* When clicking on the link to approve in the MSP tenant a new window will be opened and the user will be taken to that specific elevation request in idemeum so an approve/deny action can be taken.
* In this example we will Deny the elevation request just for this user. If we go back to the ticket in ConnectWise we will see that the ticket is in closed state and that a new resolution note was added on what action was taken for this elevation request.
* There are also 2 links in the description that the user in ConnectWise can use to approve / deny the elevation request in either MSP tenant or customer tenant in idemeum.
* In case we find the device in one of the configurations in the ConnectWise company, we will also associated that configuration with the ticket created. When looking for the configuration we will search the configuration name or the tagNumber attributes.
* When clicking on the link to approve in the MSP tenant a new window will be opened and the user will be taken to that specific elevation request in idemeum so an approve/deny action can be taken.
* In this example we will Deny the elevation request just for this user. If we go back to the ticket in ConnectWise we will see that the ticket is in closed state and that a new resolution note was added on what action was taken for this elevation request.