> ## Documentation Index
> Fetch the complete documentation index at: https://docs.idemeum.com/llms.txt
> Use this file to discover all available pages before exploring further.
# HaloPSA
> Integrate idemeum with HaloPSA to create tickets for elevation requests, requests JIT accounts, and more.
## **Integration use cases with Halo PSA**
There are several integrations that we support with HaloPSA today:
1. Create tickets for elevation requests
2. Approve elevation requests from tickets
3. Request JIT accounts from tickets
4. Disable JIT accounts from HaloPSA
## **Create tickets for elevation requests**
With this integration when users request elevations, the ticket will be automatically created in HaloPSA. When the elevation is approved (let's say with mobile device), the ticket will be automatically closed. Inside the ticket there will be a link to navigate to idemeum and approve the request. If you want to approve the elevation request with a button click, please also read through the next section.
Demo of how tickets integration works with Halo PSA
### **Create custom fields in Halo**
These fields are used to associate the request ID as well as the idemeum customer name in the ticket. These fields are mandatory if you want to use the approval from tickets with custom integration.
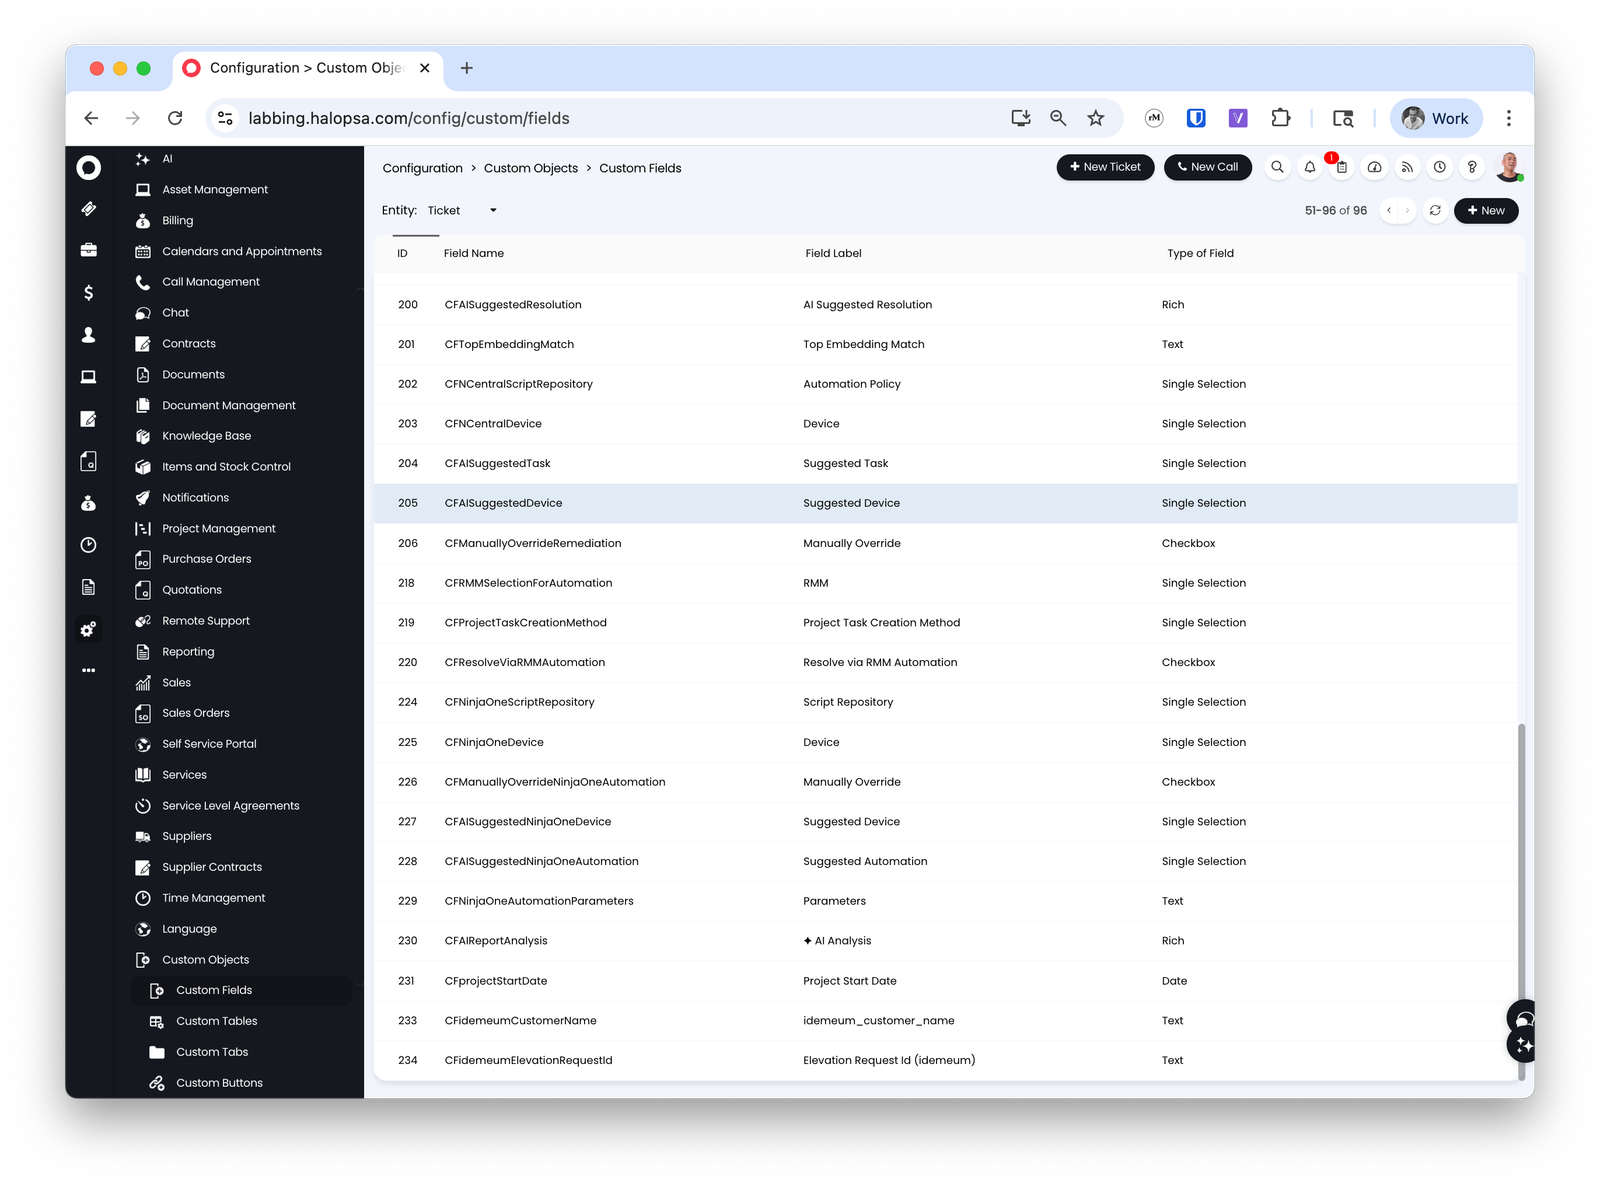
* We need to create two custom fields - `CFidemeumCustomerName` and `CFidemeumElevationRequestId`
* Navigate to `Configuration` → `Custom objects` → `Custom fields`
* Click `New`
 * For `Field Name` use `idemeumCustomerName`
* For `Field Label` use `idemeum_customer_name`
* For `Field Name` use `idemeumCustomerName`
* For `Field Label` use `idemeum_customer_name`
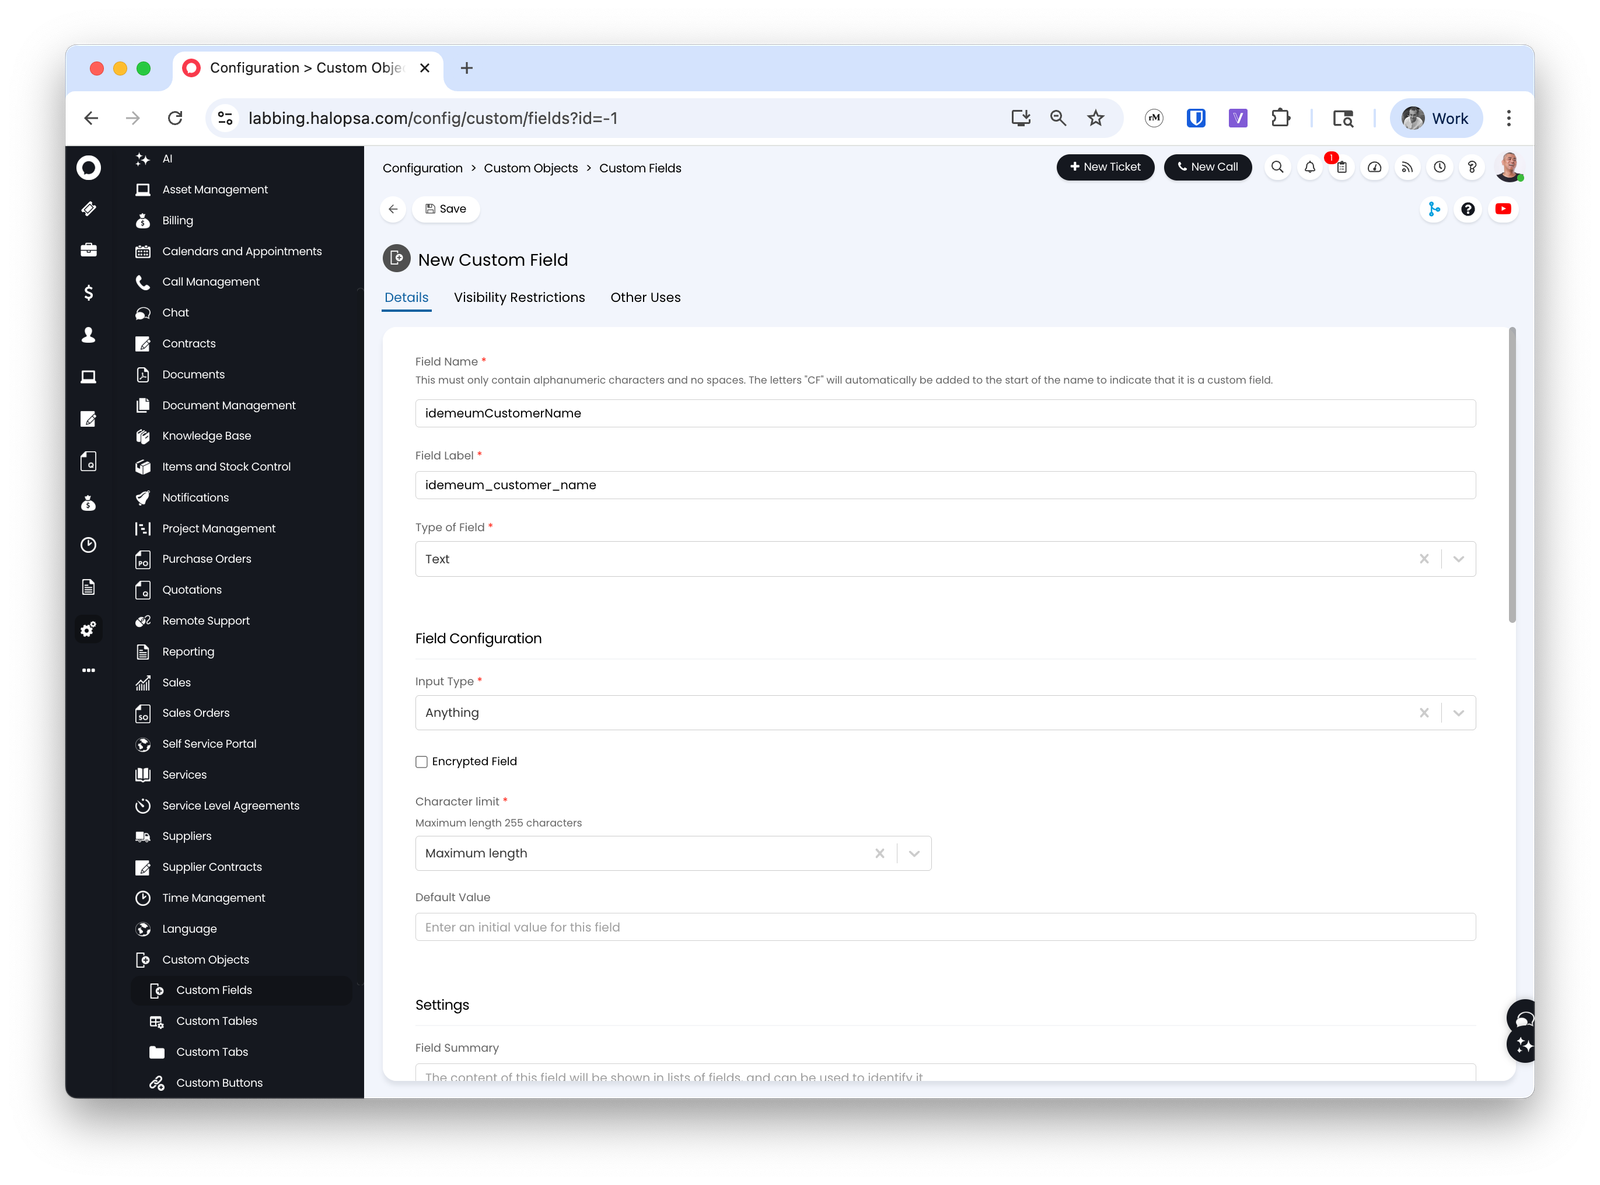 * Keep the rest as defaults and save the configuration
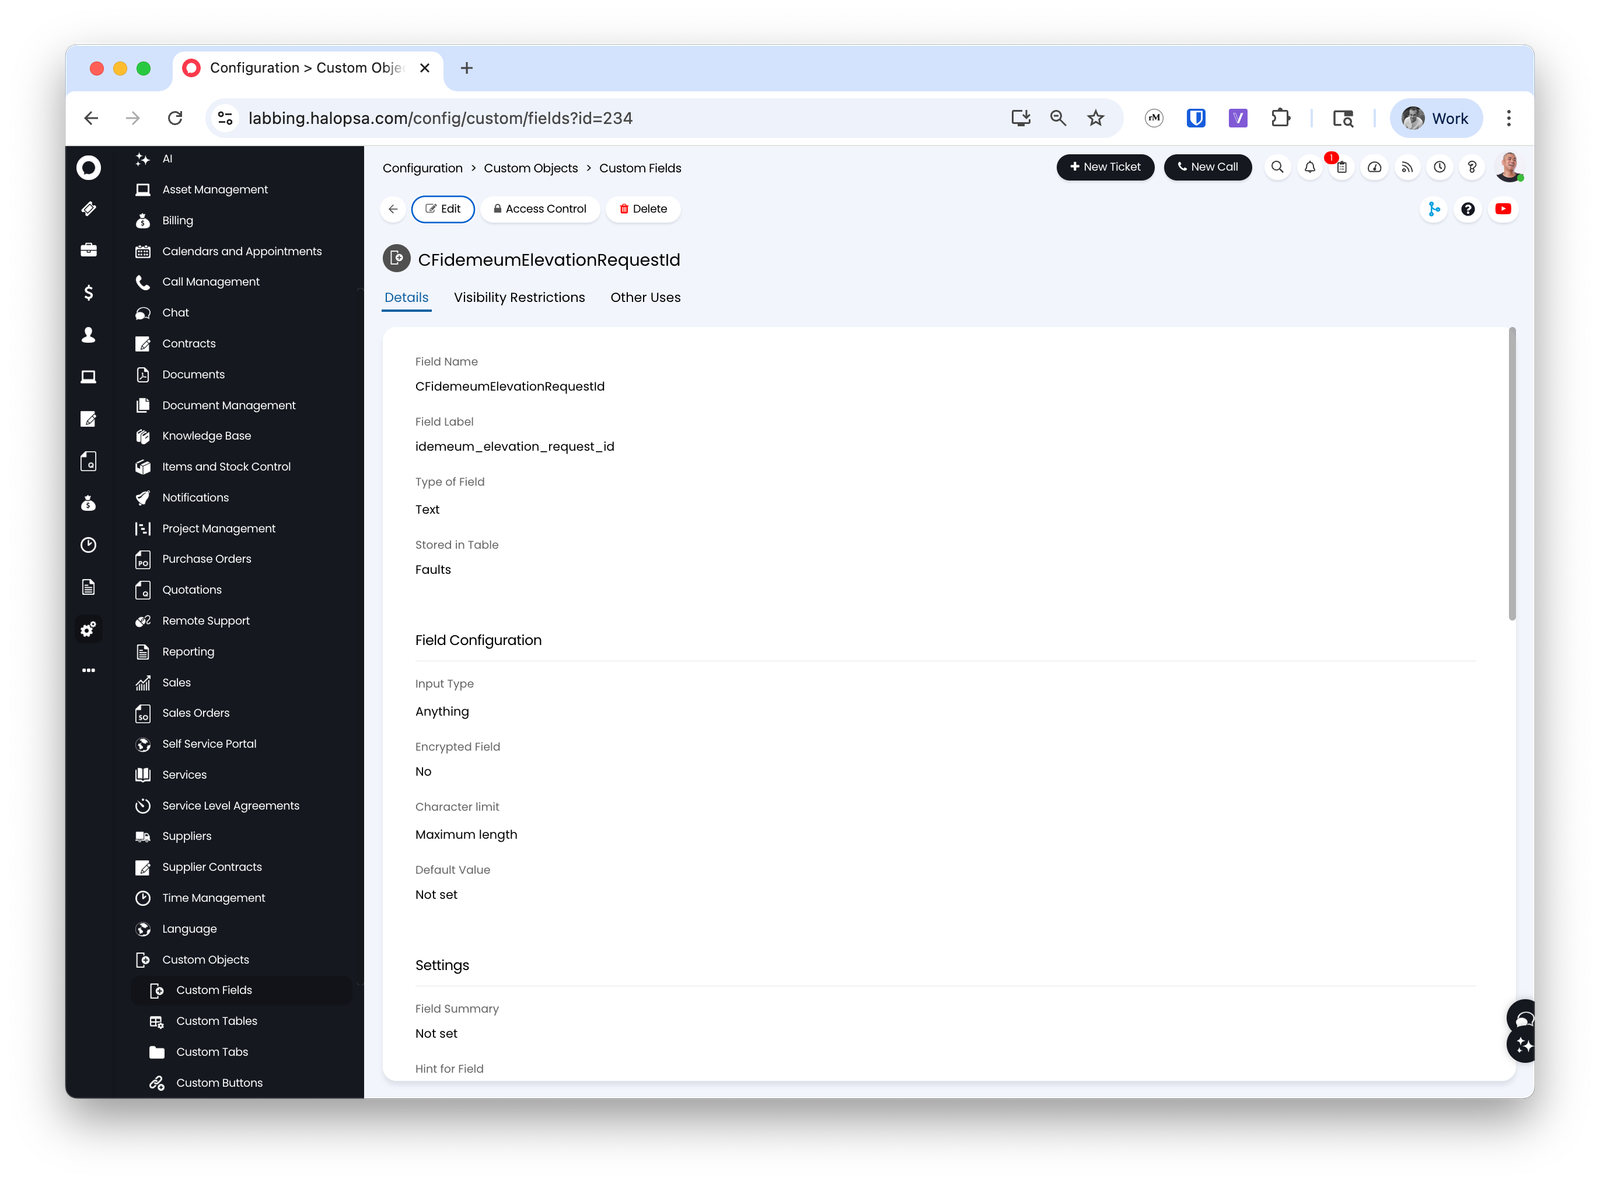
* Repeat the same steps for creating the second field `idemeumElevationRequestId`
* Keep the rest as defaults and save the configuration
* Repeat the same steps for creating the second field `idemeumElevationRequestId`
 ### **Configure HaloPSA agent**
In this step we will create an API-only agent to use with HaloPSA application.
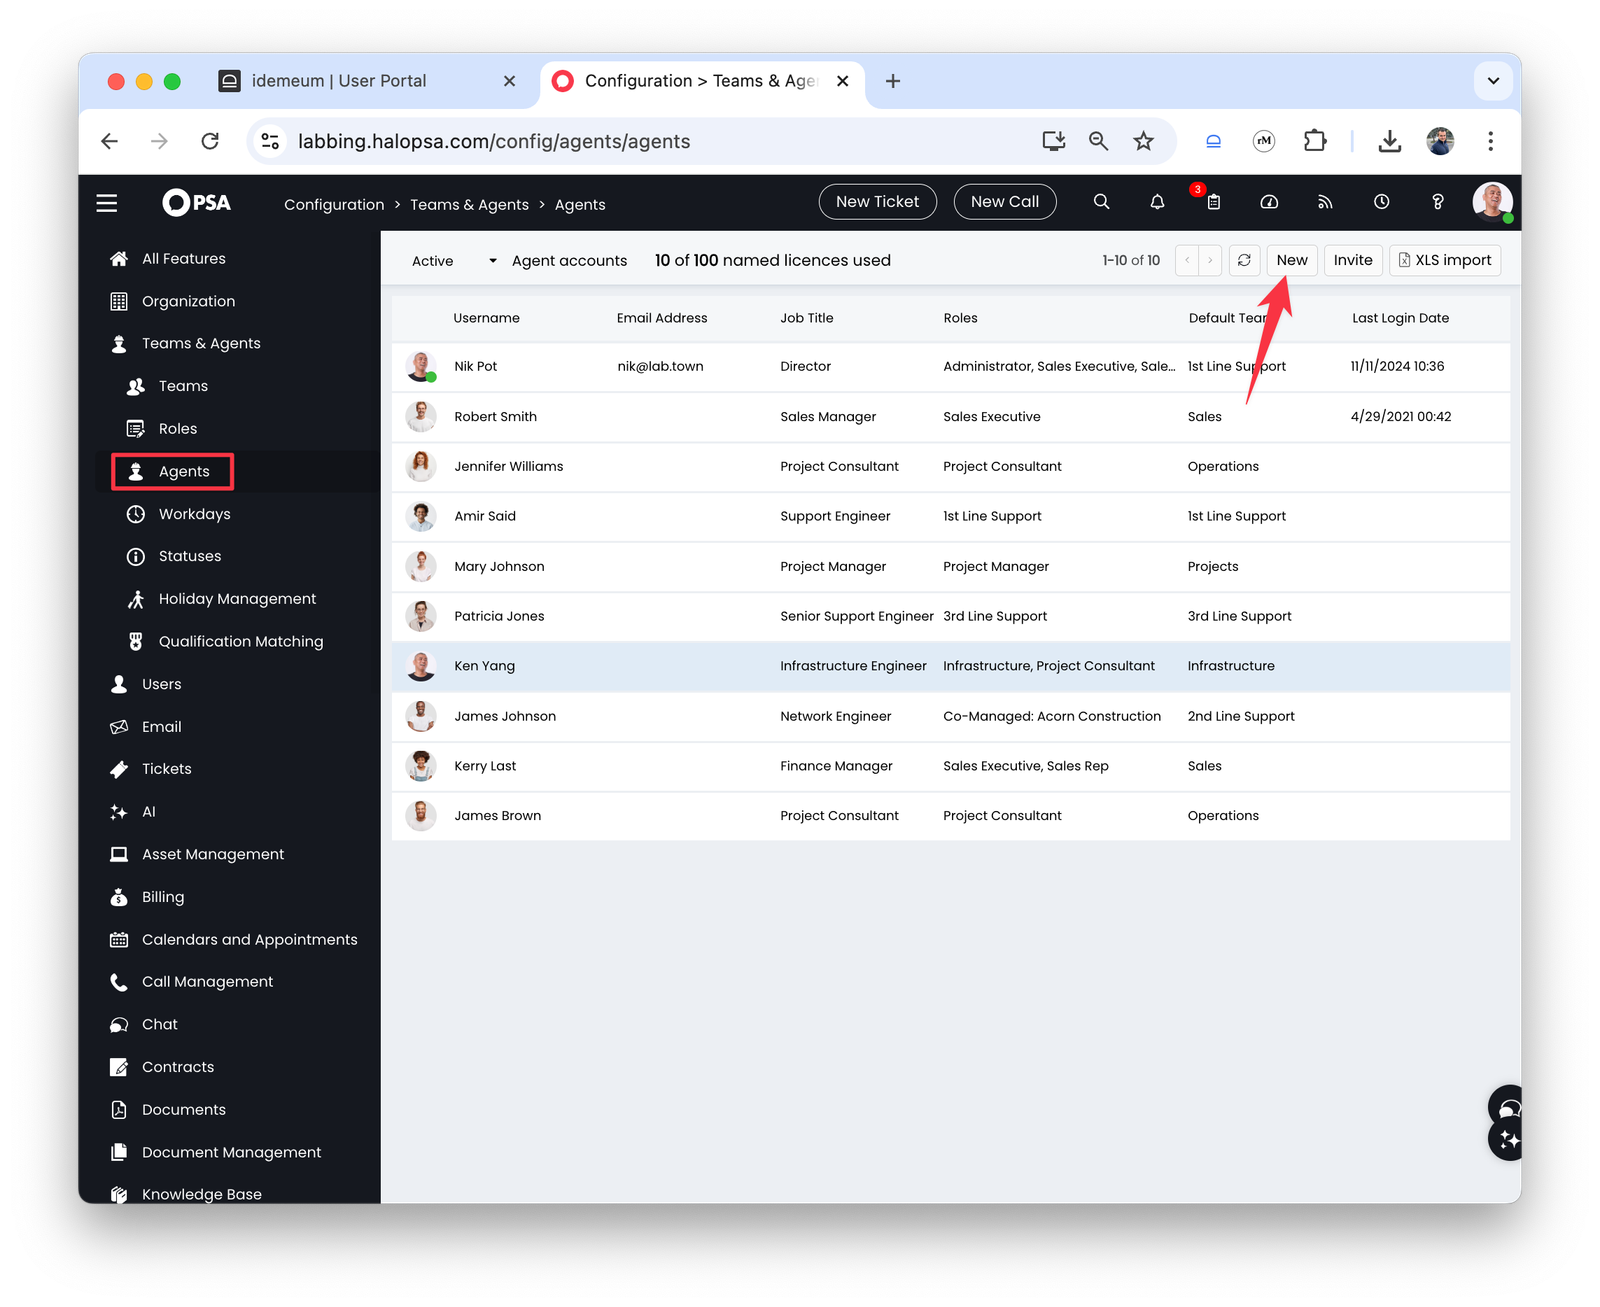
* Navigate to `Configuration` → `Teams and agents` → `Agents` and add a new agent by clicking `New` button
### **Configure HaloPSA agent**
In this step we will create an API-only agent to use with HaloPSA application.
* Navigate to `Configuration` → `Teams and agents` → `Agents` and add a new agent by clicking `New` button
 * Provide the agent username
* Make sure you check the box for `Is an API-only Agent`
* Provide the agent username
* Make sure you check the box for `Is an API-only Agent`
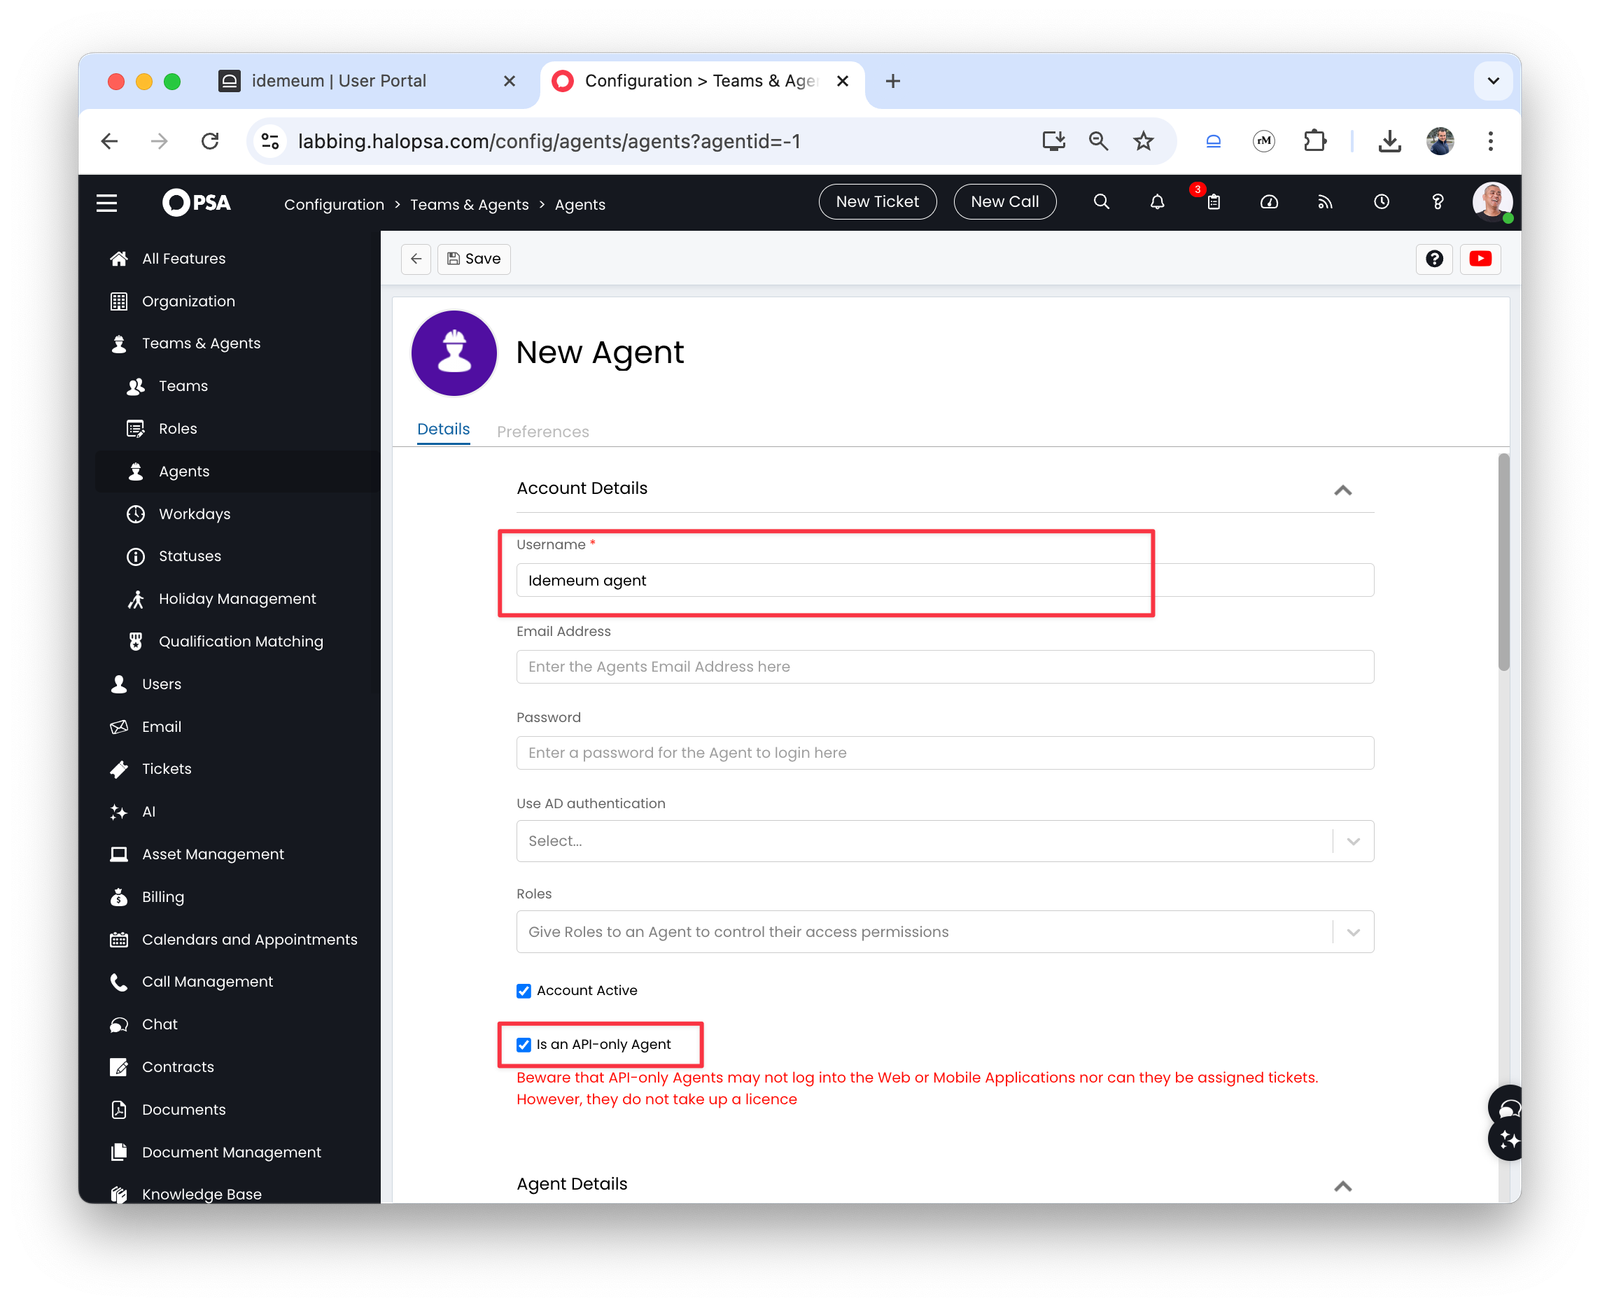 * Assign agent to the `Default team` of your choice and add the working hours
* `Save` the configuration
Now we will need to configure the proper permissions:
* Click `Edit` to configure the agent
* Navigate to `Departments and teams` tab
* If you are using teams, make sure the team you have chosen has the following permissions:
* Can be assigned to
* Can see unassigned tickets for this Team
* Can see Tickets assigned to other Agents in this Team
* Assign agent to the `Default team` of your choice and add the working hours
* `Save` the configuration
Now we will need to configure the proper permissions:
* Click `Edit` to configure the agent
* Navigate to `Departments and teams` tab
* If you are using teams, make sure the team you have chosen has the following permissions:
* Can be assigned to
* Can see unassigned tickets for this Team
* Can see Tickets assigned to other Agents in this Team
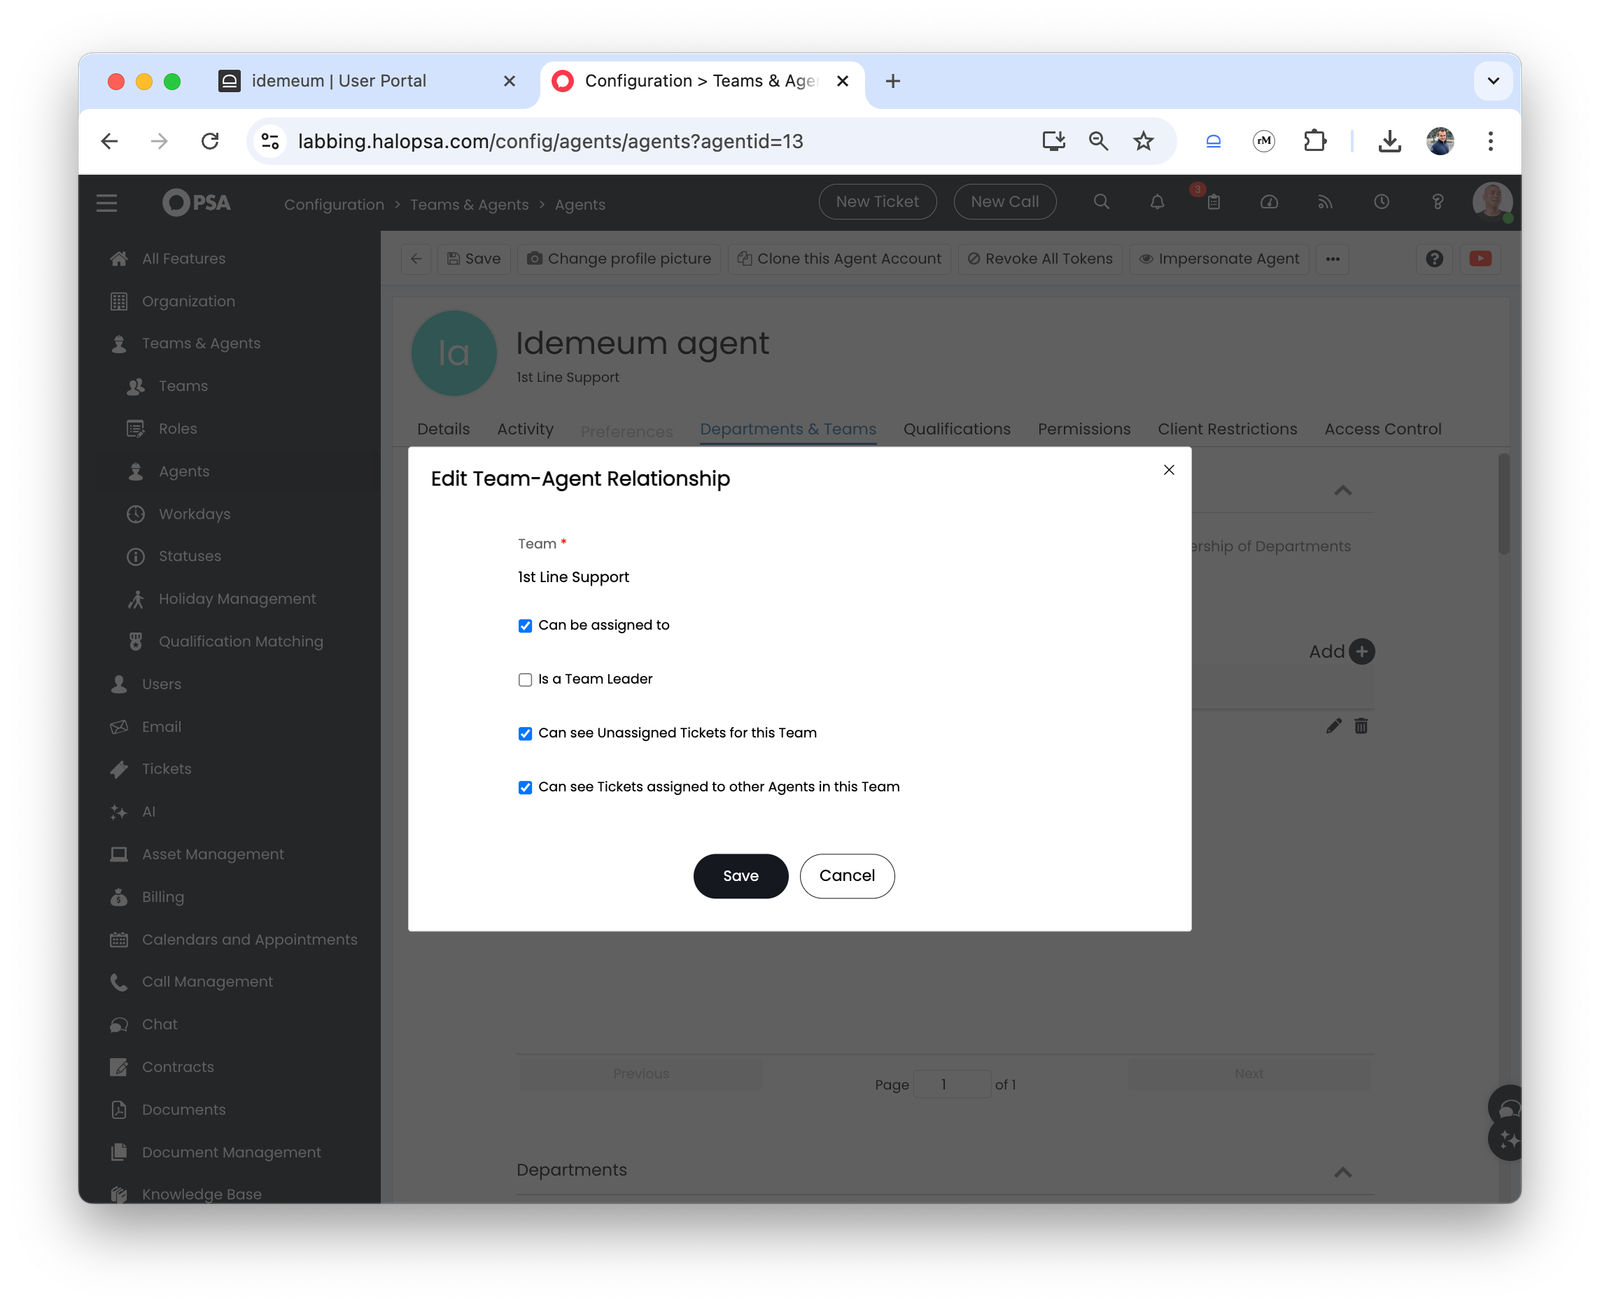 * If you are using departments, make sure the permission `Modify all` is added
* Now click on `Permissions` tab and do the following:
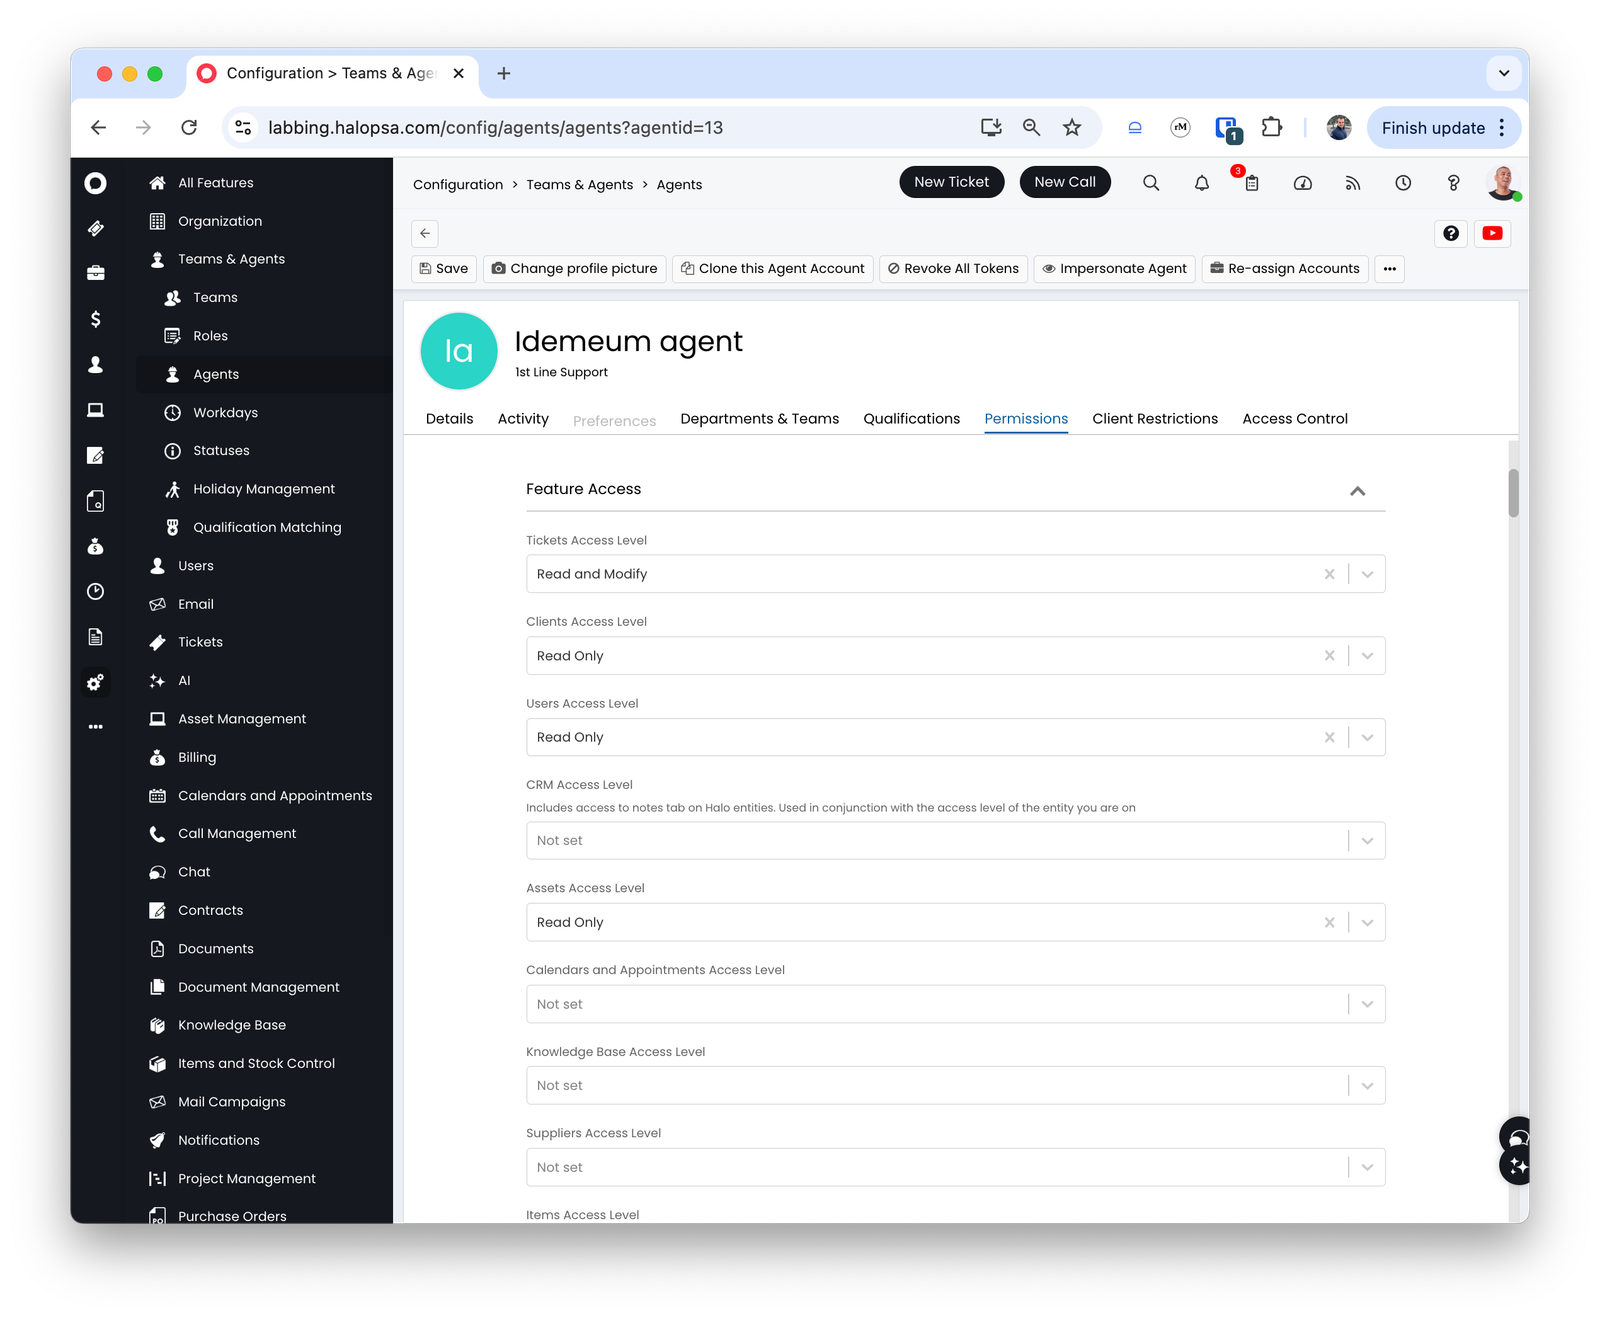
* For `Feature access` choose the following:
* Tickets Access Level to Read and Modify
* Clients Access Level to Read Only
* Users Access Level to Read Only
* Assets Access Level to Read Only
* If you are using departments, make sure the permission `Modify all` is added
* Now click on `Permissions` tab and do the following:
* For `Feature access` choose the following:
* Tickets Access Level to Read and Modify
* Clients Access Level to Read Only
* Users Access Level to Read Only
* Assets Access Level to Read Only
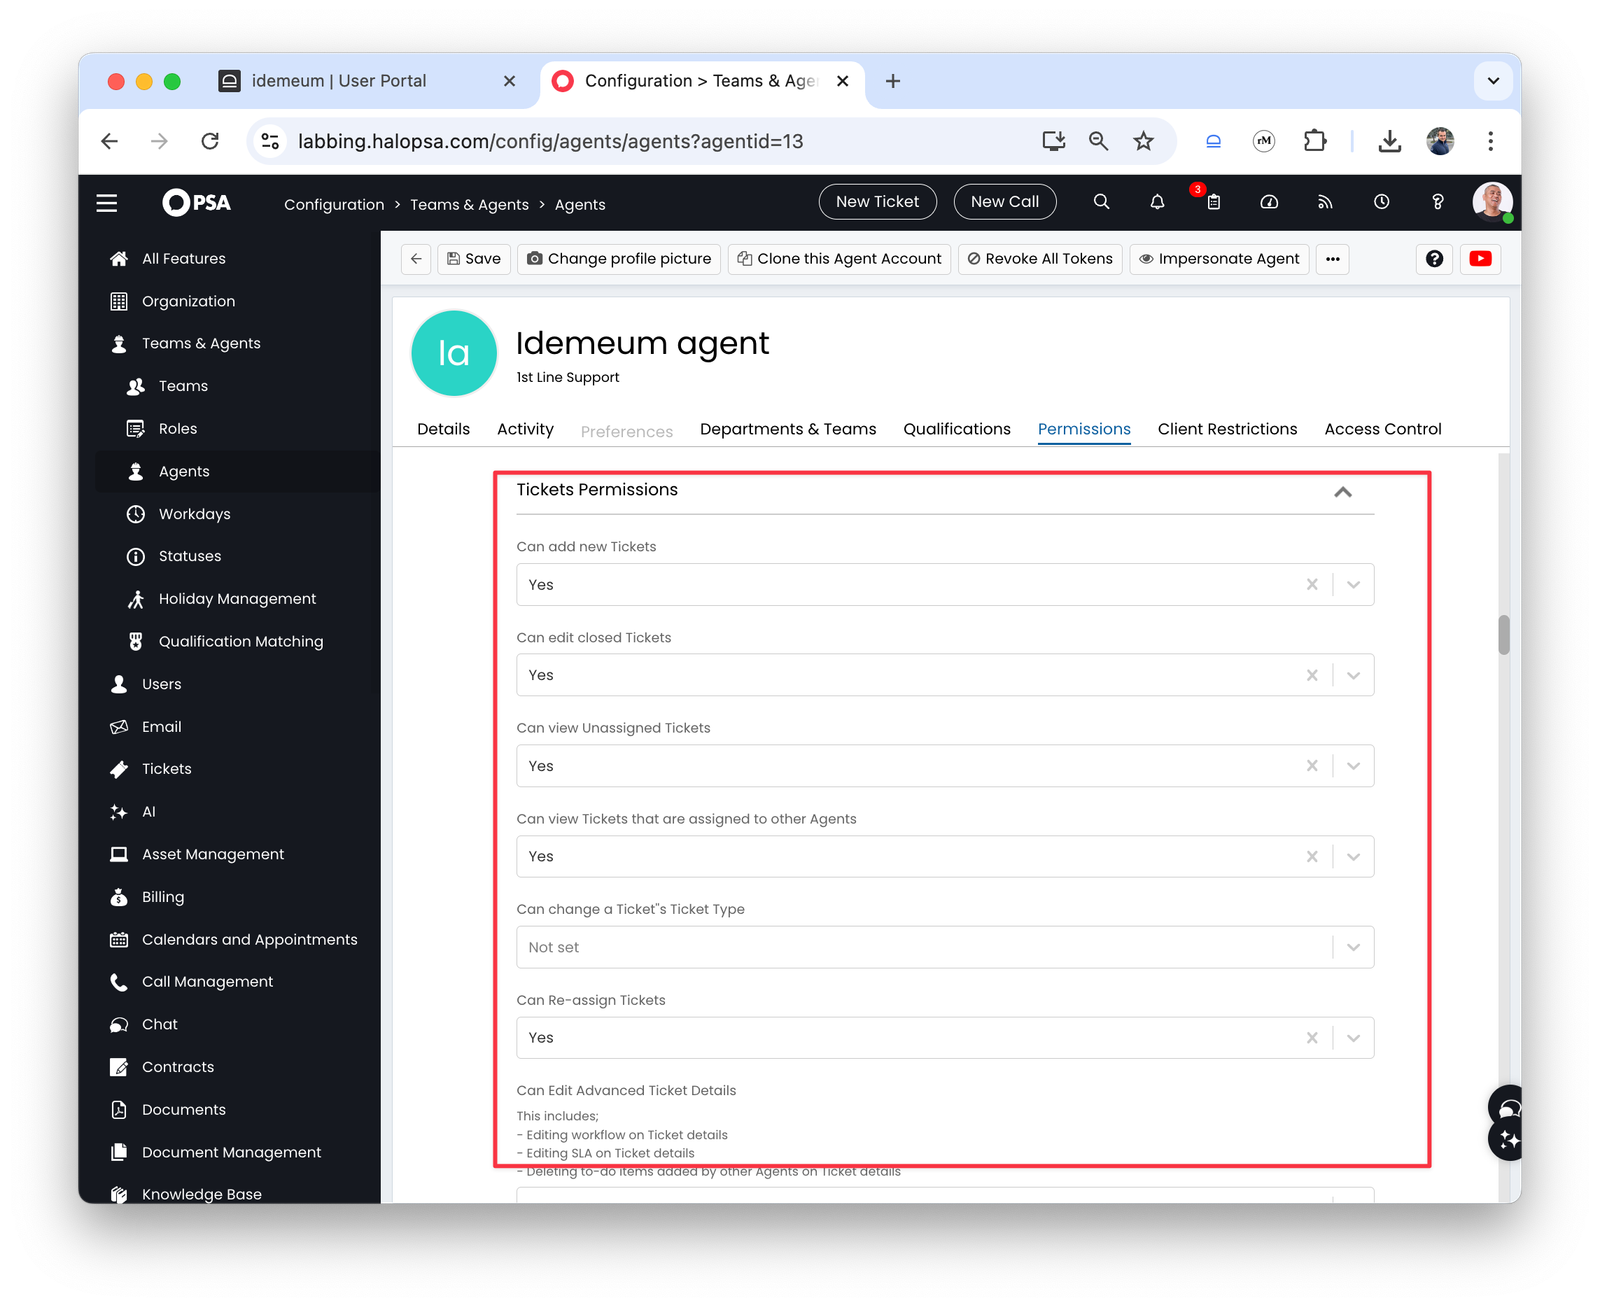
 * For `Ticket permission` choose the following:
* Can add new Tickets
* Can edit closed Tickets
* Can view Unassigned Tickets
* Can view Tickets that are assigned to other Agents
* Can Re-assign Tickets
* Can Edit Tickets Which Are Not Assigned To Them
* Can always update Ticket Statuses and re-assign Tickets outside of actions
* For `Asset type restrictions` choose the following:
* Allow use of all Asset Types
* For `Ticket permission` choose the following:
* Can add new Tickets
* Can edit closed Tickets
* Can view Unassigned Tickets
* Can view Tickets that are assigned to other Agents
* Can Re-assign Tickets
* Can Edit Tickets Which Are Not Assigned To Them
* Can always update Ticket Statuses and re-assign Tickets outside of actions
* For `Asset type restrictions` choose the following:
* Allow use of all Asset Types
 * Save the agent configuration
### **Configure HaloPSA application**
The way HaloPSA allows other systems to make calls into their system is by creating an application.
* Navigate to HaloPSA admin portal
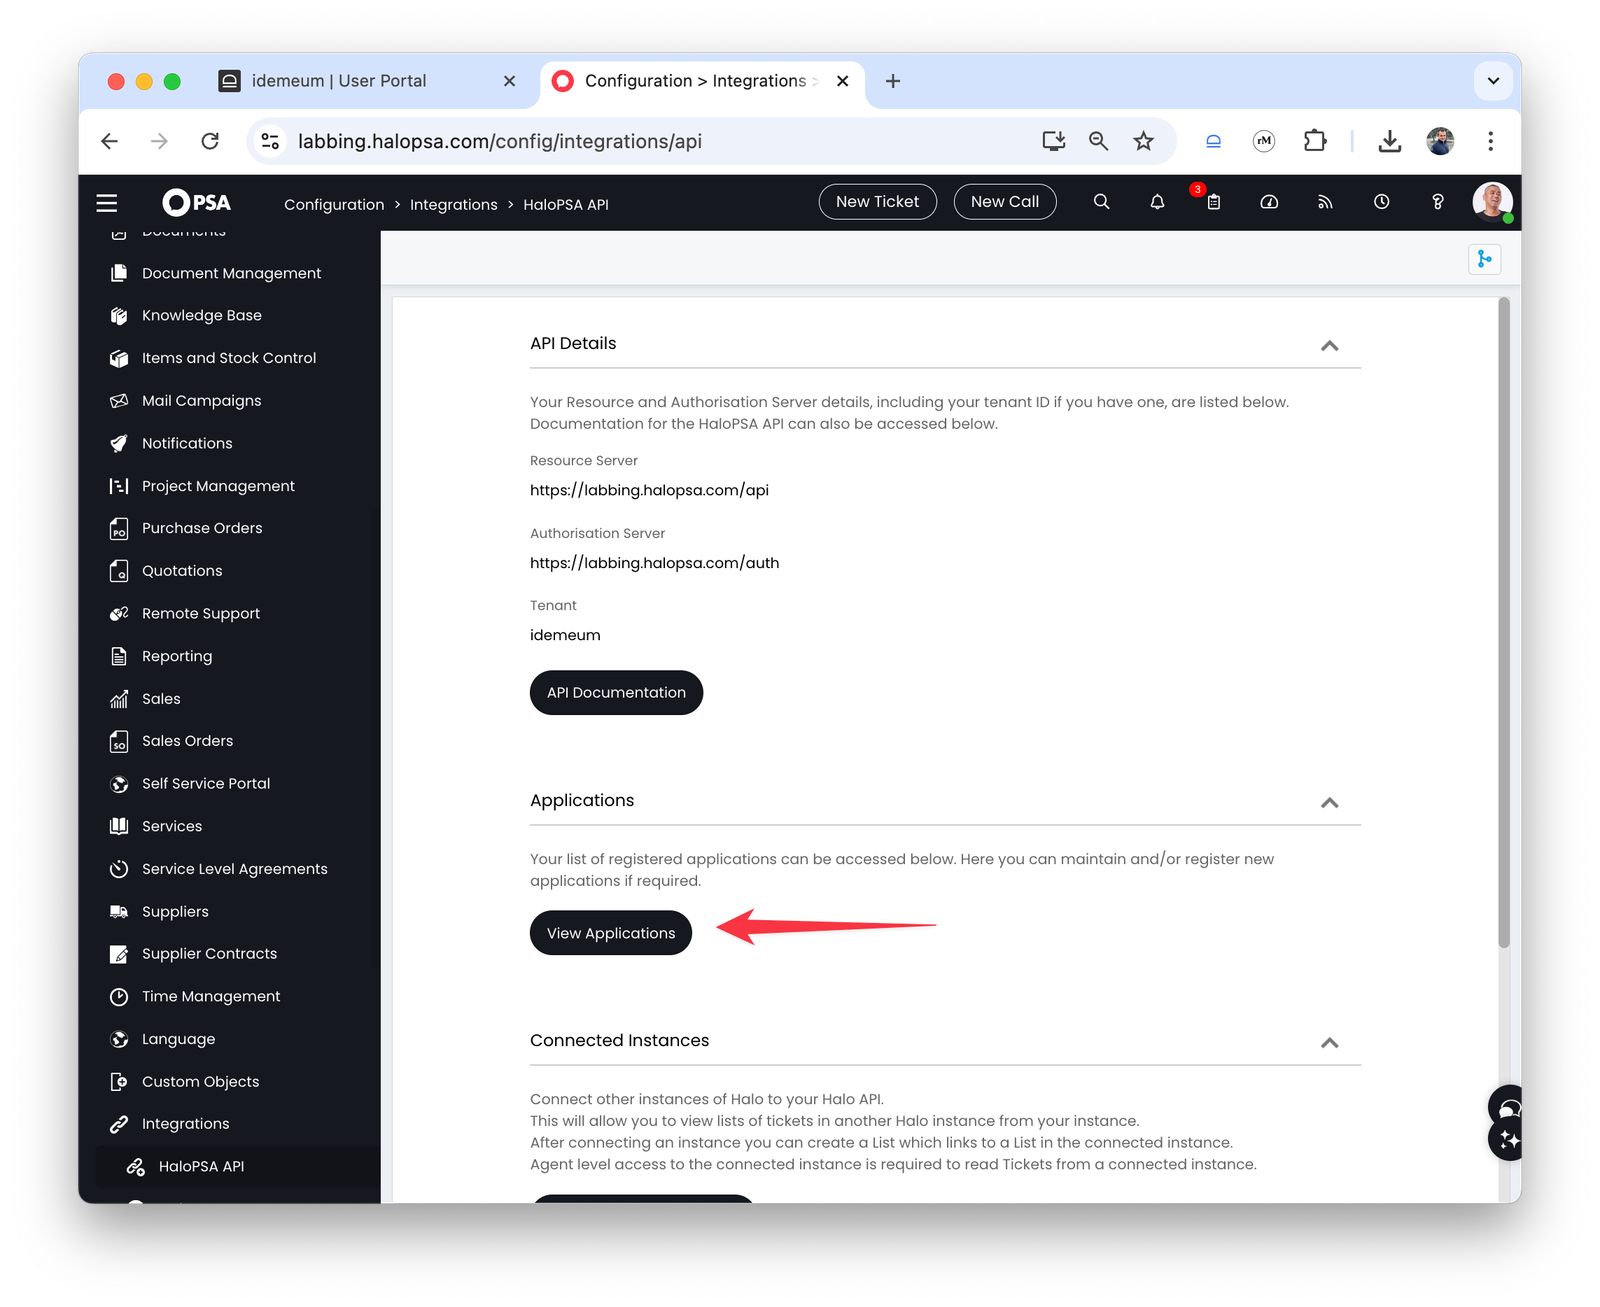
* Access `Configurations` → `Integrations` → `HaloPSA API` and click `View applications`
* Save the agent configuration
### **Configure HaloPSA application**
The way HaloPSA allows other systems to make calls into their system is by creating an application.
* Navigate to HaloPSA admin portal
* Access `Configurations` → `Integrations` → `HaloPSA API` and click `View applications`
 * Now click `New` to create a new application
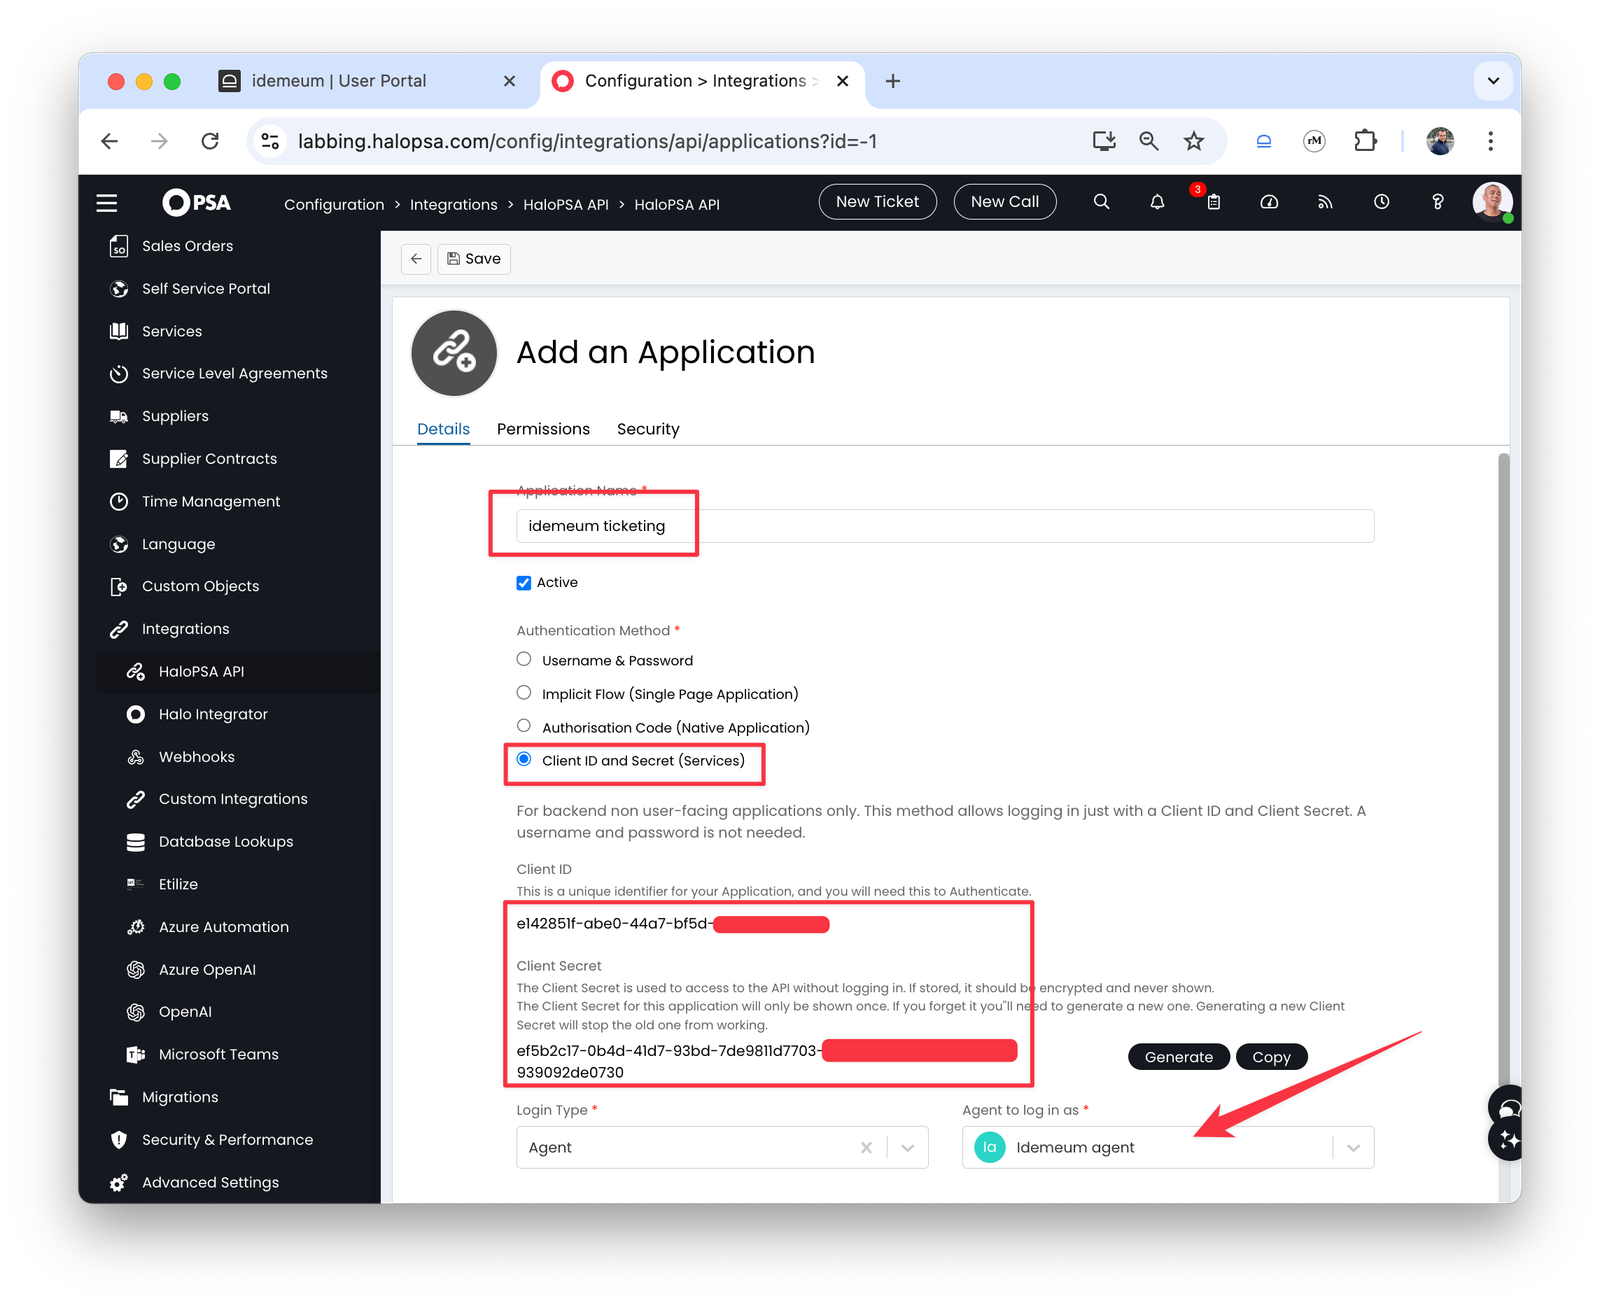
* Provide application name
* Choose `Client ID and Secret` for Authentication method. Save the `Client ID` and `Client Secret` as you will need this information for idemeum configuration.
* For the agent drop down choose the agent that we created in the previous step
* Now click `New` to create a new application
* Provide application name
* Choose `Client ID and Secret` for Authentication method. Save the `Client ID` and `Client Secret` as you will need this information for idemeum configuration.
* For the agent drop down choose the agent that we created in the previous step
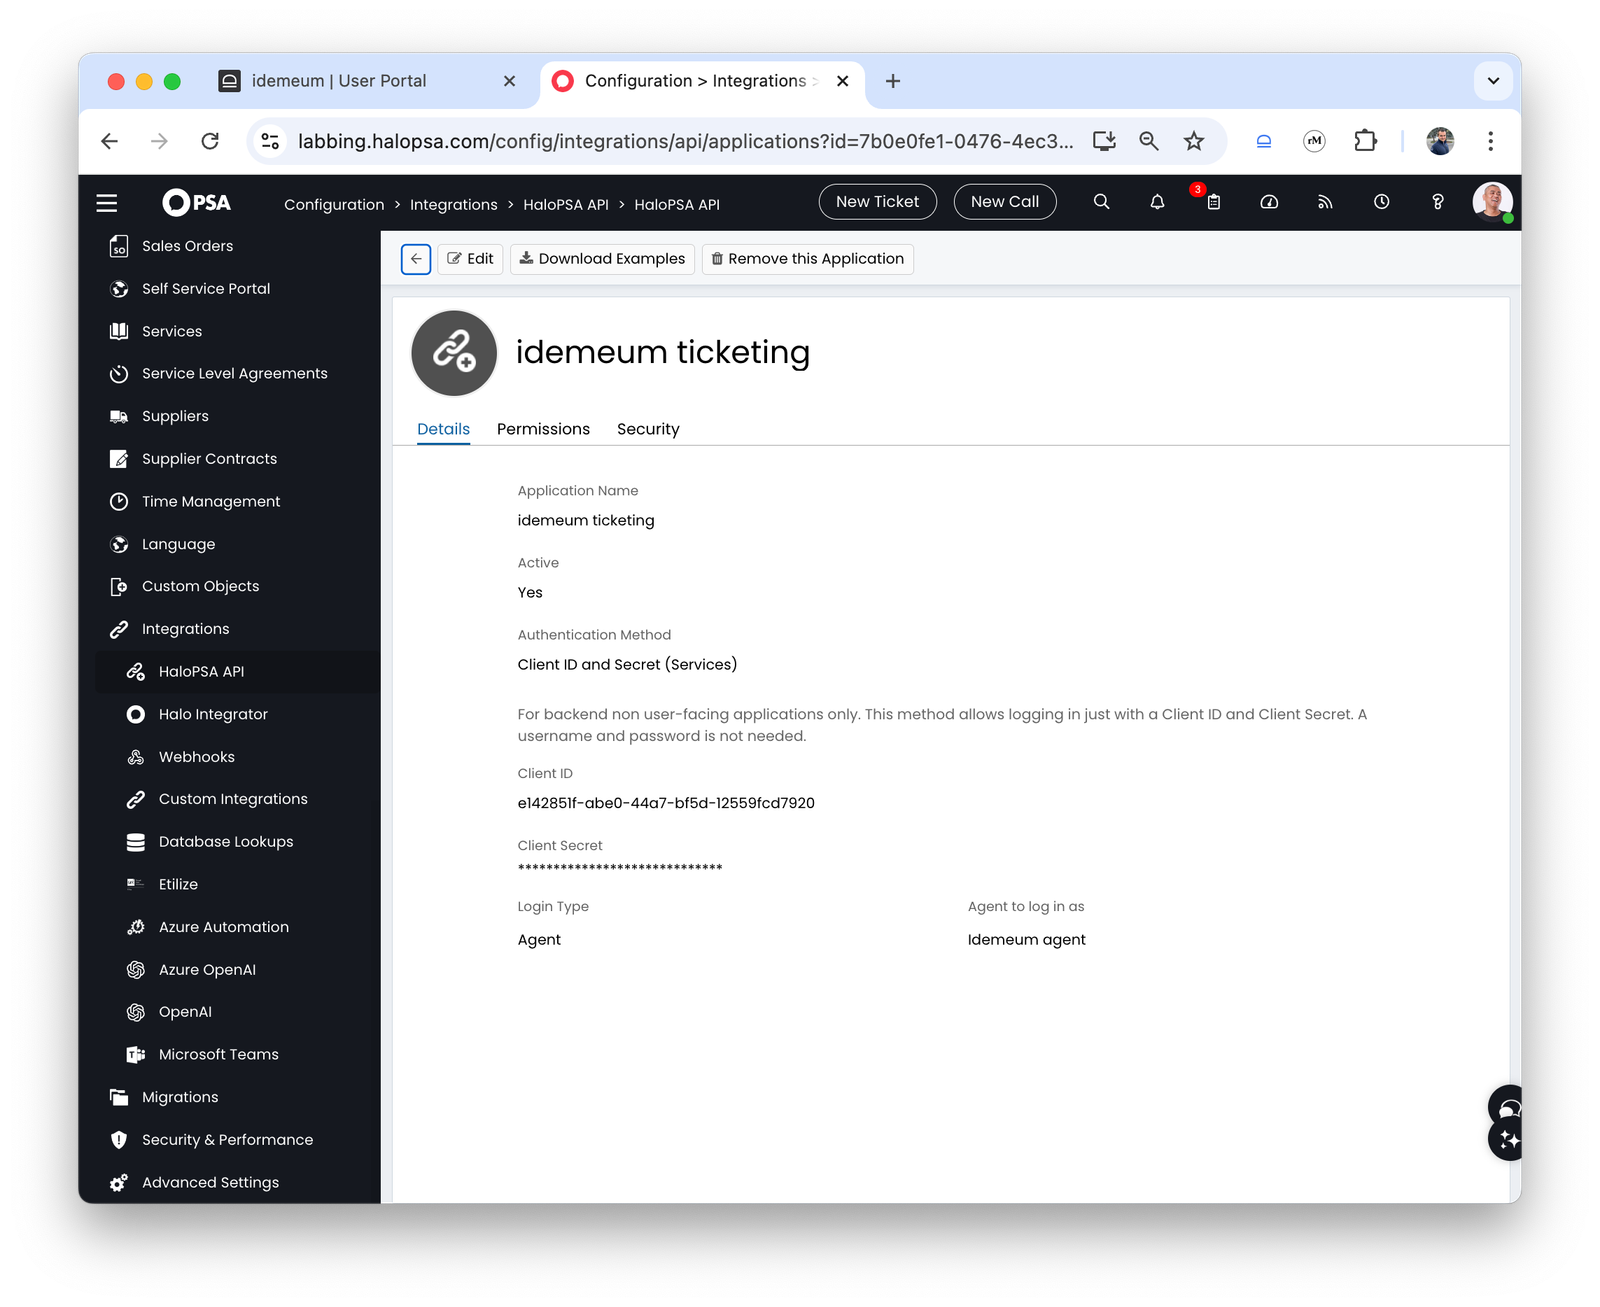
 * Click on the `Permissions` tab and add the following permissions:
* read:tickets
* edit:tickets
* read:customers
* read:assets
* `Save` the configuration
* Click on the `Permissions` tab and add the following permissions:
* read:tickets
* edit:tickets
* read:customers
* read:assets
* `Save` the configuration
 ### **Configure idemeum connector**
* Access your parent tenant admin portal
* Navigate to `Integrations`
* Click `Add integration` and then choose `Outbound integration`
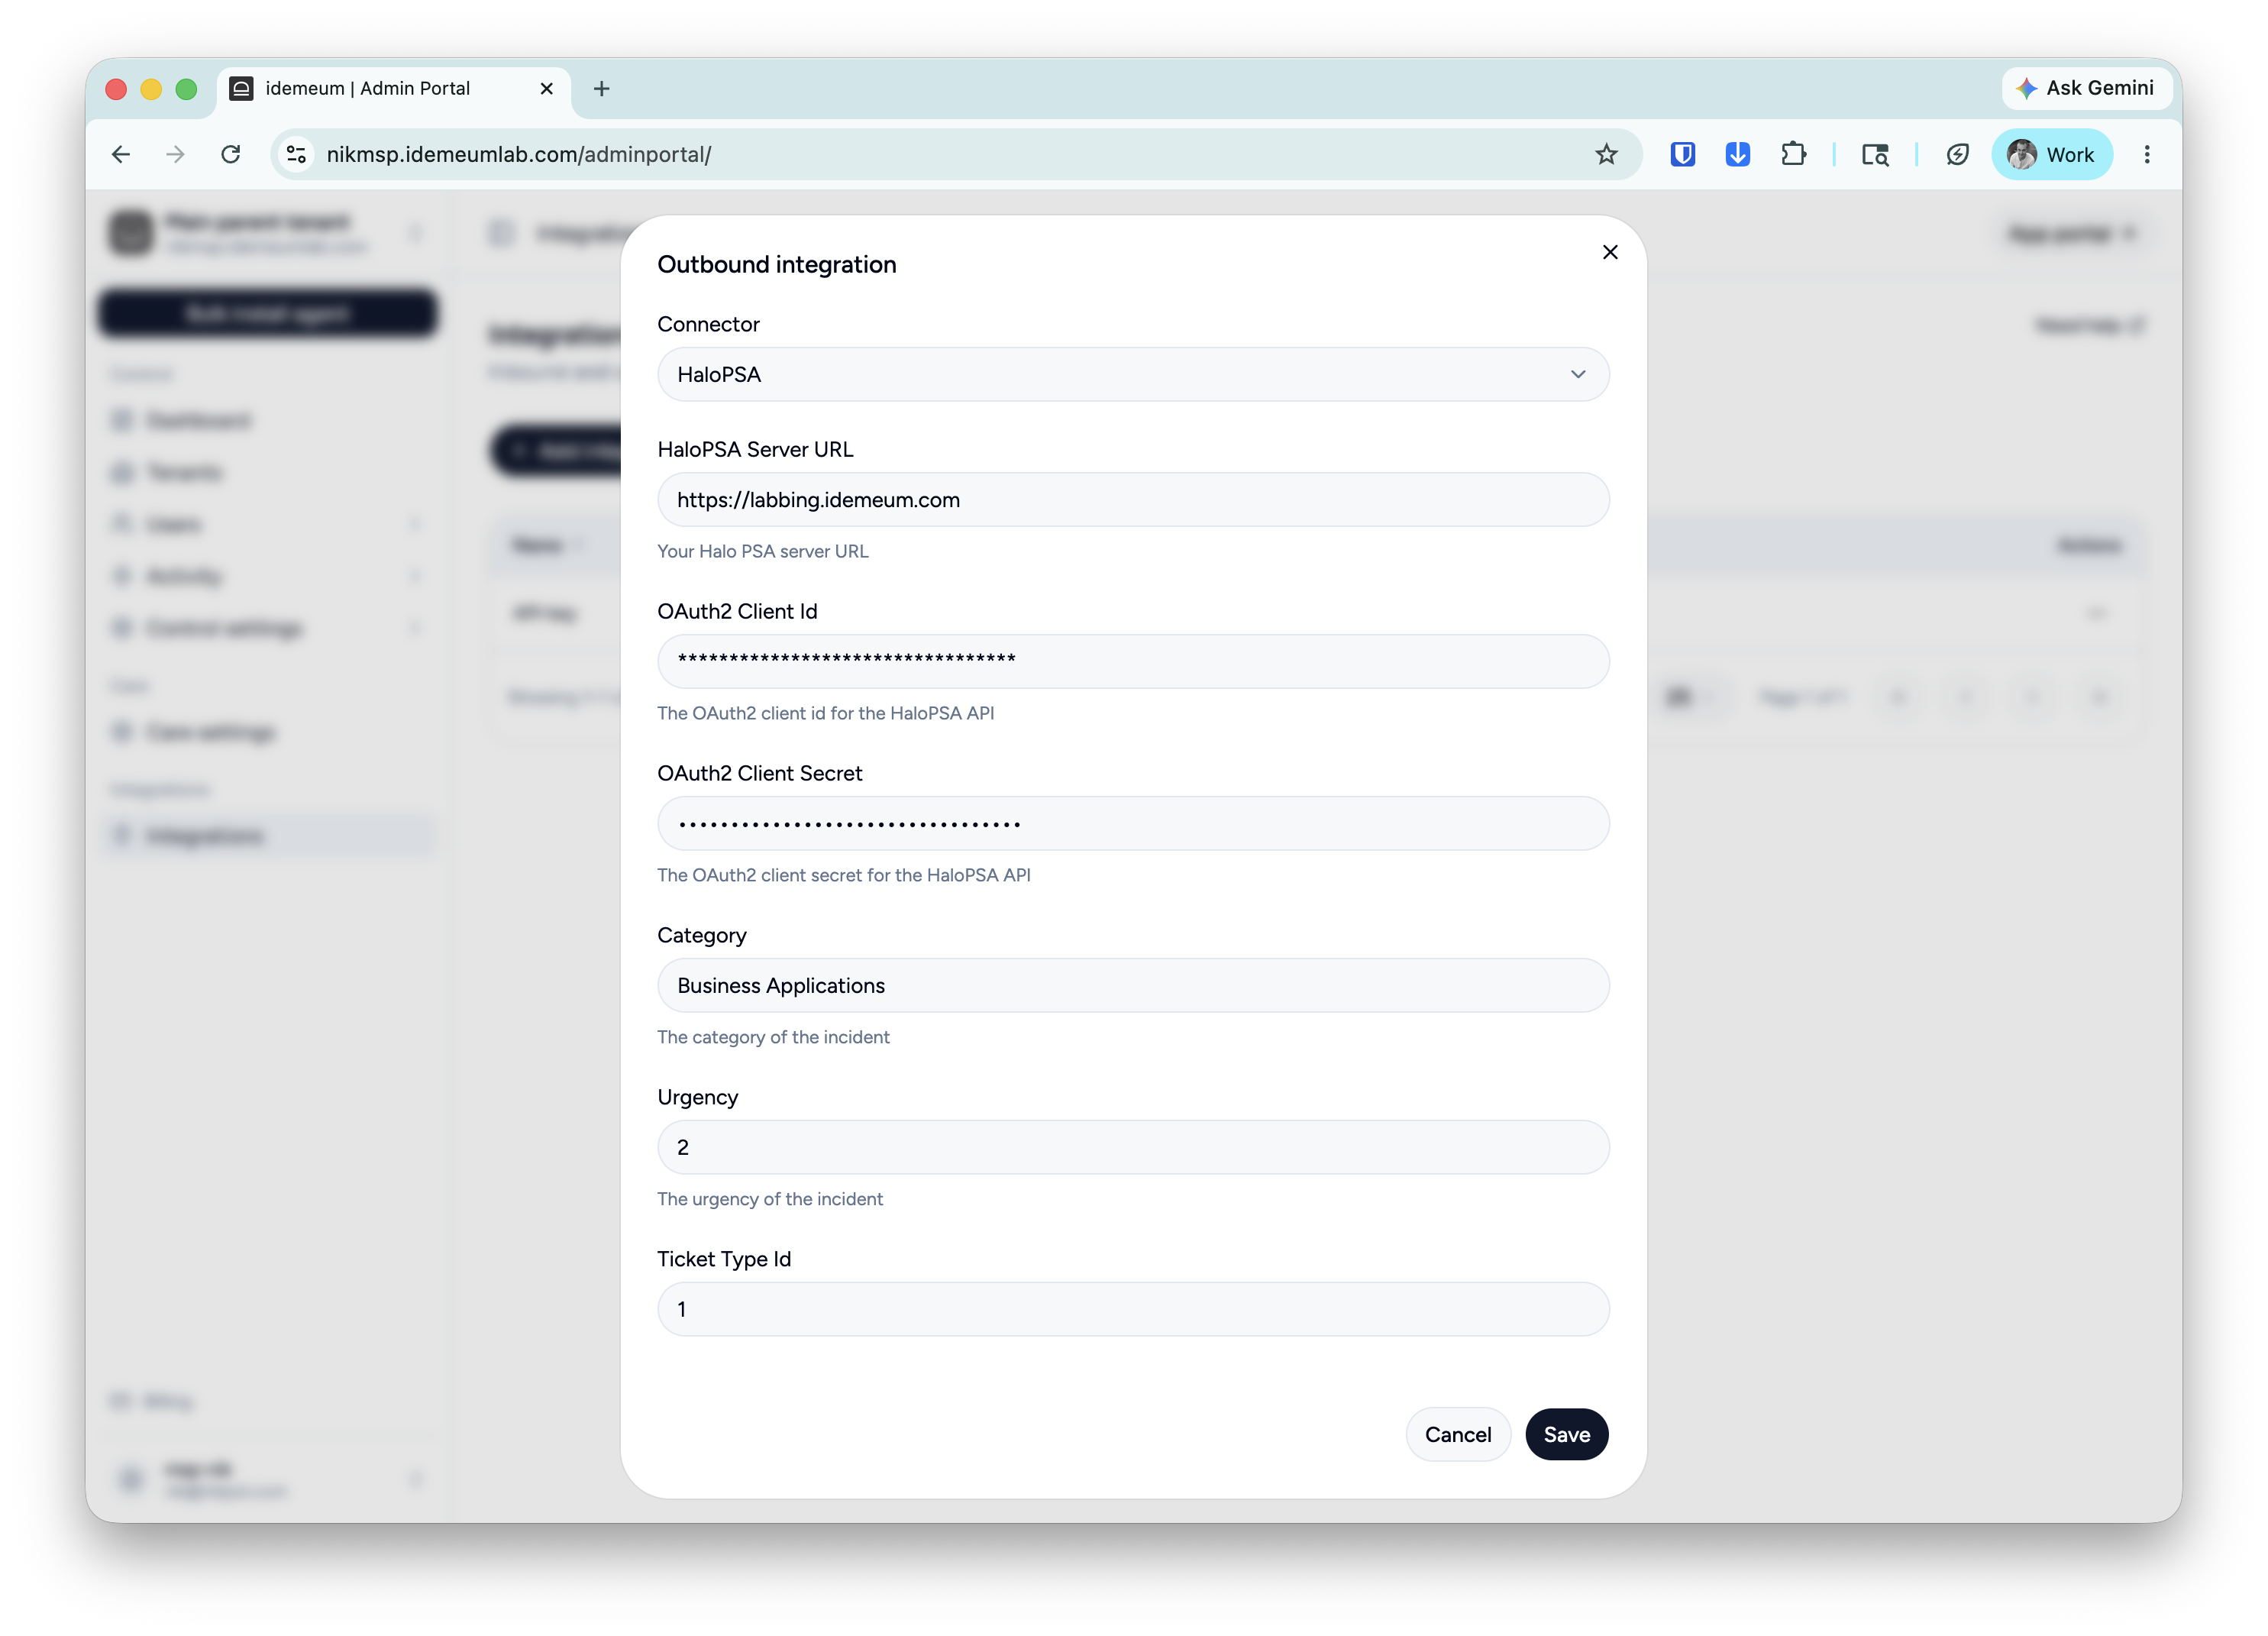
* Choose `Halo PSA` from the connector dropdown
* Now enter the URL of your HaloPSA instance and provide the `Client ID` and `Client secret` that we created in the previous step
* You can also set the values for category, urgency, and ticket type id
### **Configure idemeum connector**
* Access your parent tenant admin portal
* Navigate to `Integrations`
* Click `Add integration` and then choose `Outbound integration`
* Choose `Halo PSA` from the connector dropdown
* Now enter the URL of your HaloPSA instance and provide the `Client ID` and `Client secret` that we created in the previous step
* You can also set the values for category, urgency, and ticket type id
 * `Save` the configuration
### **Customers mapping**
Once the integration with HaloPSA is added, you will see the new `HaloPSA` column in the `Tenants` section.
**Automatic mapping**
As a first step idemeum will try to `automatically` map the customers in idemeum to tenants in HaloPSA. Here is how we will try to do that:
1. Use the `Display Name` of the customer in idemeum to search for a customer in HaloPSA
2. If no match was found using the `Display Name`, then we would use the `Name` of the customer in idemeum to search for a customer in HaloPSA
3. If no match was found using the `Name`, then the admin will have to manually link the customers
**Manual mapping**
The admin can manually link a tenant from idemeum with one in HaloPSA by providing the name of the customer from HaloPSA.
* Navigate to idemeum admin portal and access `Tenants` section
* Search for the customer name
* Click on the `Link` button
* Enter the HaloPSA customer name to map this idemeum customer to
* Once found we will display the customer name from HaloPSA in the PSA column.
The name matching will be using case-insensitive equality.
### **Ticket creation**
Here is how idemeum will create the tickets in HaloPSA:
* Idemeum will create a ticket of type `Incident`
* We will use these default values for the ticket:
1. `category` - **Business Applications**
2. `urgency` - **Medium**
3. `impact` - **Single User Affected**
* In the ticket there will be information about the user that requested access to which application from which device.
* `Save` the configuration
### **Customers mapping**
Once the integration with HaloPSA is added, you will see the new `HaloPSA` column in the `Tenants` section.
**Automatic mapping**
As a first step idemeum will try to `automatically` map the customers in idemeum to tenants in HaloPSA. Here is how we will try to do that:
1. Use the `Display Name` of the customer in idemeum to search for a customer in HaloPSA
2. If no match was found using the `Display Name`, then we would use the `Name` of the customer in idemeum to search for a customer in HaloPSA
3. If no match was found using the `Name`, then the admin will have to manually link the customers
**Manual mapping**
The admin can manually link a tenant from idemeum with one in HaloPSA by providing the name of the customer from HaloPSA.
* Navigate to idemeum admin portal and access `Tenants` section
* Search for the customer name
* Click on the `Link` button
* Enter the HaloPSA customer name to map this idemeum customer to
* Once found we will display the customer name from HaloPSA in the PSA column.
The name matching will be using case-insensitive equality.
### **Ticket creation**
Here is how idemeum will create the tickets in HaloPSA:
* Idemeum will create a ticket of type `Incident`
* We will use these default values for the ticket:
1. `category` - **Business Applications**
2. `urgency` - **Medium**
3. `impact` - **Single User Affected**
* In the ticket there will be information about the user that requested access to which application from which device.
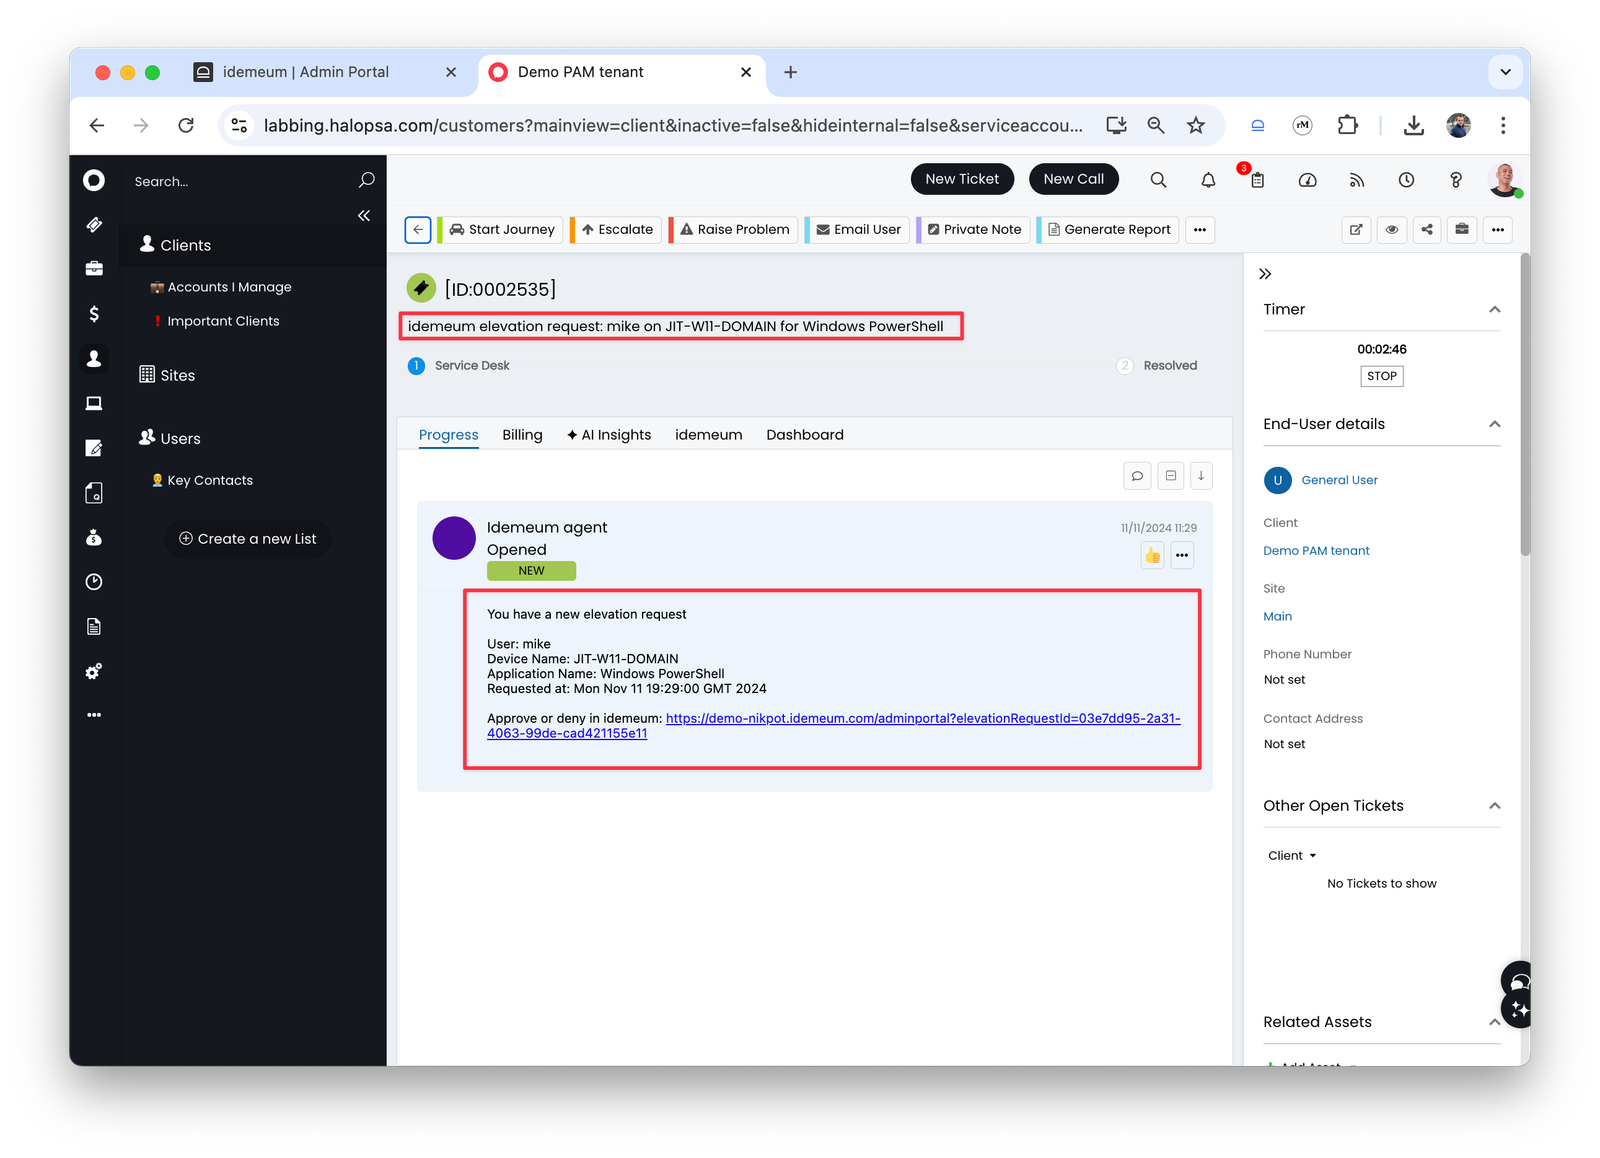 * idemeum knows from which desktop name the elevation was initiated from so will lookup that name in your assets list. If found then we will associate that asset with the HaloPSA ticket.
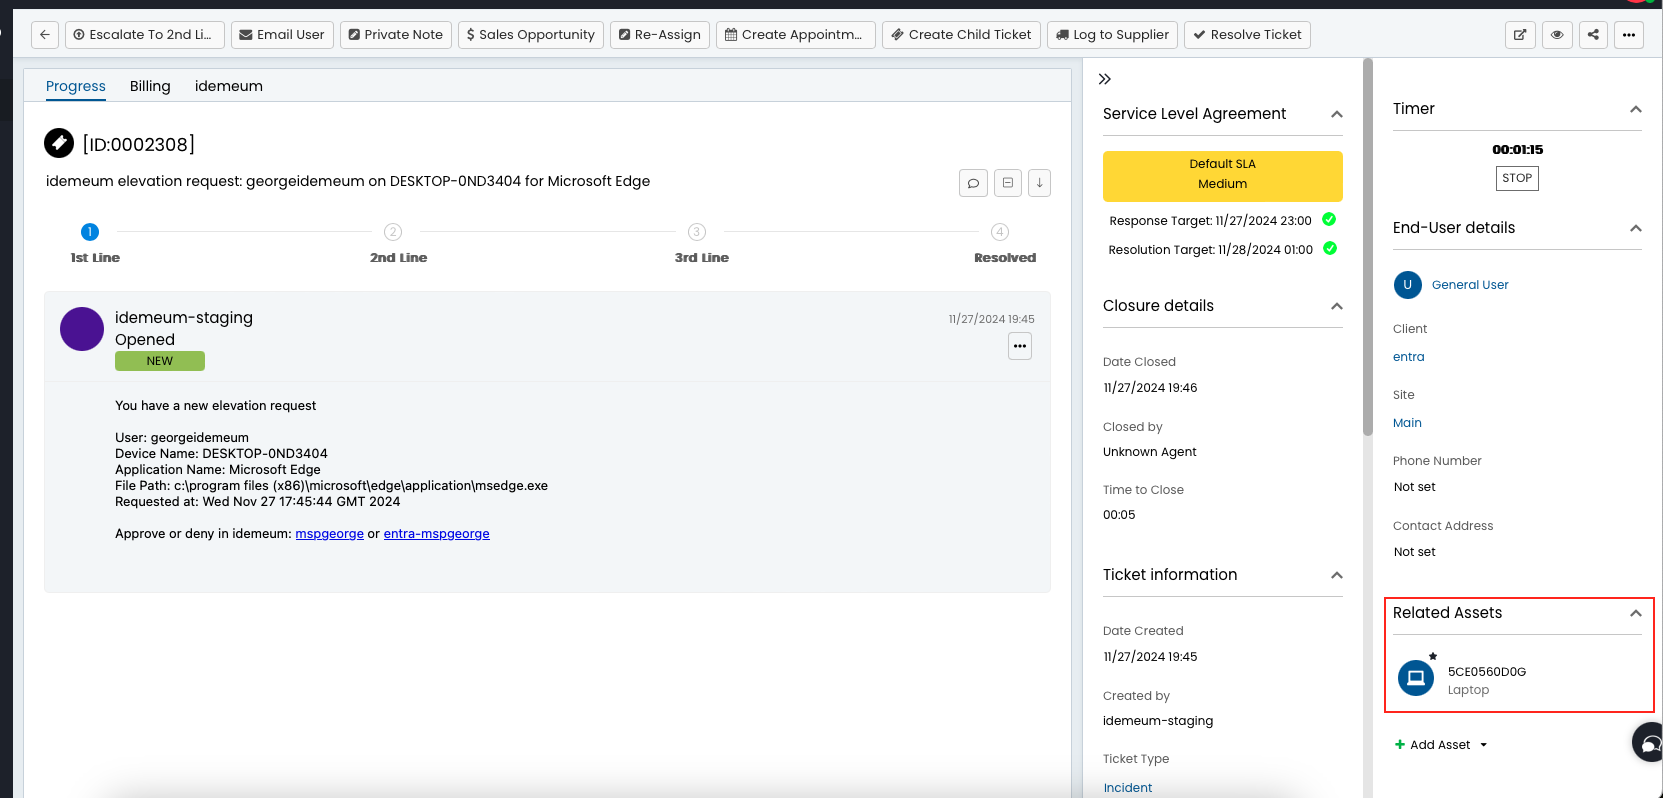 * There is also a link to navigate to idemeum portal and respond to the request
* Once the ticket is approved or denied the HaloPSA ticket will be updated with the status `Closed`. If we can find an agent in HaloPSA with the email address of the idemeum user that approved/denied the elevation request then we will assign that agent to the ticket.
* There is also a link to navigate to idemeum portal and respond to the request
* Once the ticket is approved or denied the HaloPSA ticket will be updated with the status `Closed`. If we can find an agent in HaloPSA with the email address of the idemeum user that approved/denied the elevation request then we will assign that agent to the ticket.
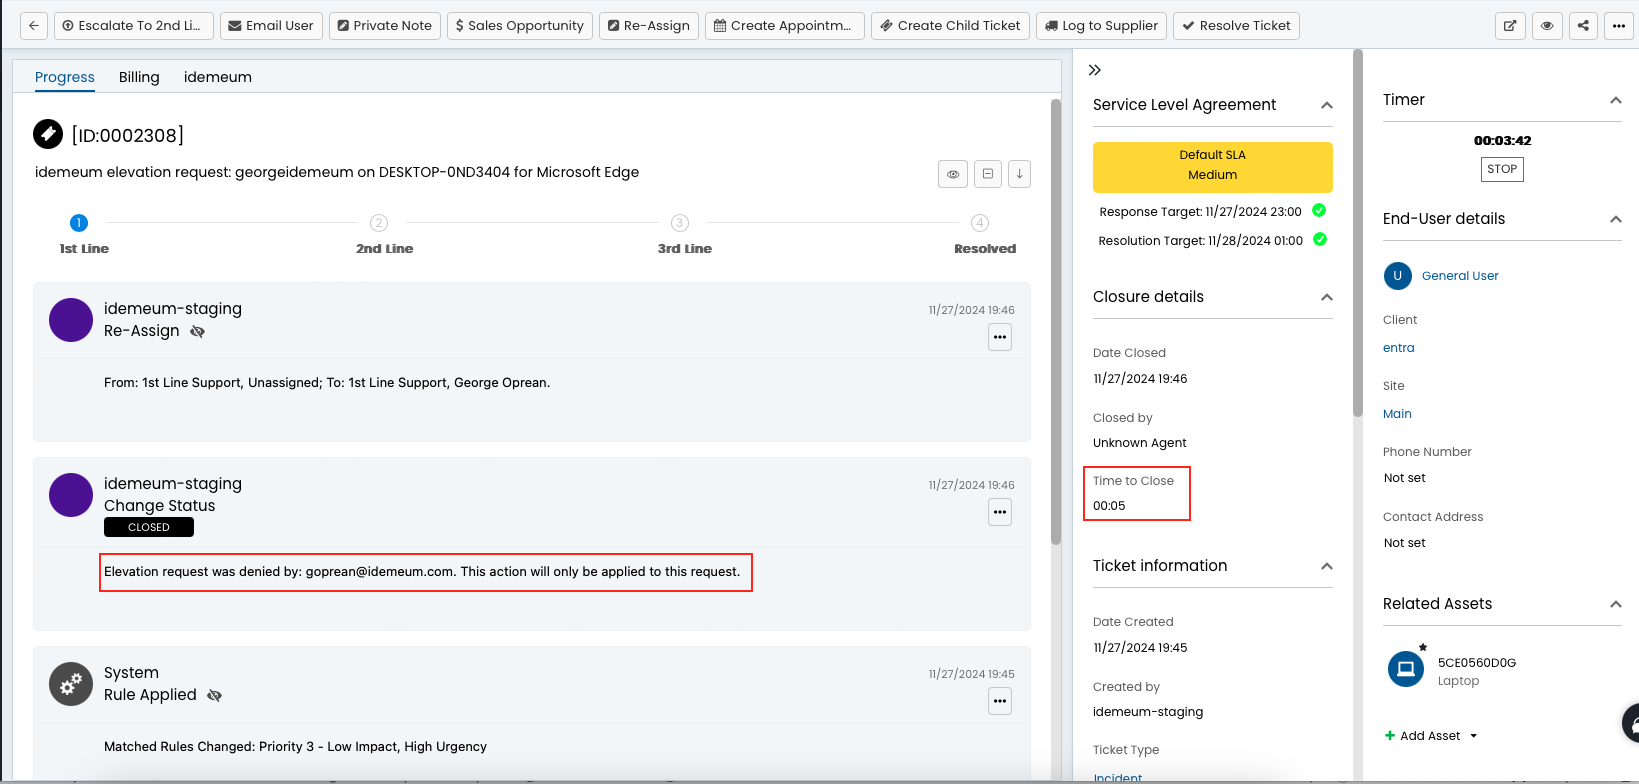
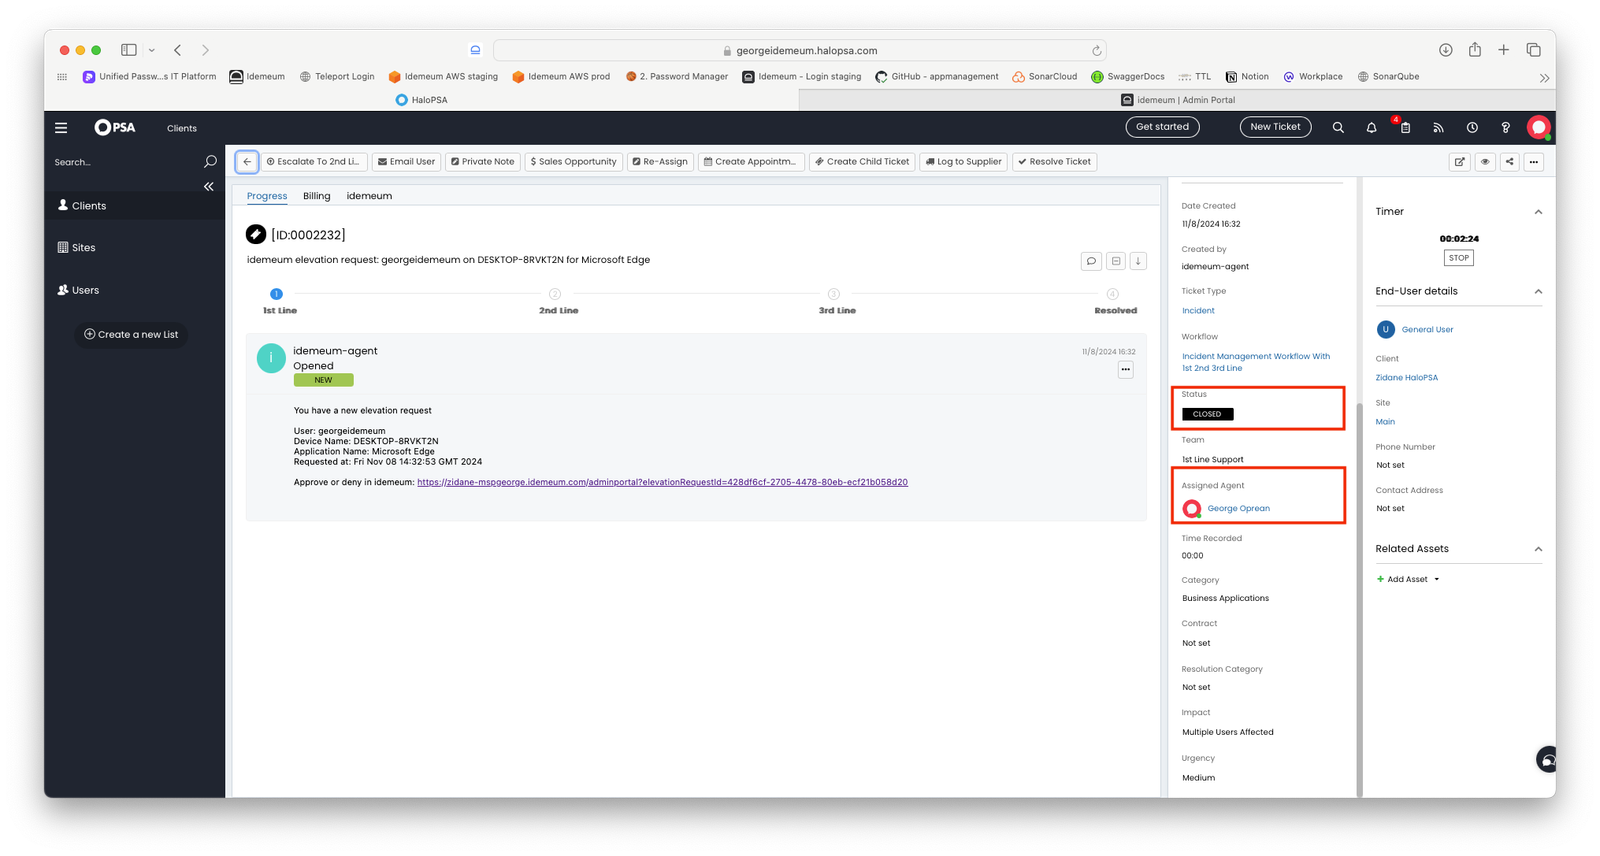 * When a ticket is closed we will add some information on how the ticket was closed in the closure notes: who closed it, was the elevation approved or not, for this user or at a tenant level, etc.
* We will also add a closure time of 5 mins. If you want to use other value rather than 5 mins contact idemeum support.
* When a ticket is closed we will add some information on how the ticket was closed in the closure notes: who closed it, was the elevation approved or not, for this user or at a tenant level, etc.
* We will also add a closure time of 5 mins. If you want to use other value rather than 5 mins contact idemeum support.
 ## **Approve elevation requests from tickets**
By default there is a link in the ticket details that allows you to approve the elevation request. The new tab will open and you will be redirected to idemeum to approve the request. You can simplify this process by configuring an API-based integration to approve / deny the elevation request with a single click.
Make sure you first create the two custom fields as described in the previous section - `CFidemeumCustomerName` and `CFidemeumElevationRequestId`
### **Create custom integration in HaloPSA**
* Navigate to `Configurations` → `Custom integrations`
## **Approve elevation requests from tickets**
By default there is a link in the ticket details that allows you to approve the elevation request. The new tab will open and you will be redirected to idemeum to approve the request. You can simplify this process by configuring an API-based integration to approve / deny the elevation request with a single click.
Make sure you first create the two custom fields as described in the previous section - `CFidemeumCustomerName` and `CFidemeumElevationRequestId`
### **Create custom integration in HaloPSA**
* Navigate to `Configurations` → `Custom integrations`
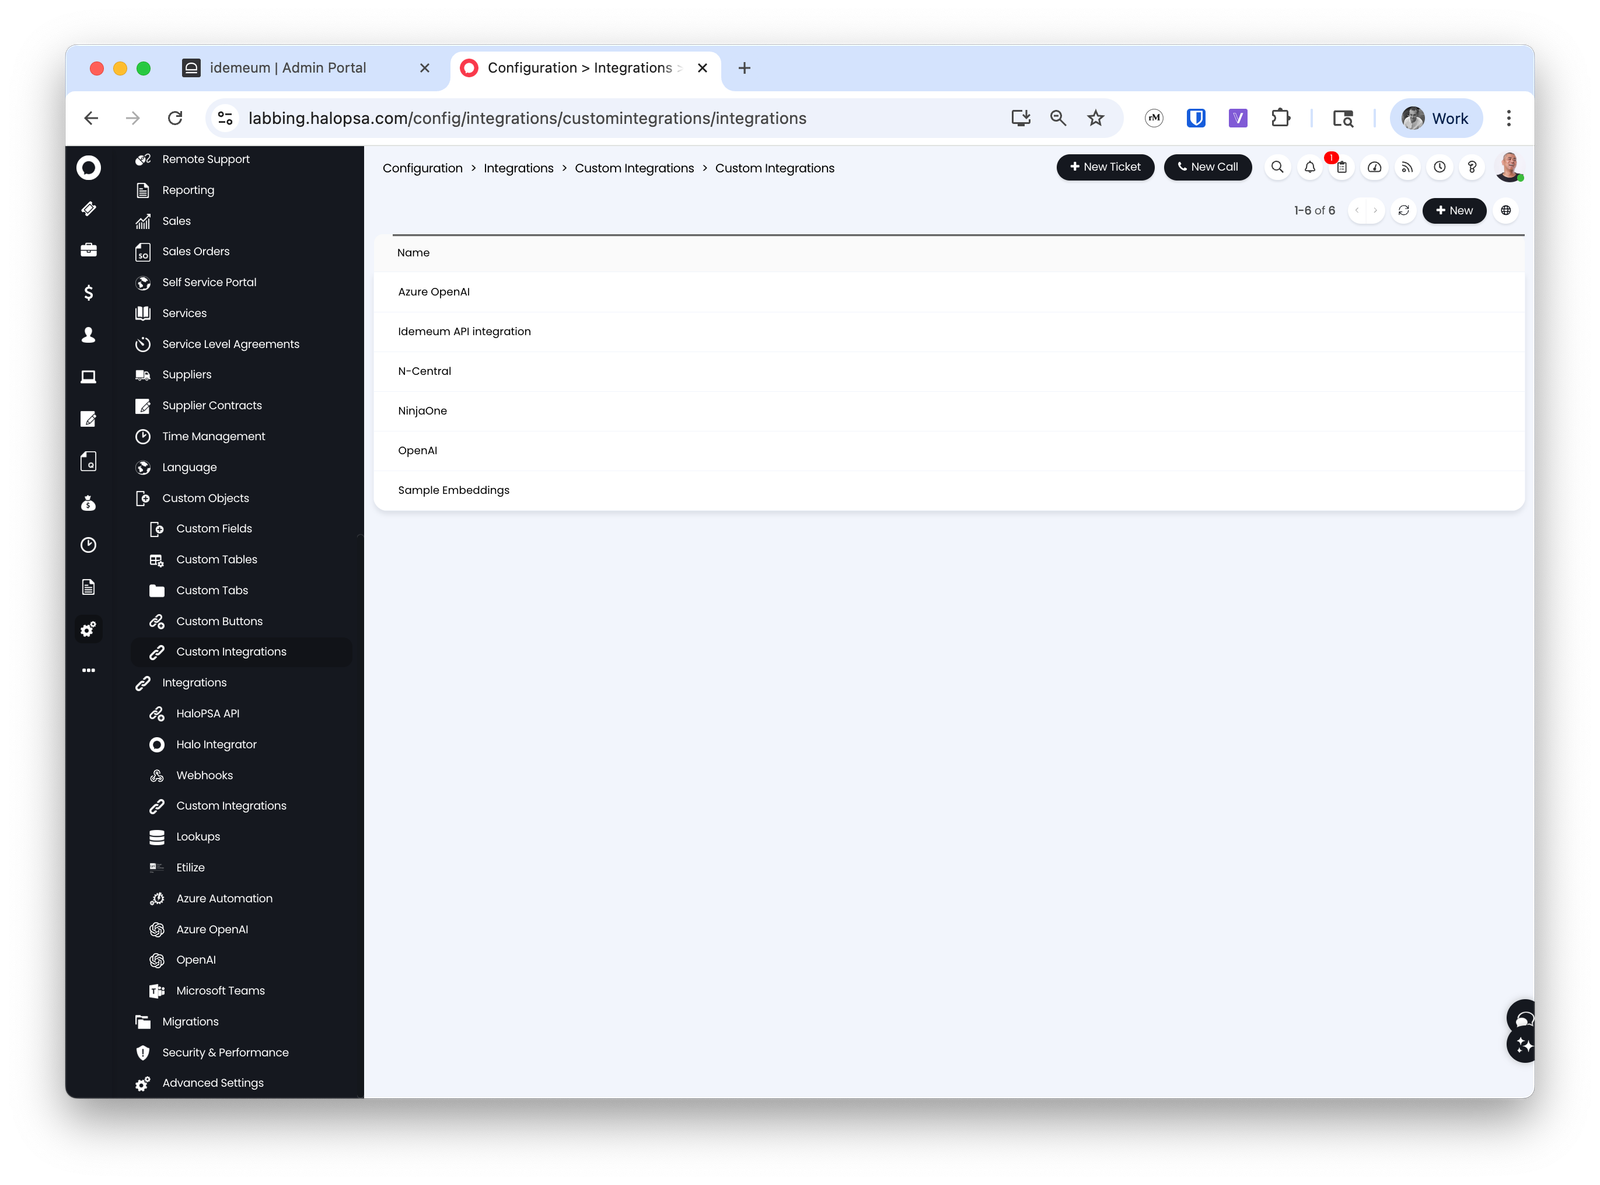 * Click `New`
* Provide the integration name `Idemeum API integration`
* For base resource URL enter the URL of your parent tenant. i.e. `https://nikmsp.idemeum.com`
* For `Authorization` choose `API key`
* For `Key` enter `X-Idemeum-Api-Key`
* For value obtain the API key from idemeum (navigate to `Global Settings` → `Integrations` and view the API key there)
* Add the API key to `header`
* Click `New`
* Provide the integration name `Idemeum API integration`
* For base resource URL enter the URL of your parent tenant. i.e. `https://nikmsp.idemeum.com`
* For `Authorization` choose `API key`
* For `Key` enter `X-Idemeum-Api-Key`
* For value obtain the API key from idemeum (navigate to `Global Settings` → `Integrations` and view the API key there)
* Add the API key to `header`
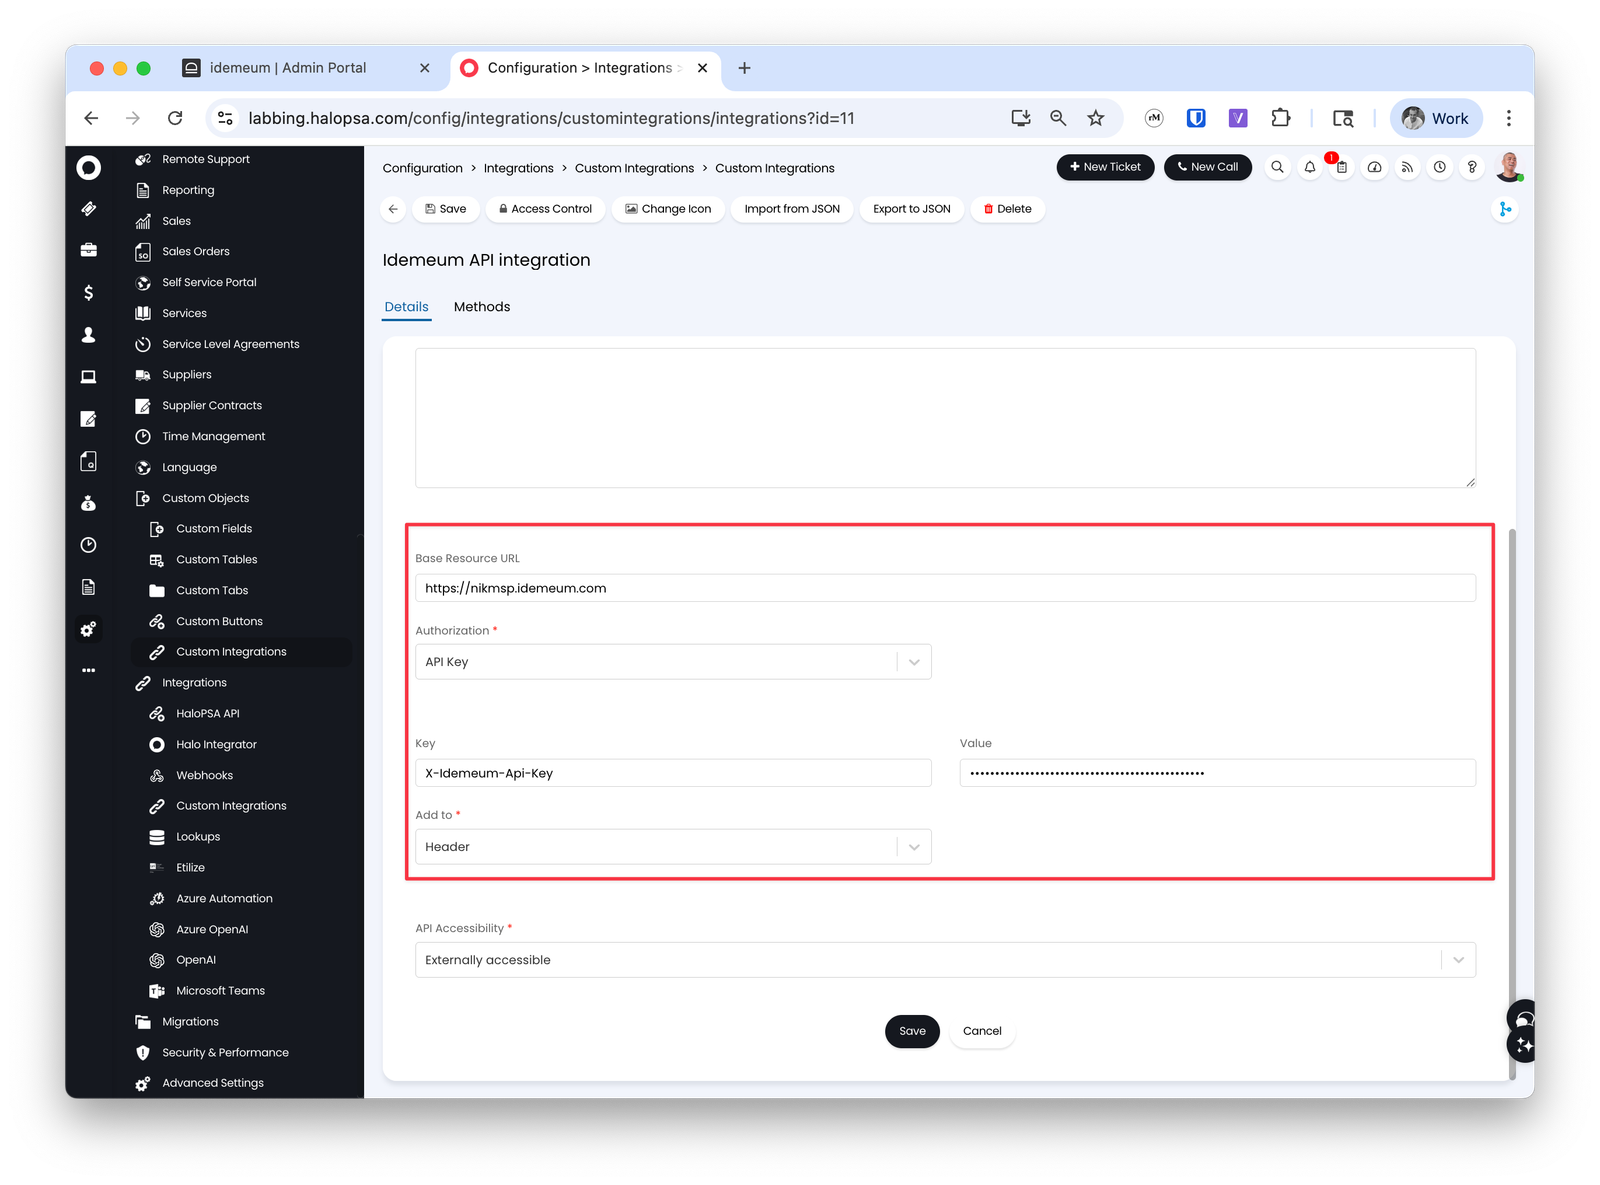 * Save the configuration
### **Create custom methods in Halo PSA**
* Navigate to `Configurations` → `Custom integrations` → `Custom methods`
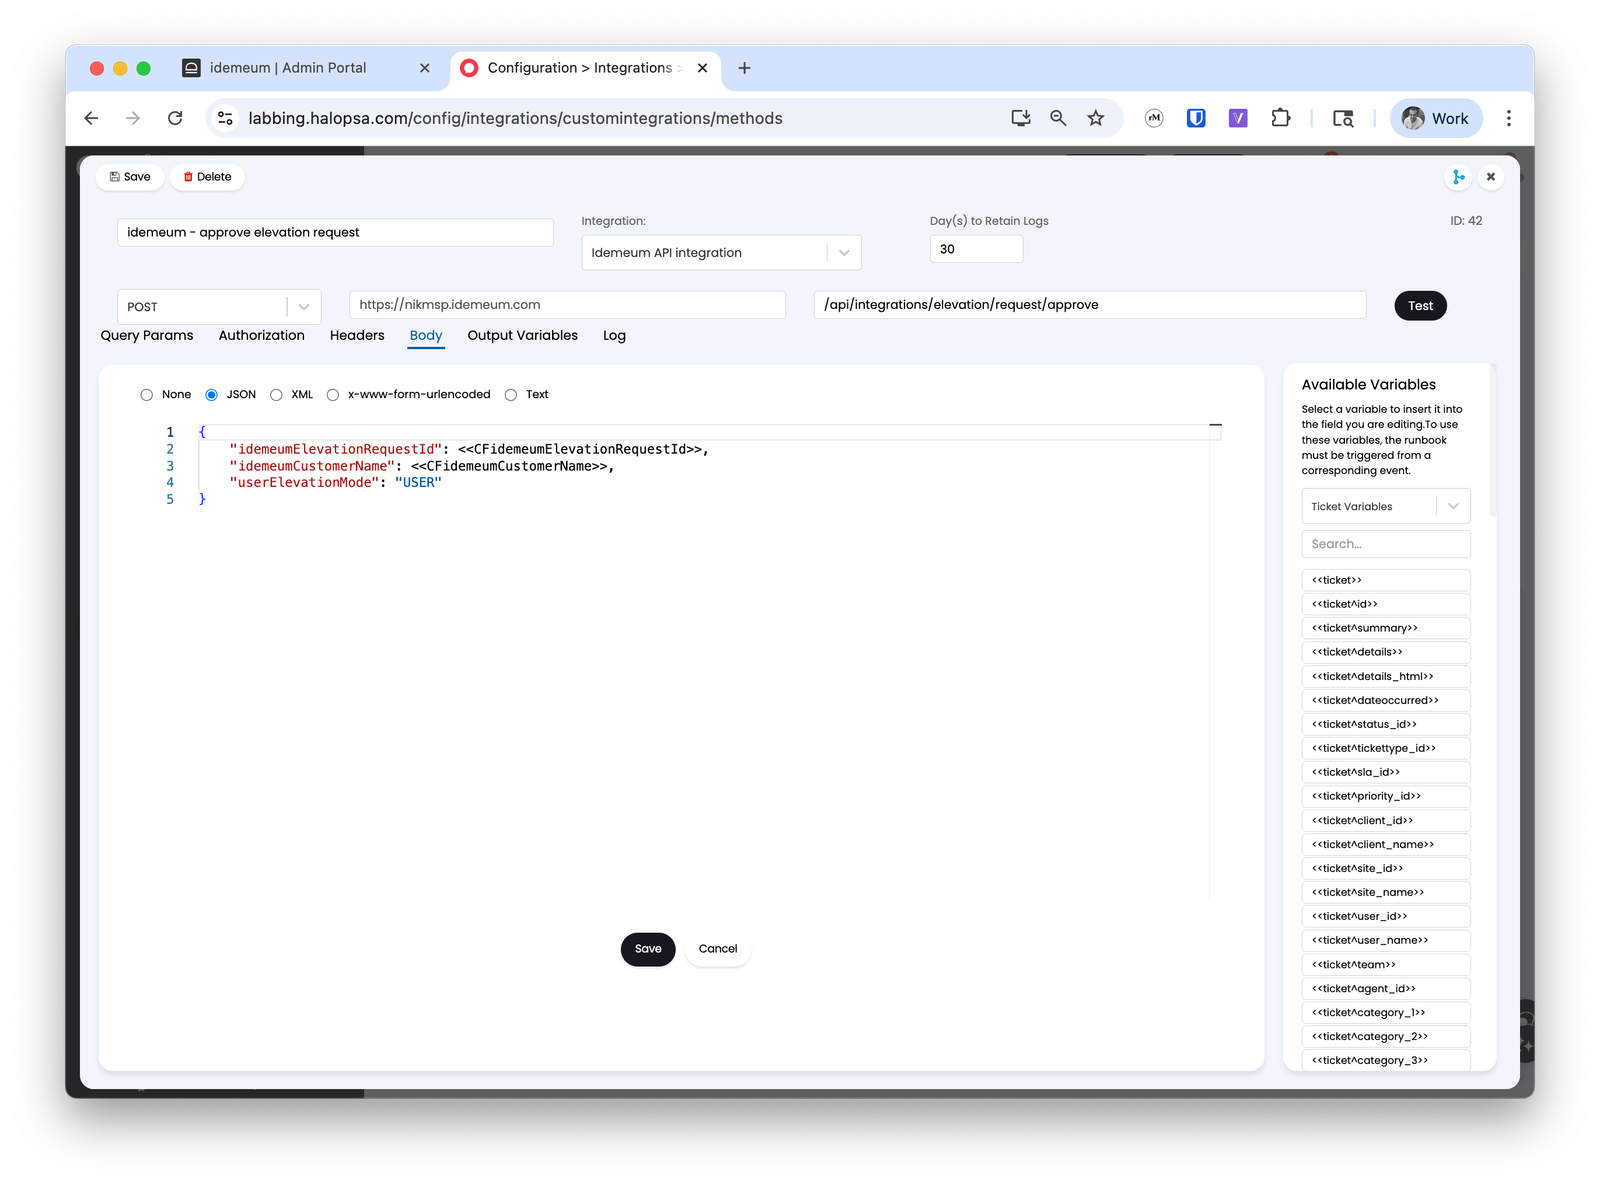
* Click `New` to add the custom `approve` method
* Provide the method name `idemeum - approve elevation request`
* For integration dropdown choose `Idemeum API integration`
* For method choose `POST`
* For method URL add `/api/integrations/elevation/request/approve`
* Save the configuration
### **Create custom methods in Halo PSA**
* Navigate to `Configurations` → `Custom integrations` → `Custom methods`
* Click `New` to add the custom `approve` method
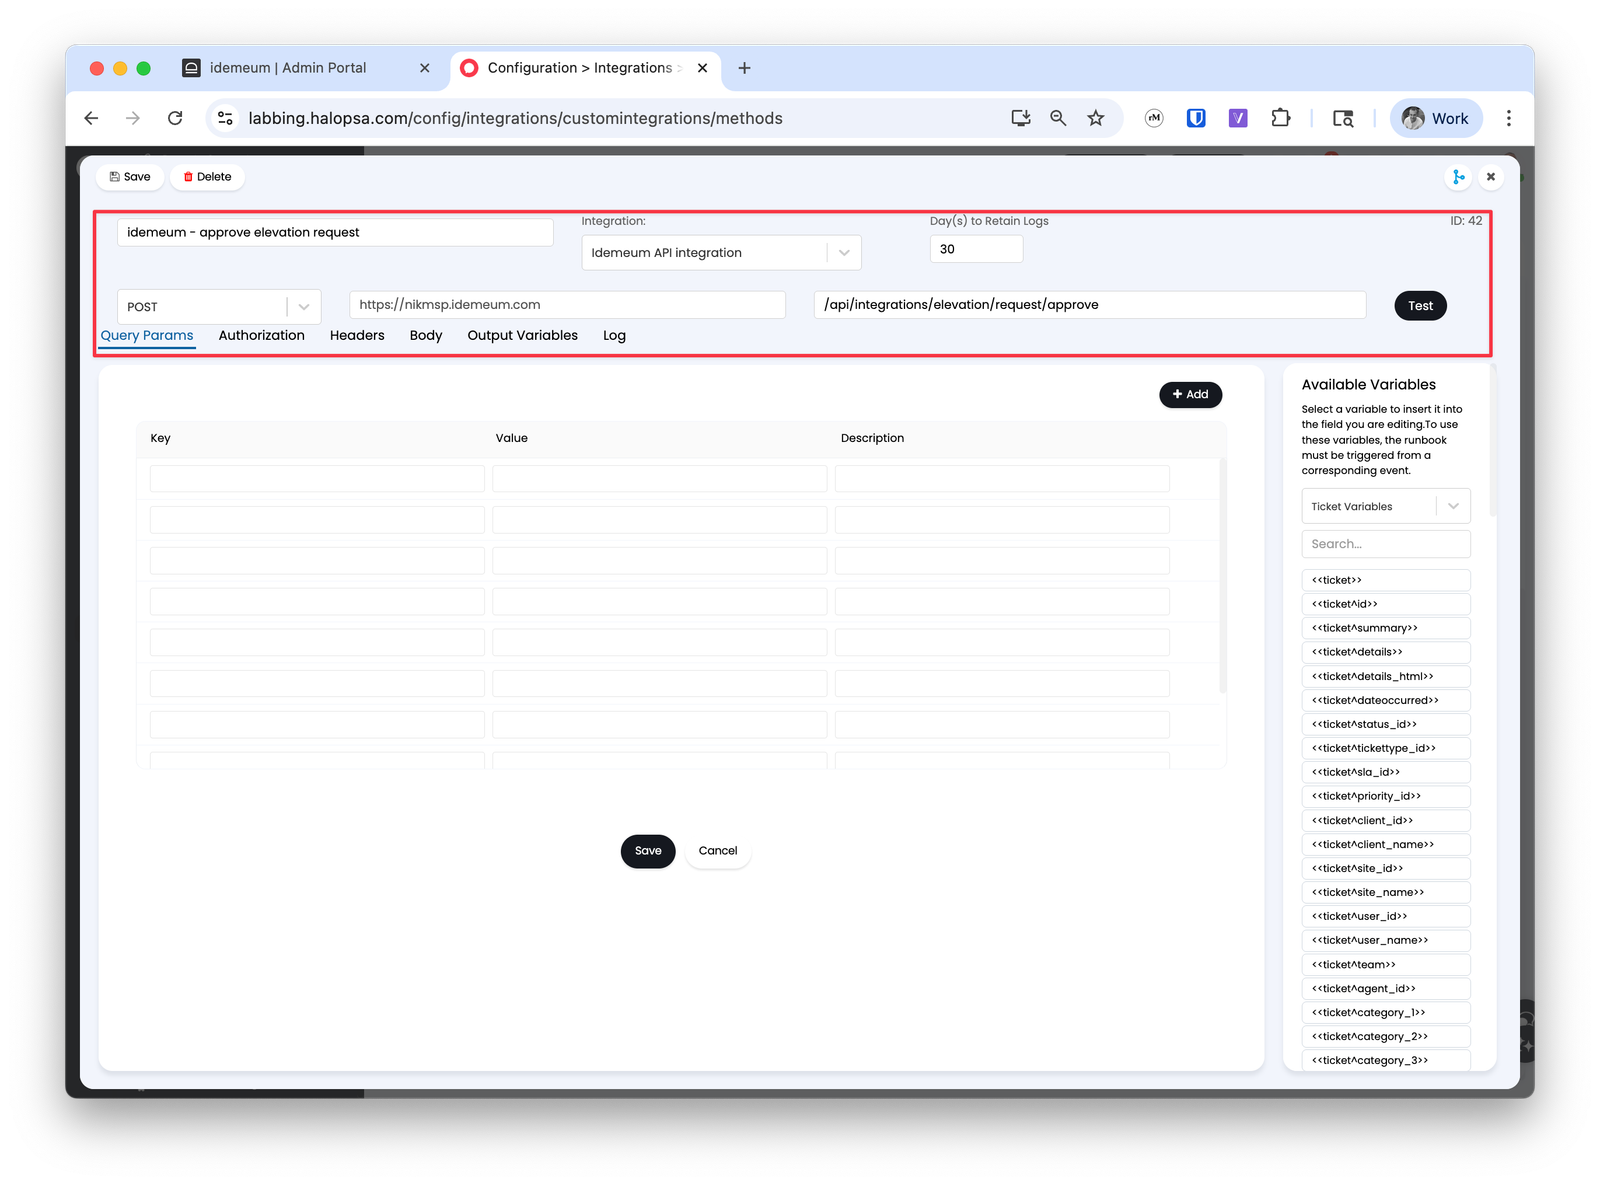
* Provide the method name `idemeum - approve elevation request`
* For integration dropdown choose `Idemeum API integration`
* For method choose `POST`
* For method URL add `/api/integrations/elevation/request/approve`
 * For `Authorization` choose `Inherit from integration settings`
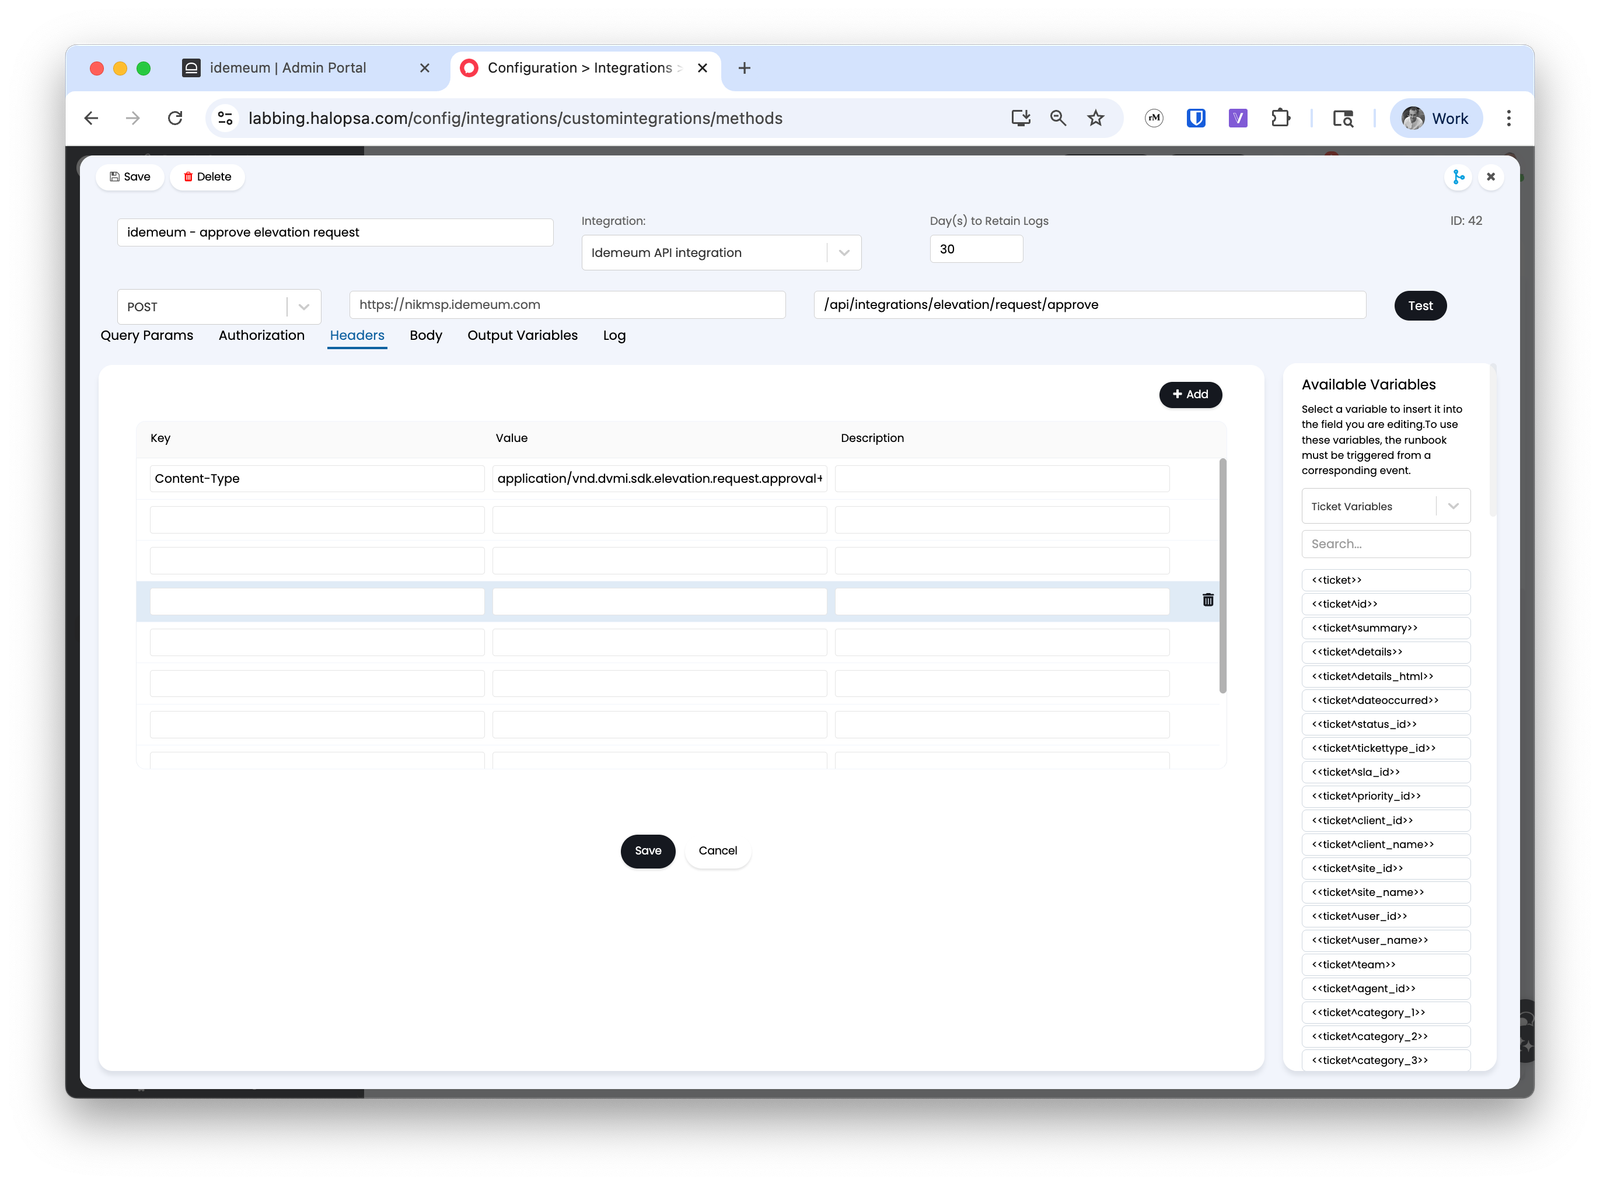
* Add the following to `Headers`
* Key `Content-Type`
* Value `application/vnd.dvmi.sdk.elevation.request.approval+json`
* For `Authorization` choose `Inherit from integration settings`
* Add the following to `Headers`
* Key `Content-Type`
* Value `application/vnd.dvmi.sdk.elevation.request.approval+json`
 * Add the following to JSON `Body`. Here we will use the custom variables that we created before.
```json theme={null}
{
"idemeumElevationRequestId": <>,
"idemeumCustomerName": <>,
"userElevationMode": "USER"
}
```
* Add the following to JSON `Body`. Here we will use the custom variables that we created before.
```json theme={null}
{
"idemeumElevationRequestId": <>,
"idemeumCustomerName": <>,
"userElevationMode": "USER"
}
```
 * Save the `approve` method
* Now we will create the `deny` method
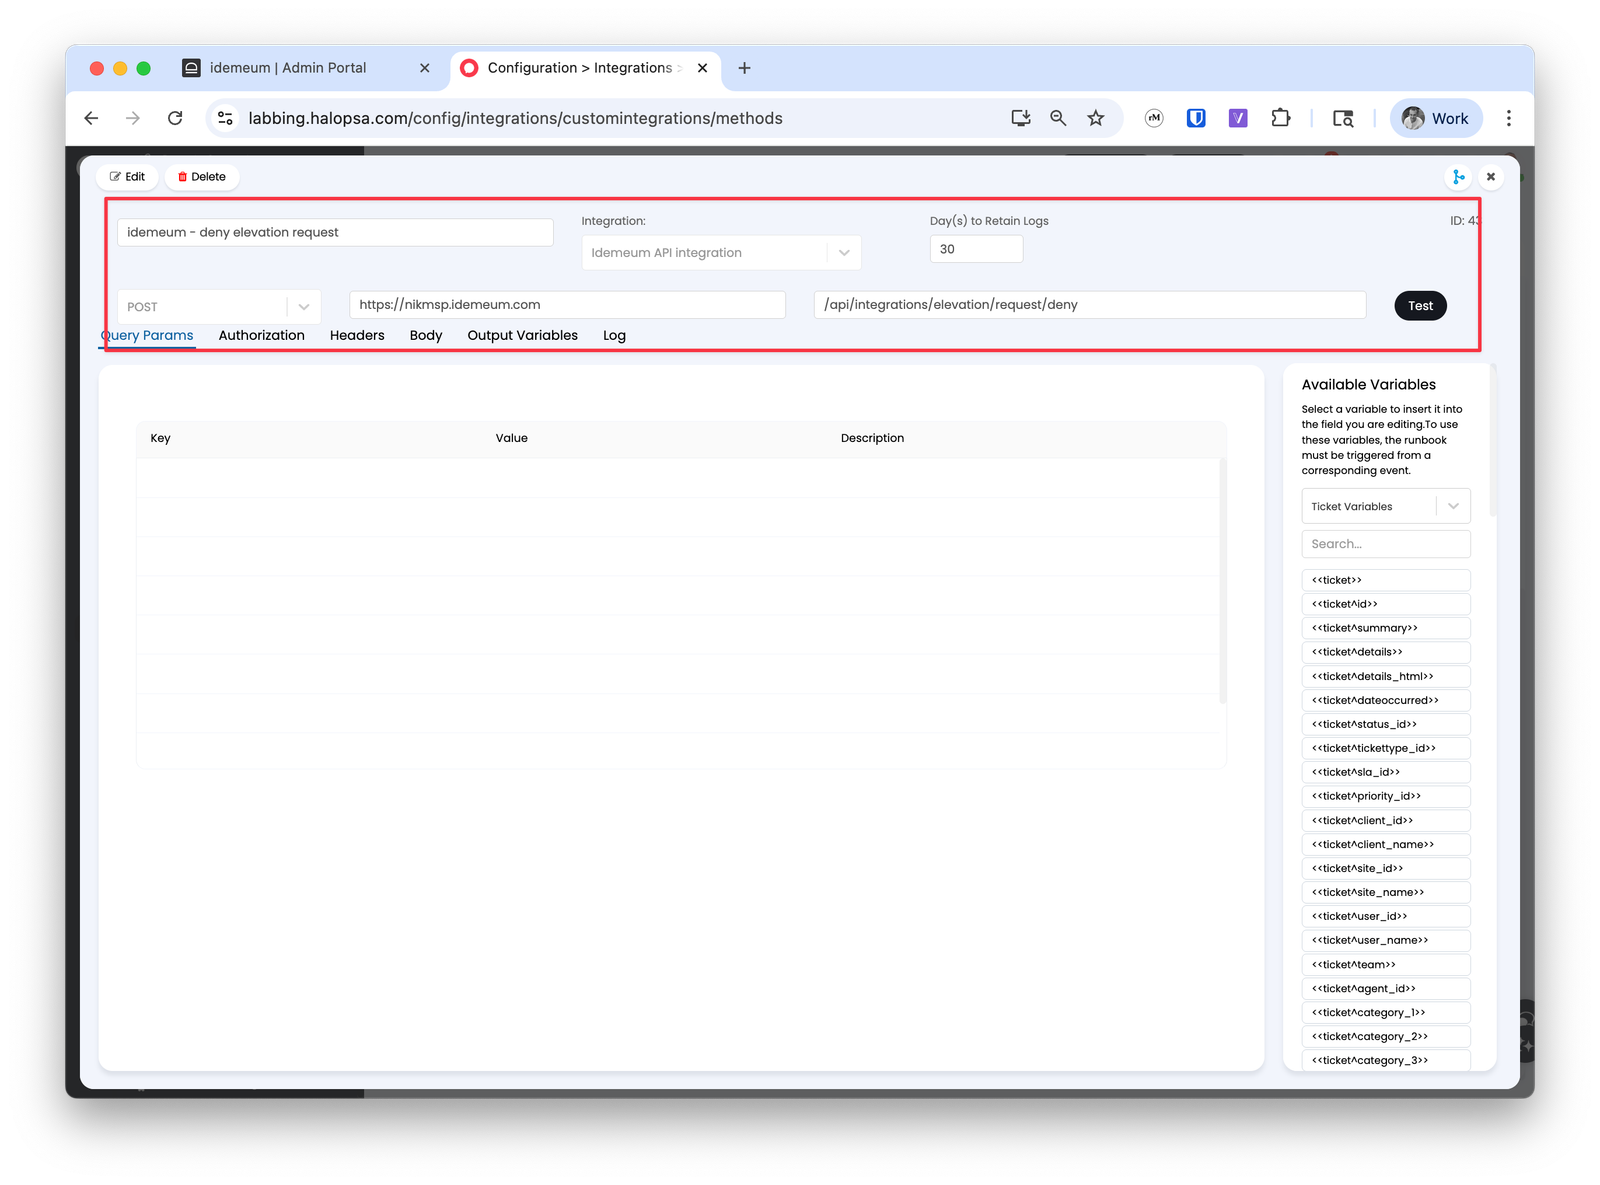
* Click `New` to create second method
* Provide the method name `idemeum - deny elevation request`
* For integration dropdown choose `Idemeum API integration`
* For method choose `POST`
* For method URL add `/api/integrations/elevation/request/deny`
* Save the `approve` method
* Now we will create the `deny` method
* Click `New` to create second method
* Provide the method name `idemeum - deny elevation request`
* For integration dropdown choose `Idemeum API integration`
* For method choose `POST`
* For method URL add `/api/integrations/elevation/request/deny`
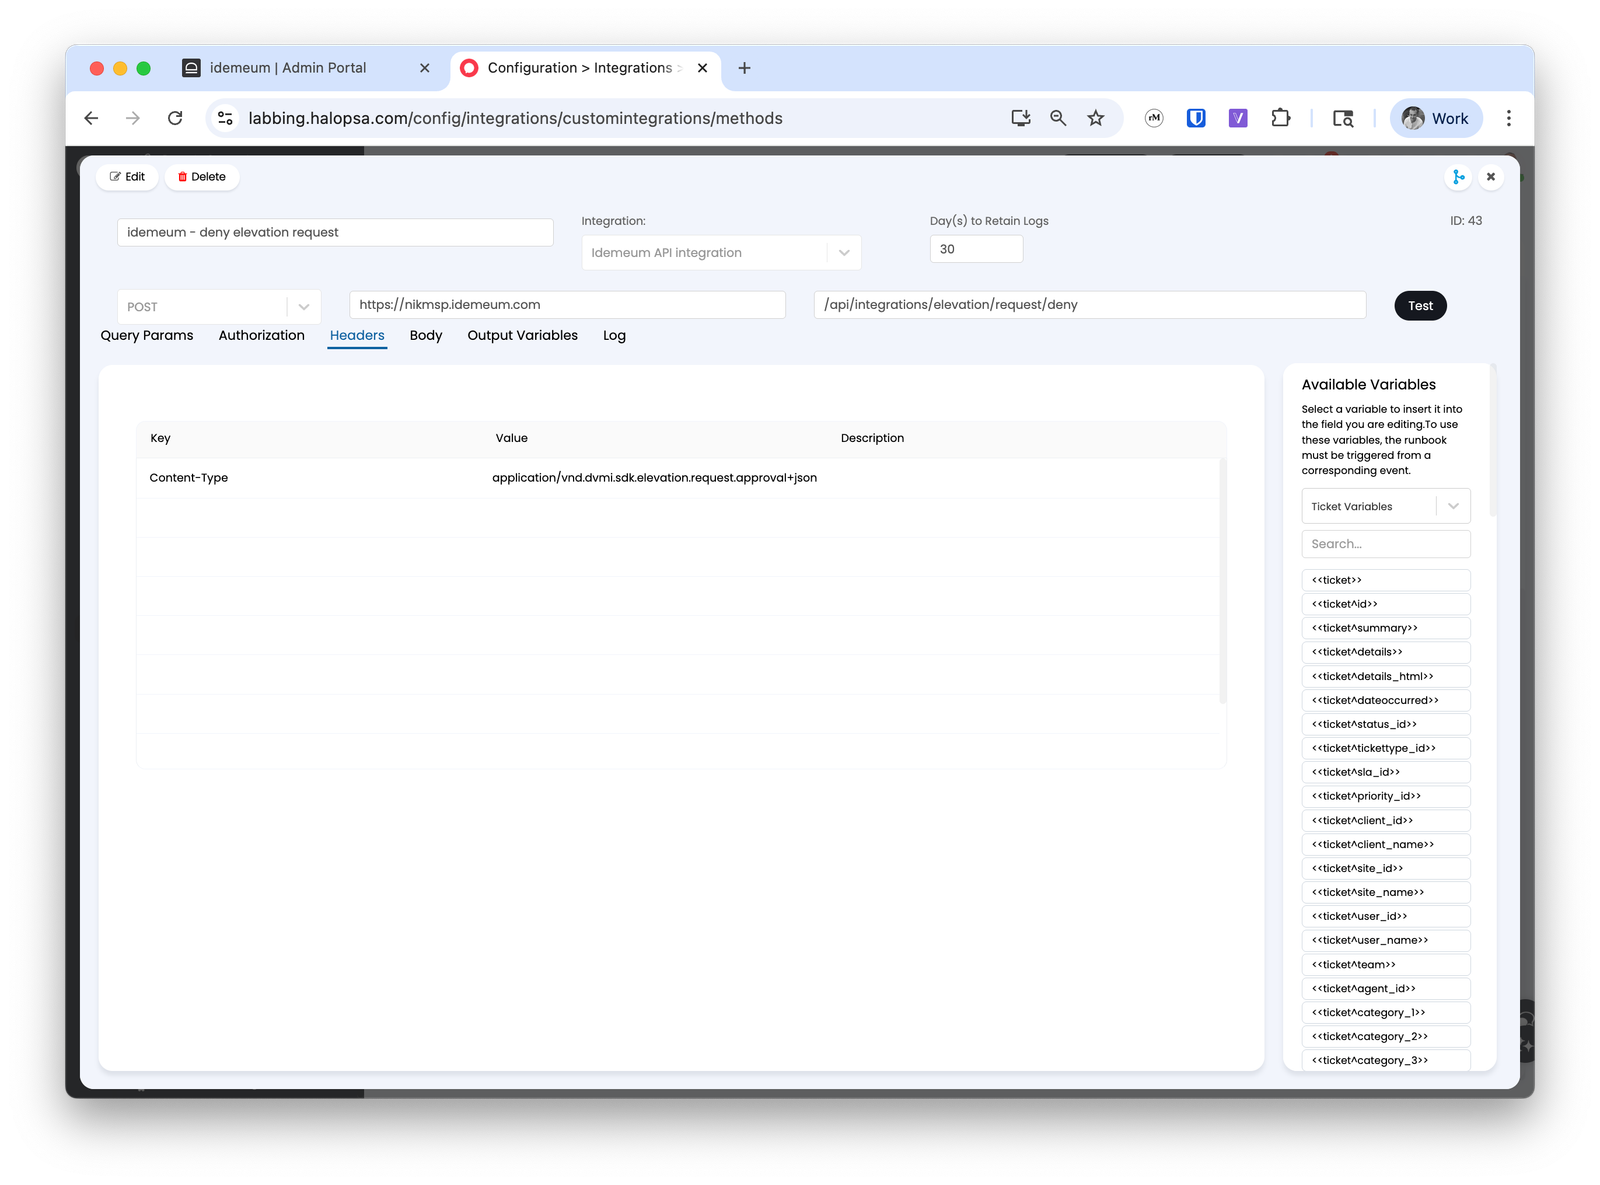
 * For `Authorization` choose `Inherit from integration settings`
* Add the following to `Headers`
* Key `Content-Type`
* Value `application/vnd.dvmi.sdk.elevation.request.approval+json`
* For `Authorization` choose `Inherit from integration settings`
* Add the following to `Headers`
* Key `Content-Type`
* Value `application/vnd.dvmi.sdk.elevation.request.approval+json`
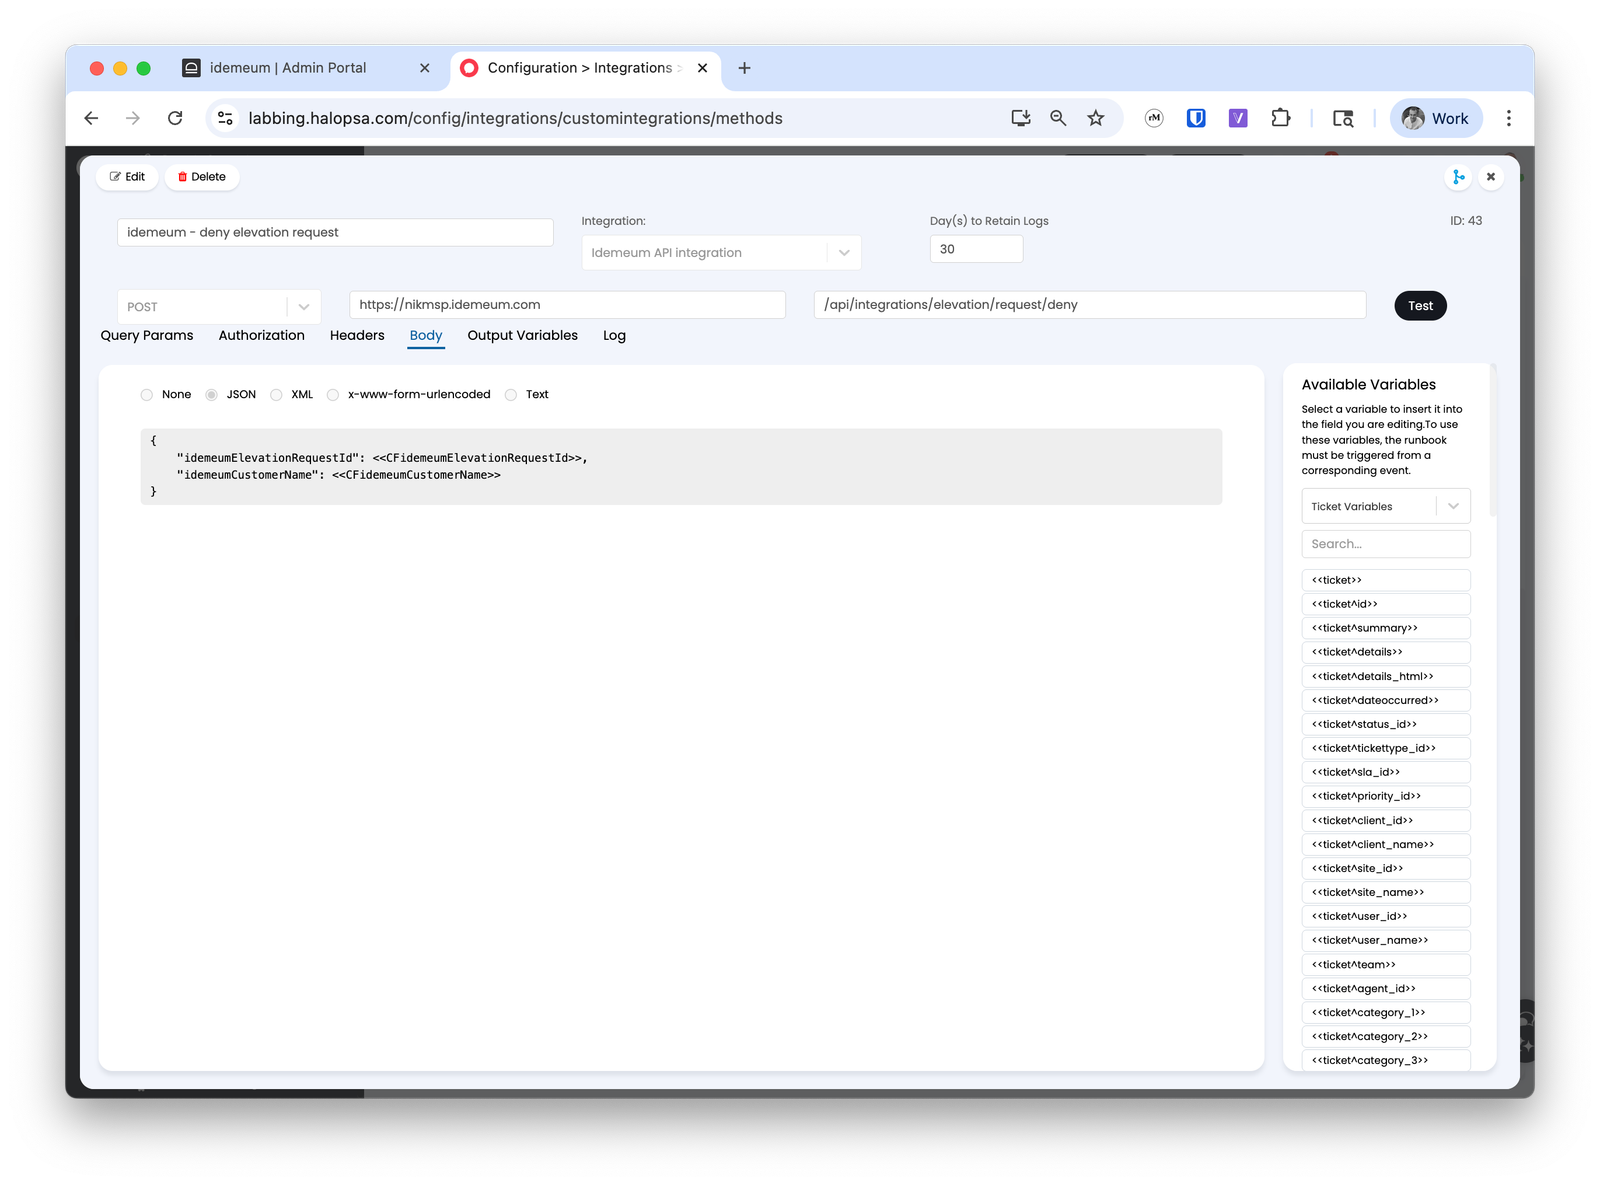
 * Add the following to JSON `Body`. Here we will use the custom variables that we created before.
```json theme={null}
{
"idemeumElevationRequestId": <>,
"idemeumCustomerName": <>
}
```
* Add the following to JSON `Body`. Here we will use the custom variables that we created before.
```json theme={null}
{
"idemeumElevationRequestId": <>,
"idemeumCustomerName": <>
}
```
 * Save the `deny` method
### **Create ticket actions in HaloPSA**
Now we will create two custom ticket actions that will call these `approve` and `deny` methods.
* Navigate to `Configuration` → `Tickets` → `Actions`
* Create `New` to create the first method
* Provide the name `Idemeum - approve elevation request`
* Choose the sequence you desire
* Assign the icon, color and button name
* Action type is `Generic action`
* Save the `deny` method
### **Create ticket actions in HaloPSA**
Now we will create two custom ticket actions that will call these `approve` and `deny` methods.
* Navigate to `Configuration` → `Tickets` → `Actions`
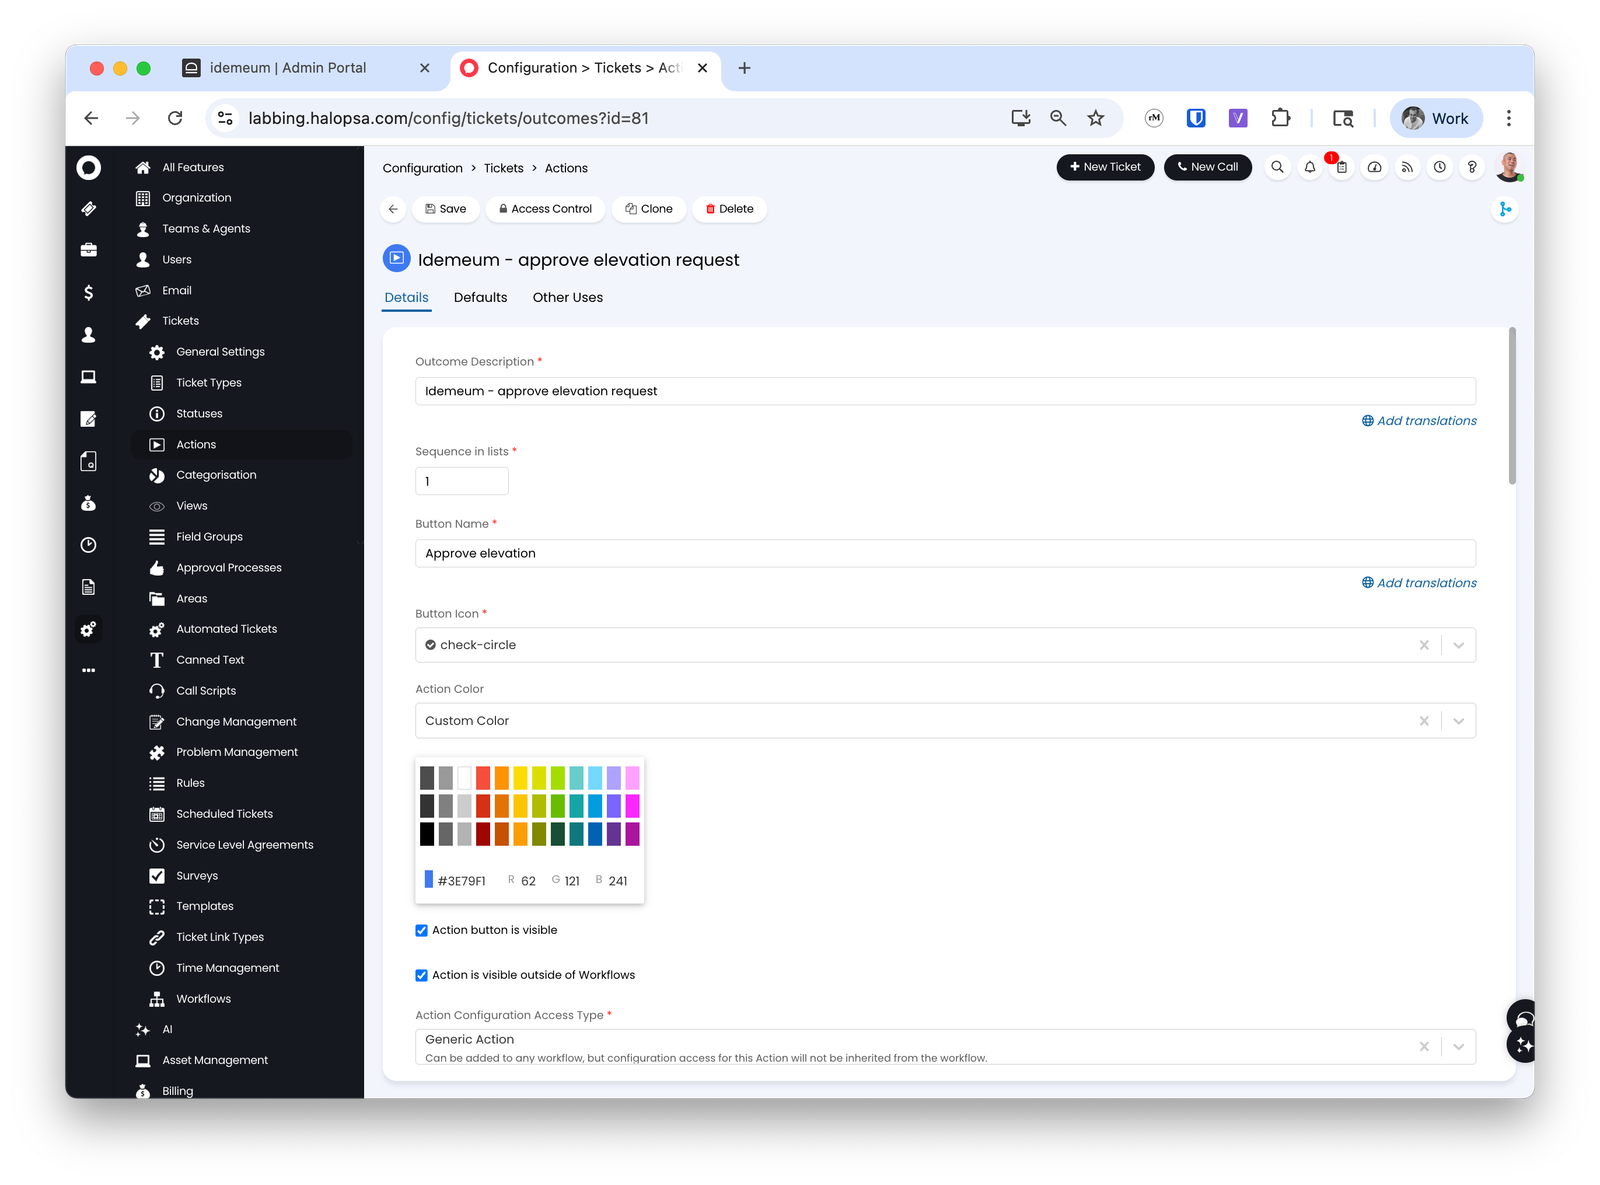
* Create `New` to create the first method
* Provide the name `Idemeum - approve elevation request`
* Choose the sequence you desire
* Assign the icon, color and button name
* Action type is `Generic action`
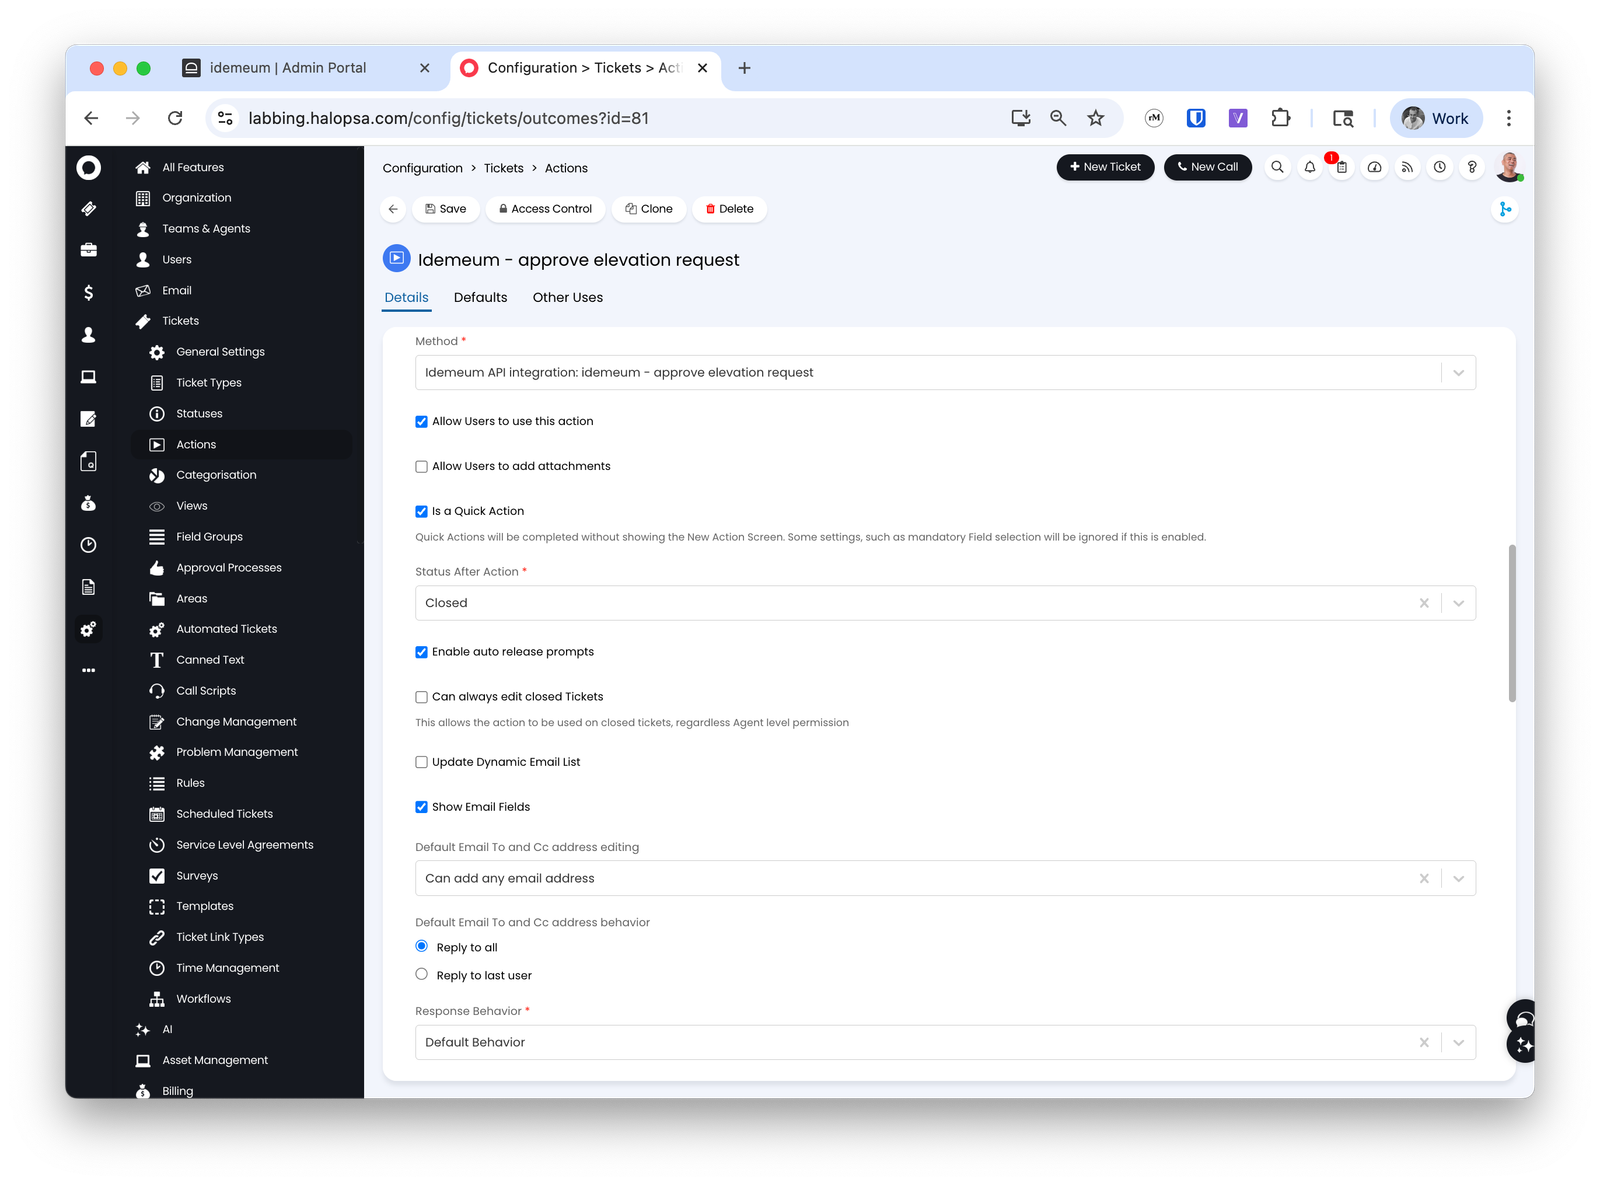
 * For `System use` choose `Execute an Integration Method`
* For method choose the idemeum `approve` method that we created
* Check `Allow users to use this action`
* Choose `Is a quick action`
* Choose the status to `Closed` after the action is executed
* For `System use` choose `Execute an Integration Method`
* For method choose the idemeum `approve` method that we created
* Check `Allow users to use this action`
* Choose `Is a quick action`
* Choose the status to `Closed` after the action is executed
 * Save the configuration
* Now we will create the second `Deny` action.
* Provide the name `Idemeum - deny elevation request`
* Choose the sequence you desire
* Assign the icon, color and button name
* Action type is `Generic action`
* Save the configuration
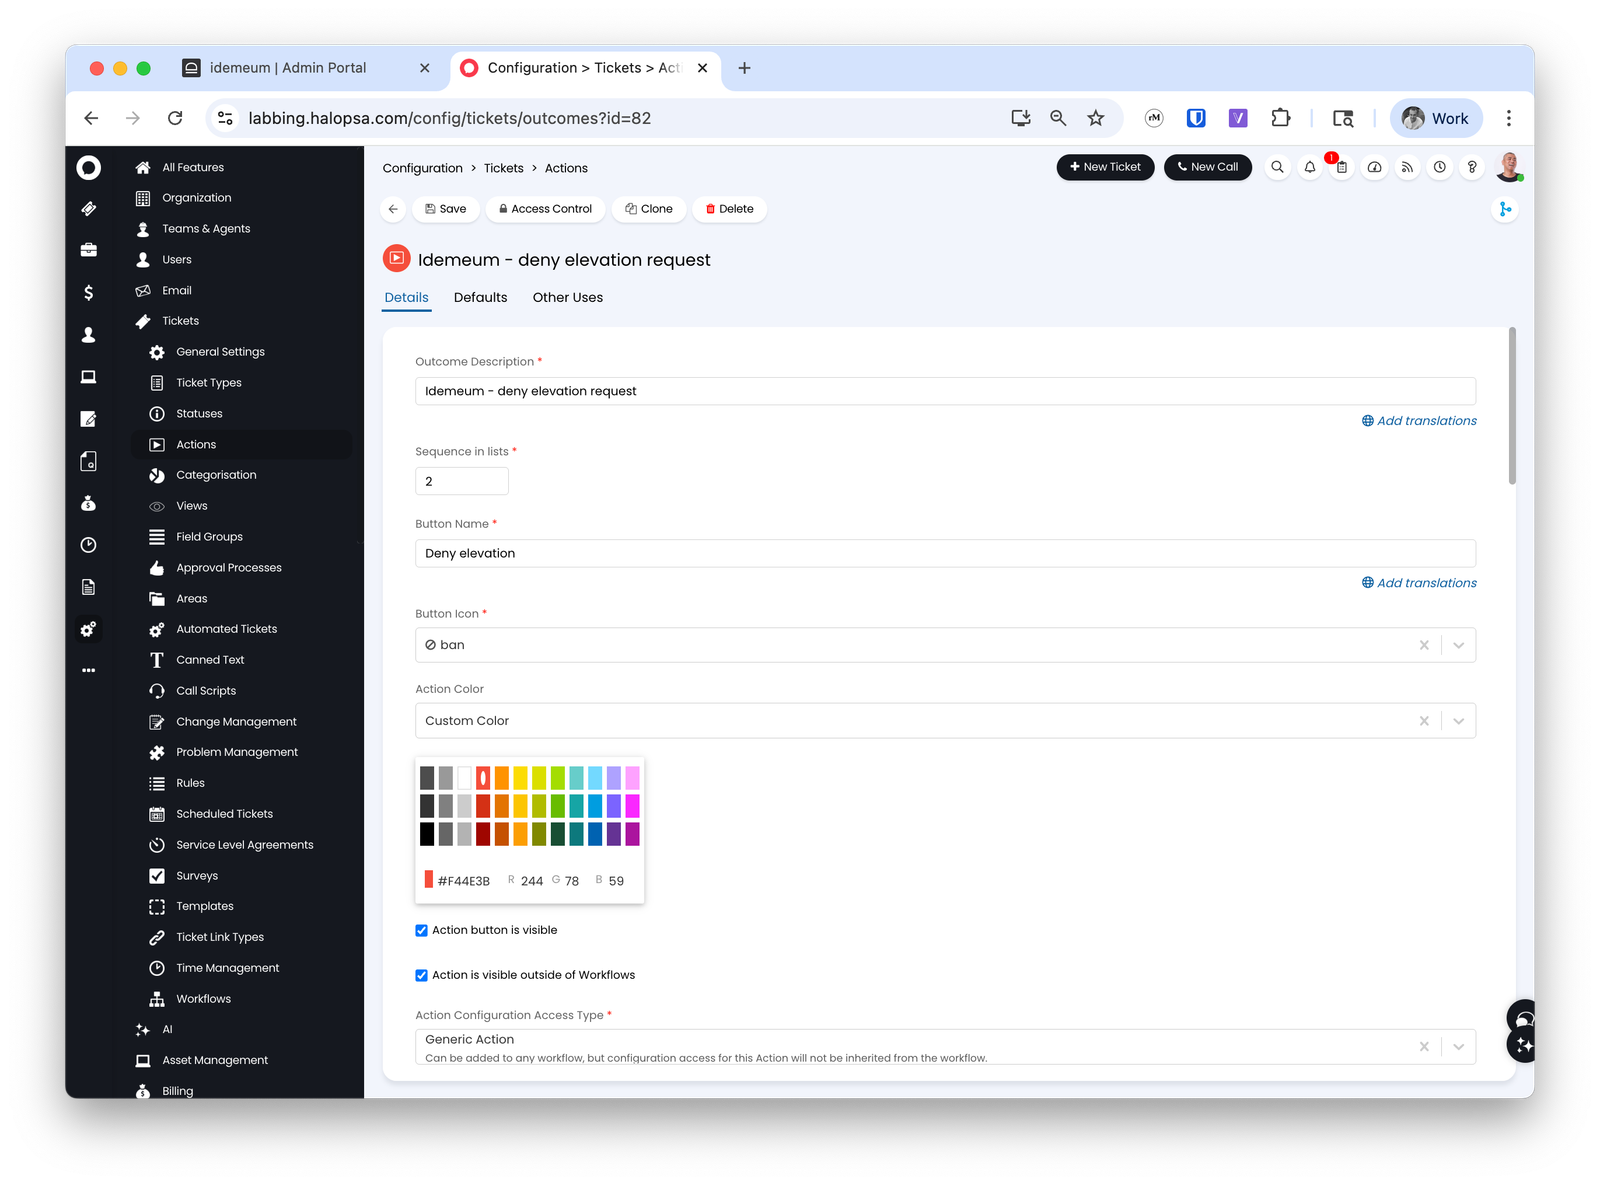
* Now we will create the second `Deny` action.
* Provide the name `Idemeum - deny elevation request`
* Choose the sequence you desire
* Assign the icon, color and button name
* Action type is `Generic action`
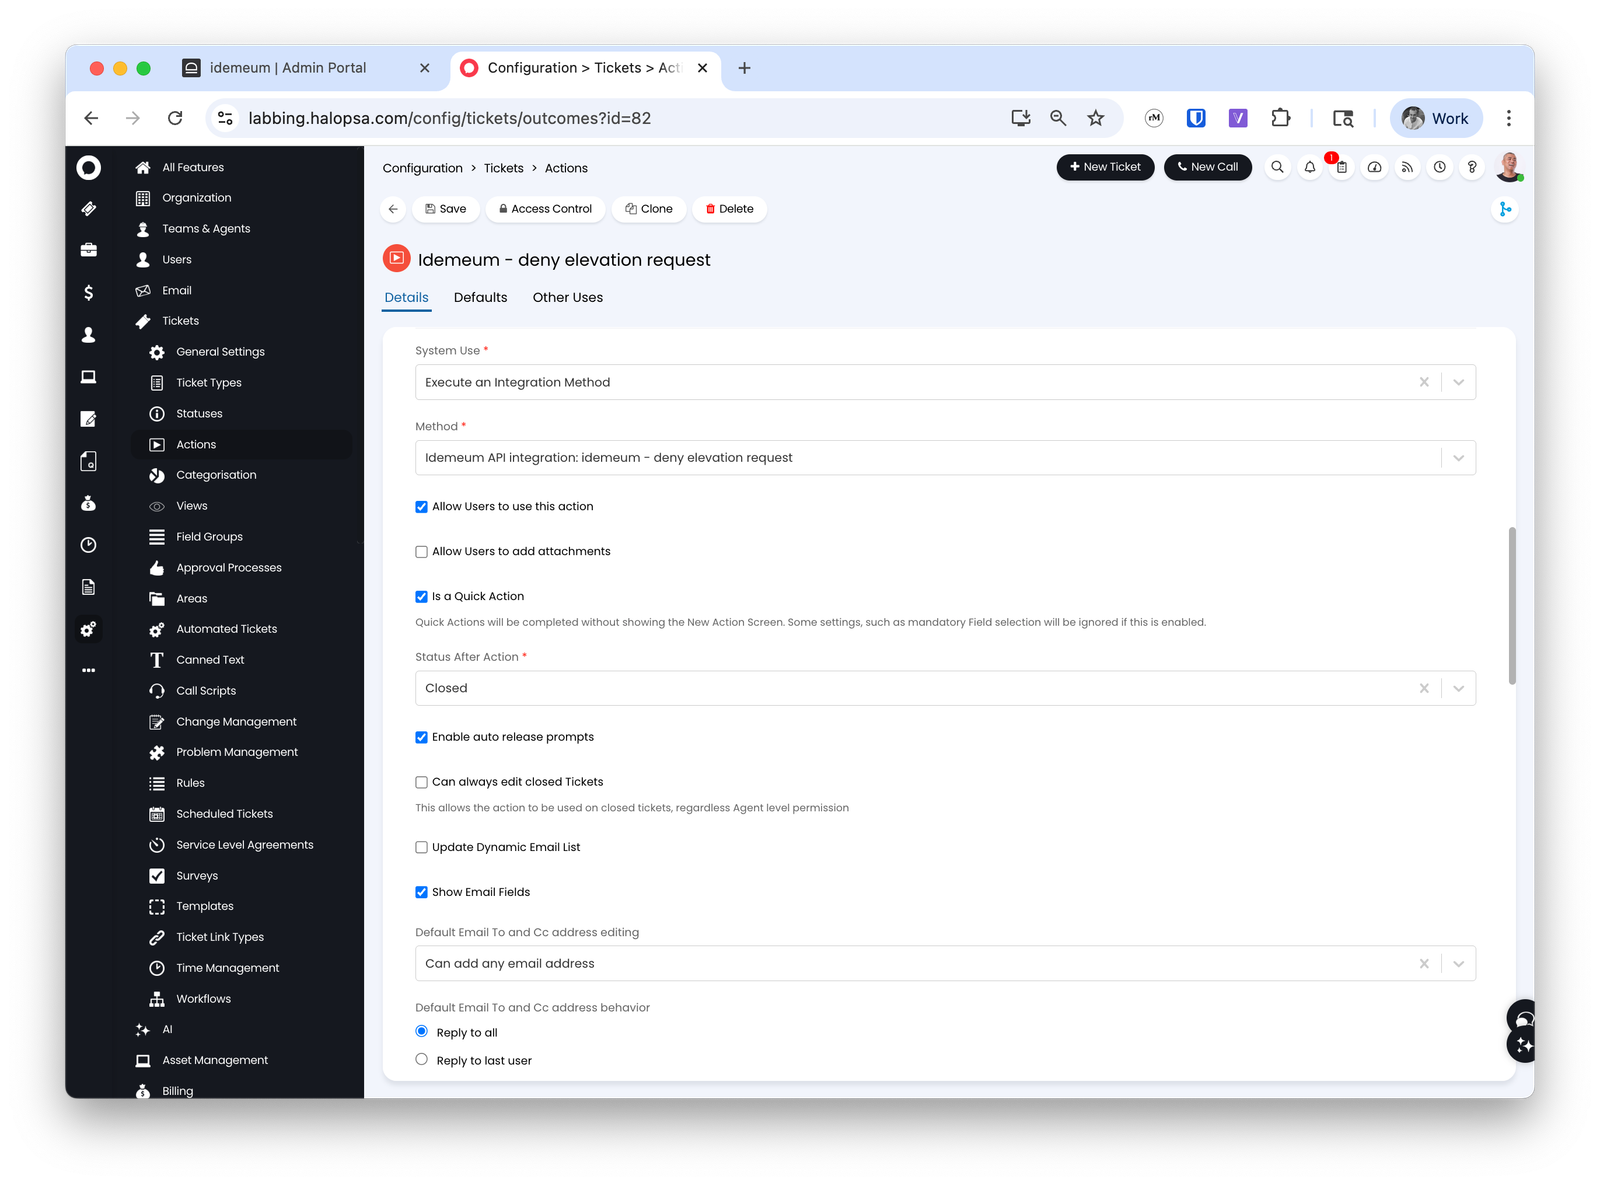
 * For `System use` choose `Execute an Integration Method`
* For method choose the idemeum `approve` method that we created
* Check `Allow users to use this action`
* Choose `Is a quick action`
* Choose the status to `Closed` after the action is executed
* For `System use` choose `Execute an Integration Method`
* For method choose the idemeum `approve` method that we created
* Check `Allow users to use this action`
* Choose `Is a quick action`
* Choose the status to `Closed` after the action is executed
 * Save the configuration
### **Assign these methods to your workflow**
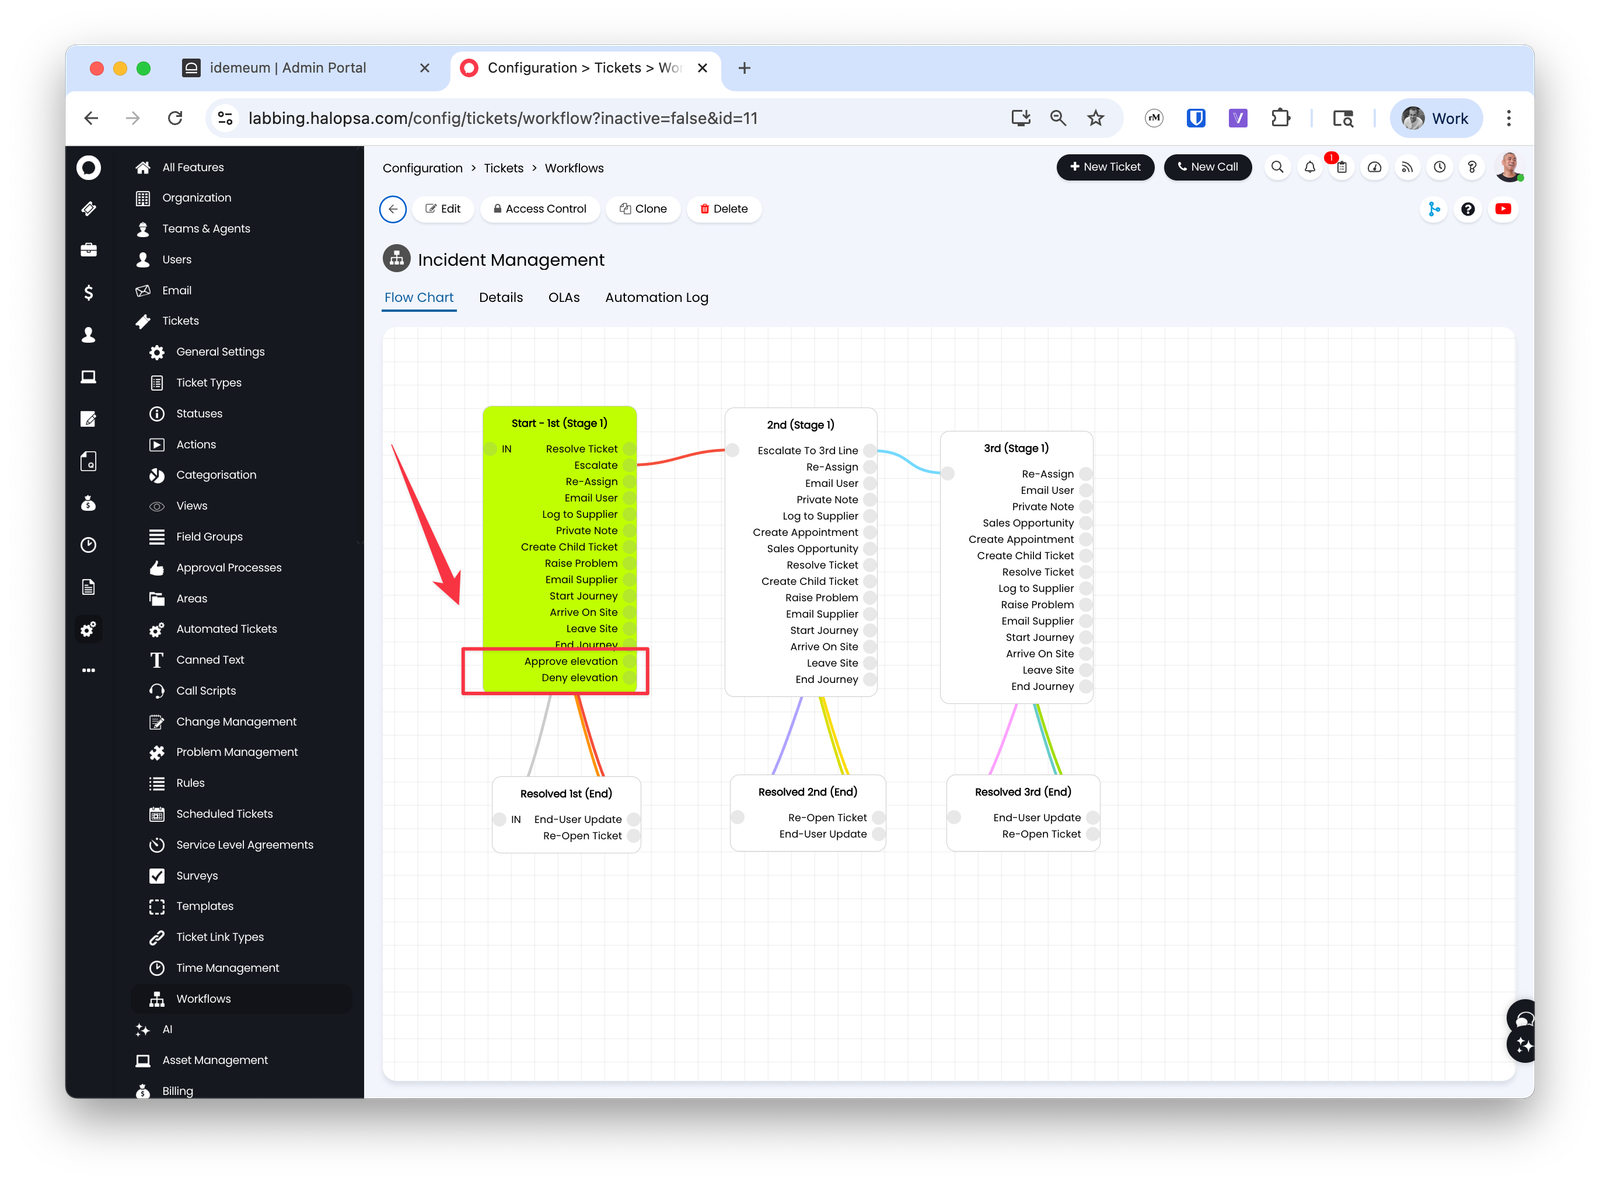
This will depend on your HaloPSA configuration and what workflow you are using. We are using a standard incident workflow for our demo.
* Access `Configuration` → `Tickets` → `Workflows`
* Choose the workflow where you will enable these actions
* Edit the workflow and make sure methods are assigned to it
* Save the configuration
### **Assign these methods to your workflow**
This will depend on your HaloPSA configuration and what workflow you are using. We are using a standard incident workflow for our demo.
* Access `Configuration` → `Tickets` → `Workflows`
* Choose the workflow where you will enable these actions
* Edit the workflow and make sure methods are assigned to it
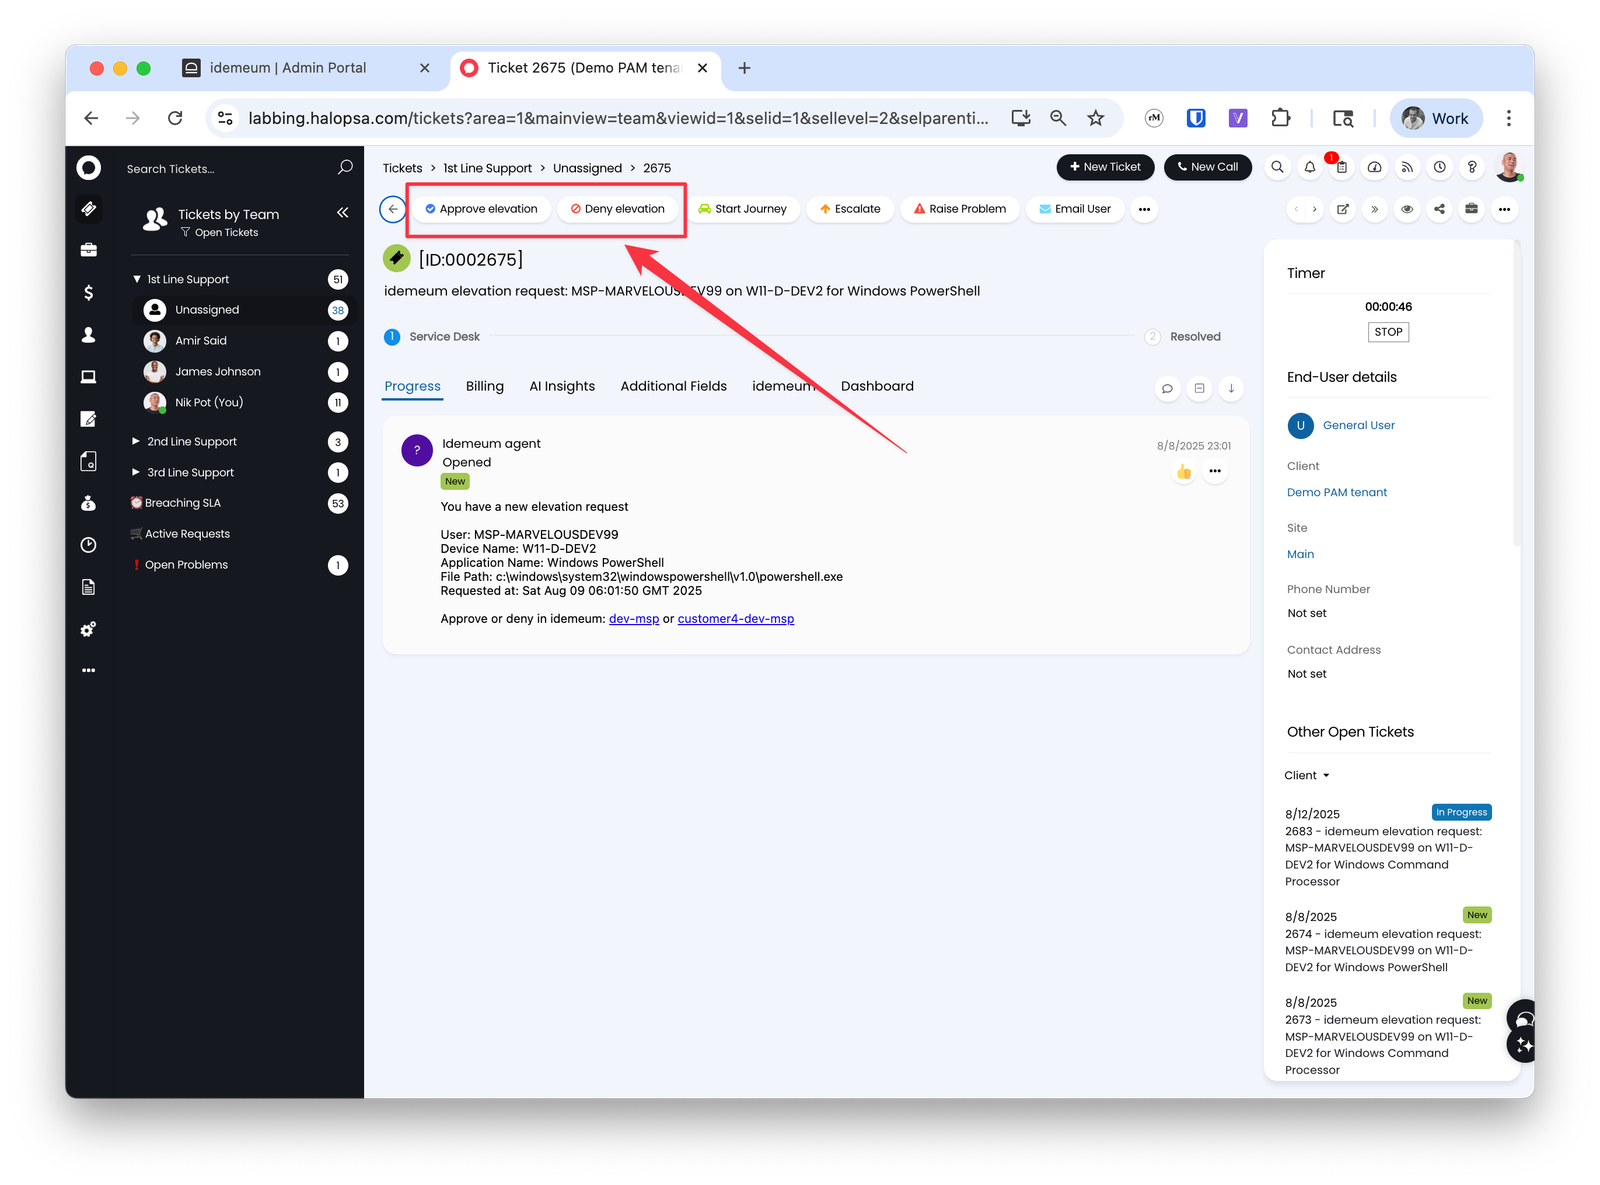
 Now these methods will start showing up on your elevation request tickets and you can approve / deny requests with a single button click.
 ## **Request JIT accounts from tickets**
MSP technicians can request Entra ID JIT accounts right from HaloPSA tickets. HaloPSA and idemeum integration leverages embedded [**iFrame**](https://en.wikipedia.org/wiki/HTML_element?ref=docs.idemeum.com#Frames) sections.
By default idemeum security does not allow cross-domain requests. Therefore, to enable this integration, request idemeum team to allow embedded iFrames for your idemeum tenant.
Request Entra JIT accounts right from your Halo PSA tickets.
### **Configure session length**
This step is optional, but will improve technician experience when accessing just-in-time accounts. By default the idemeum session length is set to `8 hours`, meaning you have to re-authenticate with mobile every 8 hours. You can extend this session to `30 days` so that you can seamlessly access JIT accounts for any customer tenant right from HaloPSA and you will stay authenticated for 30 days.
* Navigate to your MSP tenant admin portal
* Access `Settings` → `Global` and then define the `Session expiration` duration
### **Configure HaloPSA**
In HaloPSA you can create a `Custom tab` that will point to your idemeum tenant. When managing PSA ticket you can click on that tab and get immediate access to your idemeum portal.
You have 2 options for navigation:
* **Navigate to parent MSP idemeum tenant** - you can simply specify the URL for your MSP tenant, i.e. `.idemeum.com`. In this case technicians will access custom tab, MSP idemeum tenant will be loaded, then technician will search for customer tenant, access it, and will request JIT account.
* **Navigate directly to idemeum customer tenant** - you can leverage HaloPSA variables to navigate directly to customer idemeum tenant.
To support the second option you need to set up variables.
* Say we have an idemeum tenant with the display name `Demo PAM tenant` and the URL `demo-nikpot.idemeum.com`.
* We can route based on `Demo PAM tenant` with the following URL `https://.idemeum.com?customerDisplayName=`
* Or we can router based on `demo` URL with the following `https://.idemeum.com?customerName=`
* In this guide we will use display name
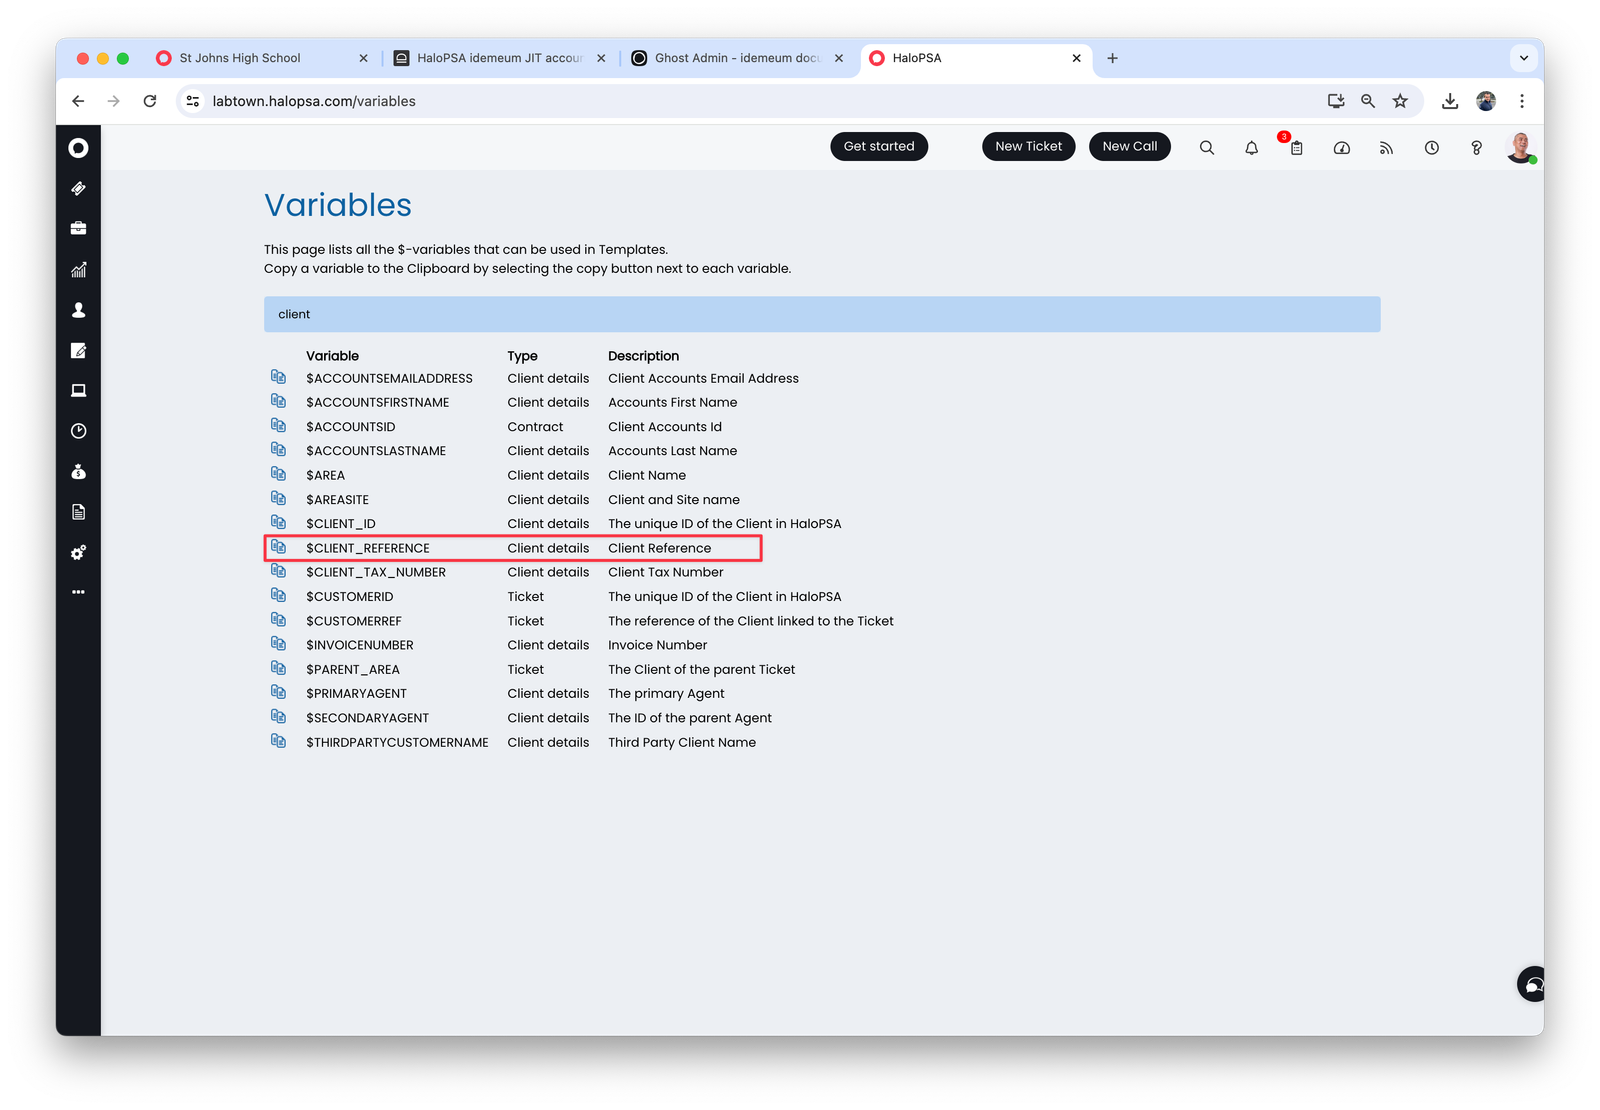
* In HaloPSA we will use default variable `Client reference` and assign the value `Demo PAM tenant` to this variable
## **Request JIT accounts from tickets**
MSP technicians can request Entra ID JIT accounts right from HaloPSA tickets. HaloPSA and idemeum integration leverages embedded [**iFrame**](https://en.wikipedia.org/wiki/HTML_element?ref=docs.idemeum.com#Frames) sections.
By default idemeum security does not allow cross-domain requests. Therefore, to enable this integration, request idemeum team to allow embedded iFrames for your idemeum tenant.
Request Entra JIT accounts right from your Halo PSA tickets.
### **Configure session length**
This step is optional, but will improve technician experience when accessing just-in-time accounts. By default the idemeum session length is set to `8 hours`, meaning you have to re-authenticate with mobile every 8 hours. You can extend this session to `30 days` so that you can seamlessly access JIT accounts for any customer tenant right from HaloPSA and you will stay authenticated for 30 days.
* Navigate to your MSP tenant admin portal
* Access `Settings` → `Global` and then define the `Session expiration` duration
### **Configure HaloPSA**
In HaloPSA you can create a `Custom tab` that will point to your idemeum tenant. When managing PSA ticket you can click on that tab and get immediate access to your idemeum portal.
You have 2 options for navigation:
* **Navigate to parent MSP idemeum tenant** - you can simply specify the URL for your MSP tenant, i.e. `.idemeum.com`. In this case technicians will access custom tab, MSP idemeum tenant will be loaded, then technician will search for customer tenant, access it, and will request JIT account.
* **Navigate directly to idemeum customer tenant** - you can leverage HaloPSA variables to navigate directly to customer idemeum tenant.
To support the second option you need to set up variables.
* Say we have an idemeum tenant with the display name `Demo PAM tenant` and the URL `demo-nikpot.idemeum.com`.
* We can route based on `Demo PAM tenant` with the following URL `https://.idemeum.com?customerDisplayName=`
* Or we can router based on `demo` URL with the following `https://.idemeum.com?customerName=`
* In this guide we will use display name
* In HaloPSA we will use default variable `Client reference` and assign the value `Demo PAM tenant` to this variable
 * We populate this variable with `Demo PAM tenant` value in the customer section by simply editing a customer in HaloPSA
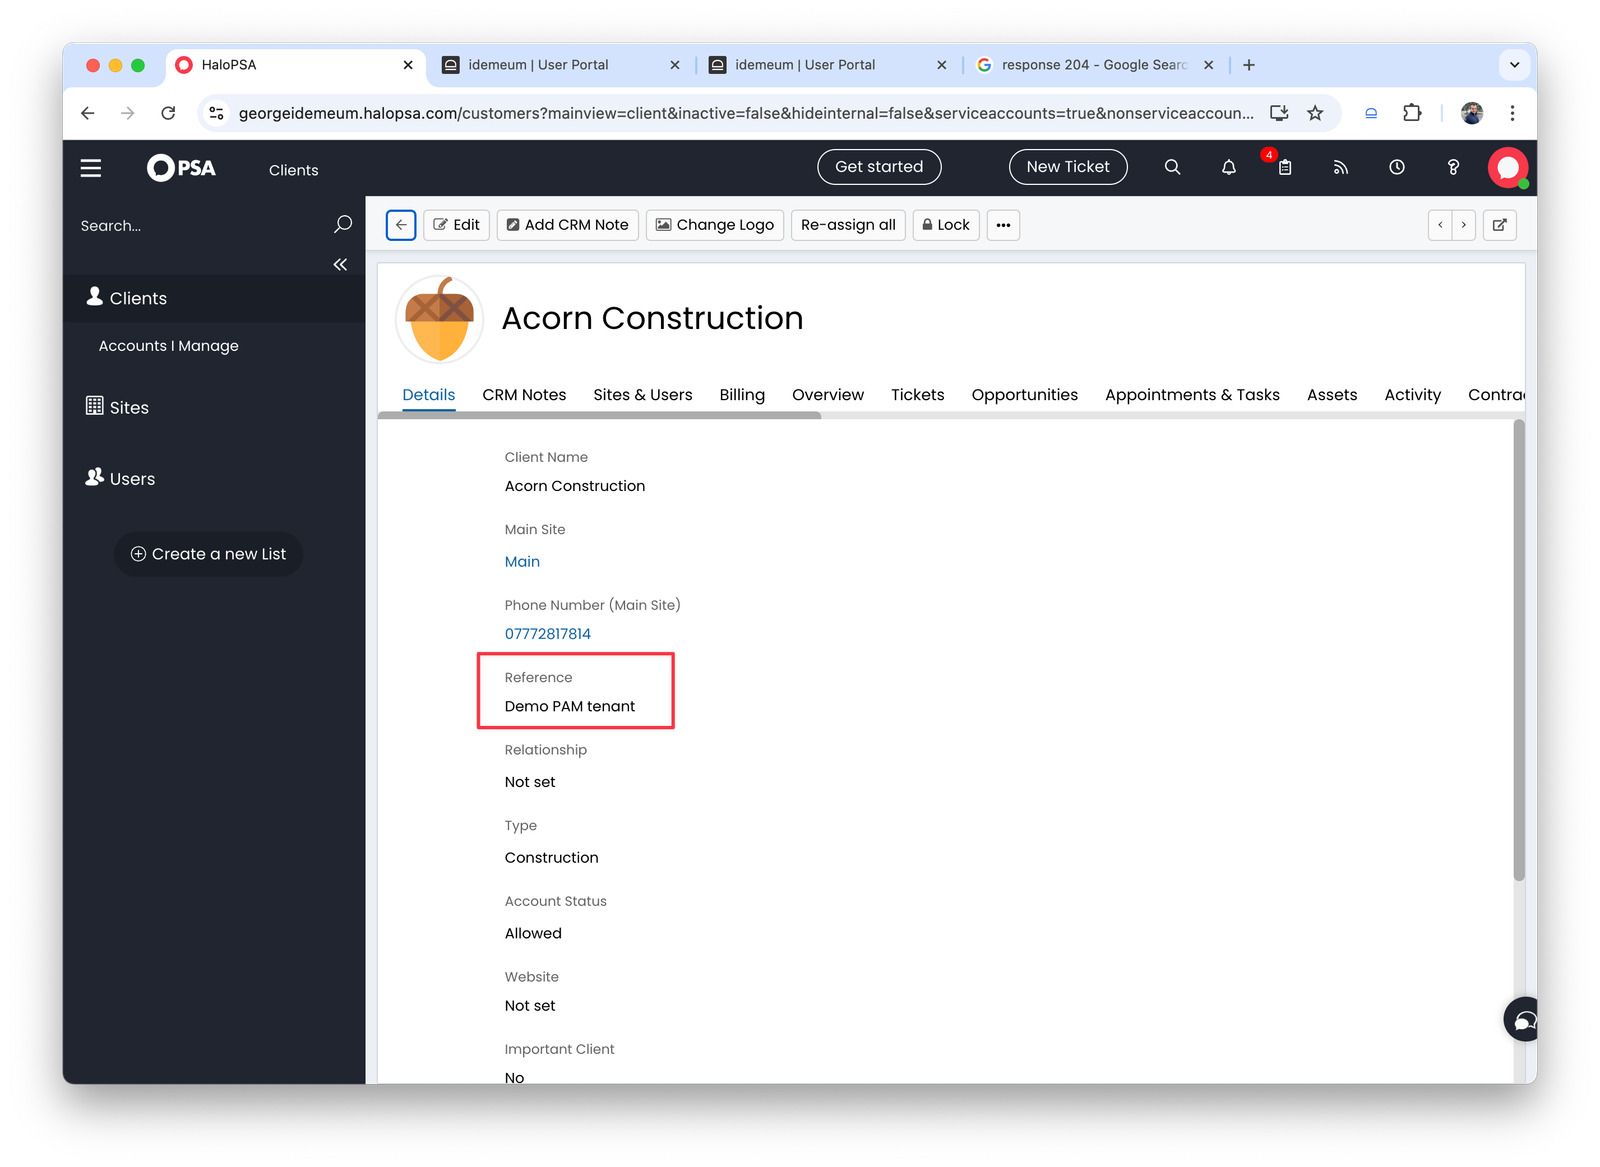 * We can tag all our customers in the same way in HaloPSA so they are mapped to a customer tenant in idemeum with the display name that is used.
Now we will set up a custom tab.
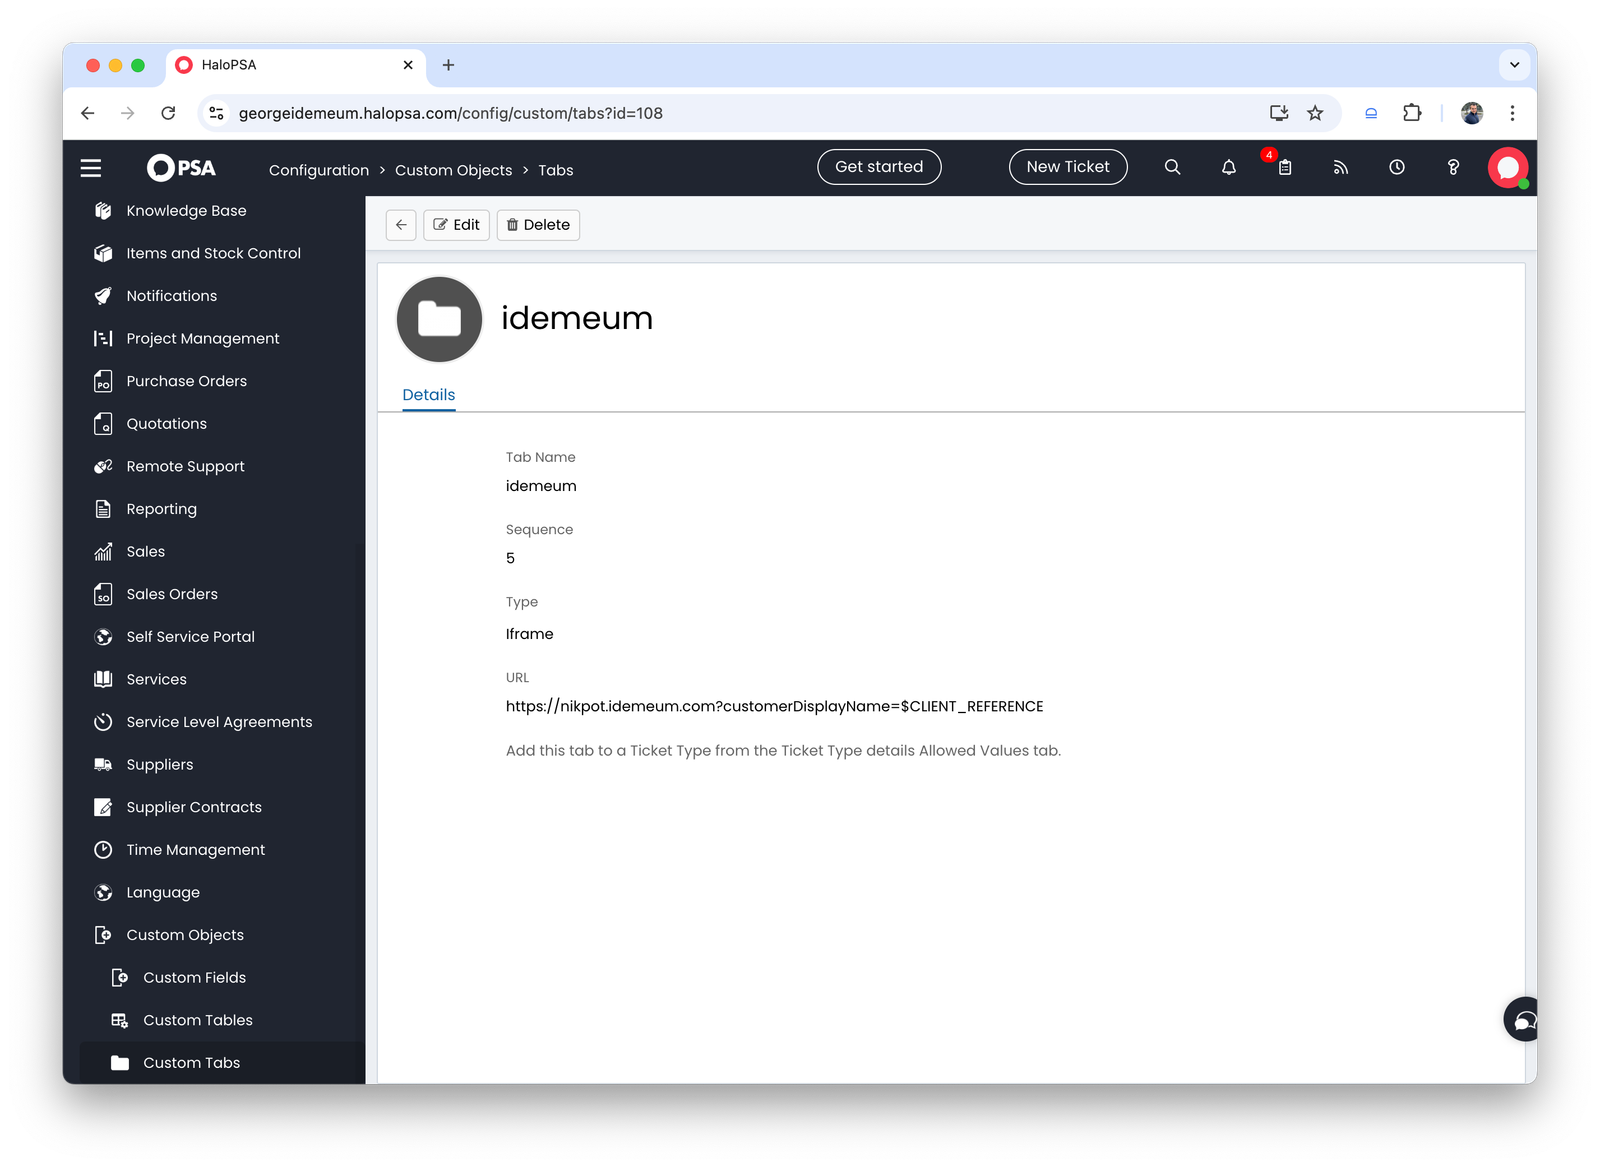
* Navigate to `Configuration` → `Custom objects` → `Custom tabs` in HaloPSA
* Create a custom tab like in the image below. As you can see for URL we are using the URL of MSP idemeum tenant, and we are passing a parameter from the variable `$CLIENT_REFERENCE`. You can specify the variable that you have chosen for integration.
* We can tag all our customers in the same way in HaloPSA so they are mapped to a customer tenant in idemeum with the display name that is used.
Now we will set up a custom tab.
* Navigate to `Configuration` → `Custom objects` → `Custom tabs` in HaloPSA
* Create a custom tab like in the image below. As you can see for URL we are using the URL of MSP idemeum tenant, and we are passing a parameter from the variable `$CLIENT_REFERENCE`. You can specify the variable that you have chosen for integration.
 ### **Test integration**
* Open any ticket in Halo PSA
* Click on `idemeum` tab
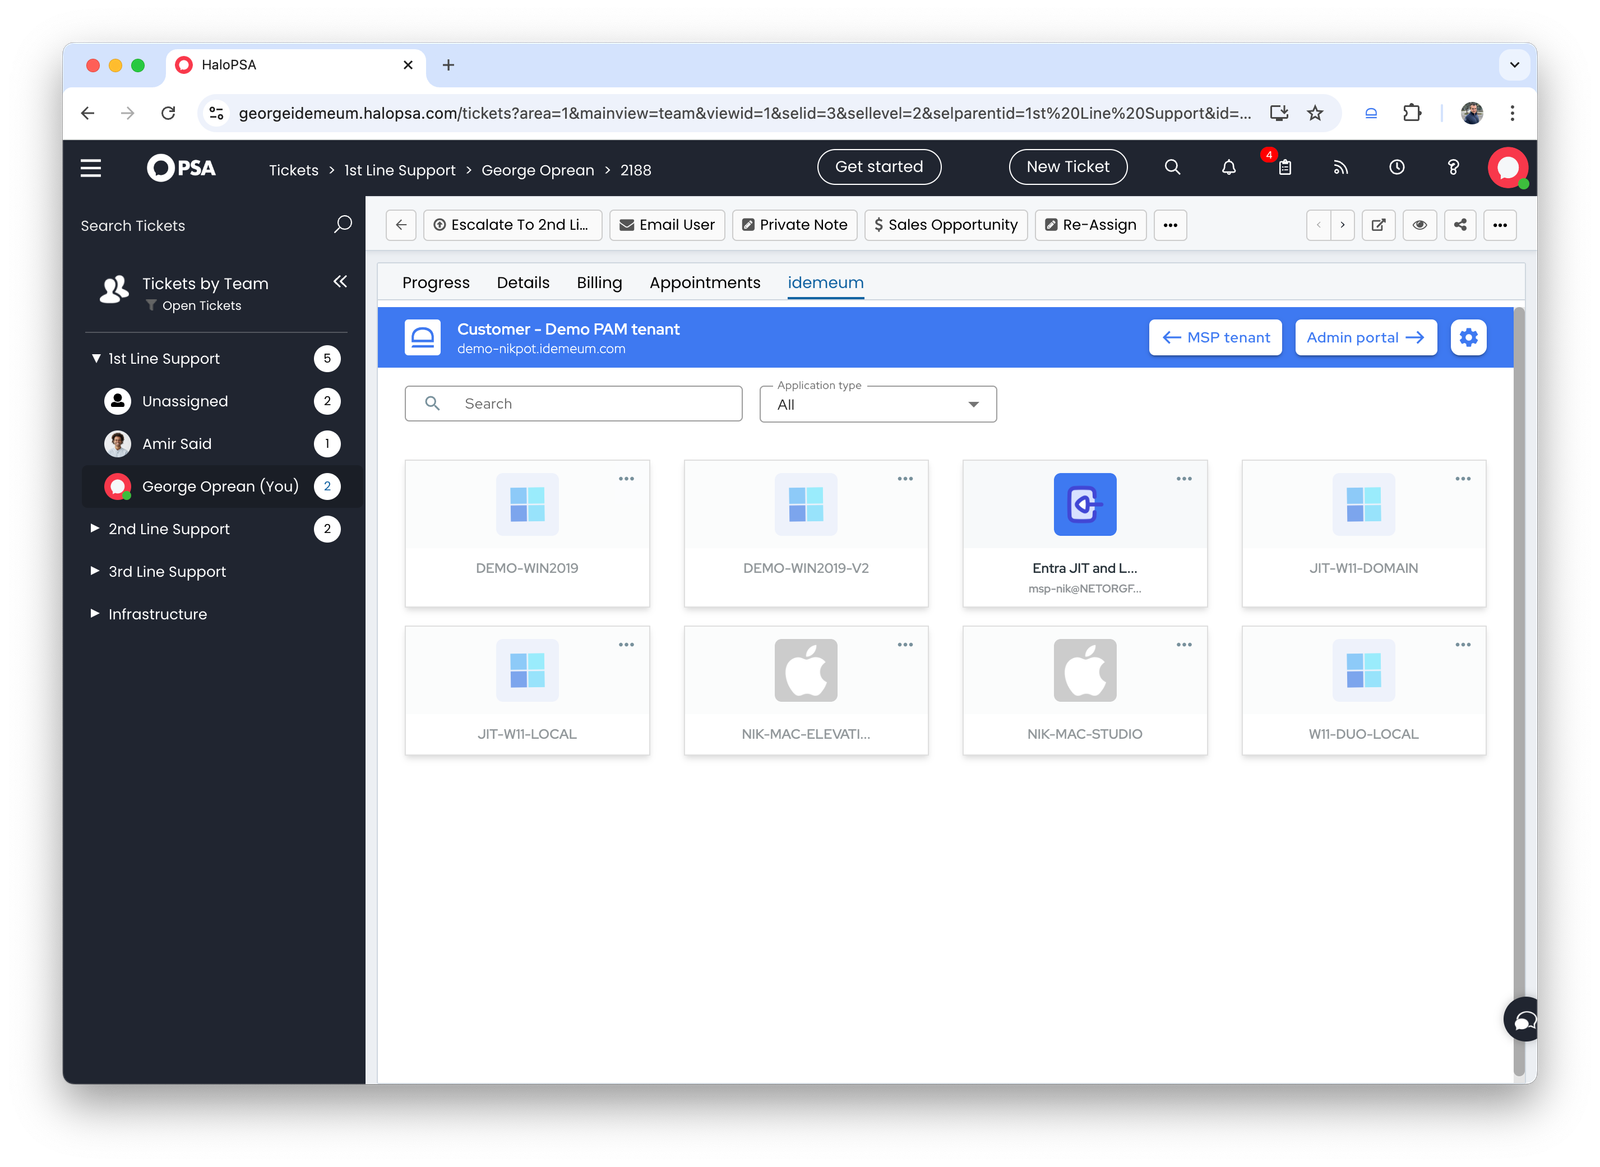
* You will be presented with the idemeum user portal for that customer. You can see all workstation and Entra apps to request JIT accounts and view credentials
### **Test integration**
* Open any ticket in Halo PSA
* Click on `idemeum` tab
* You will be presented with the idemeum user portal for that customer. You can see all workstation and Entra apps to request JIT accounts and view credentials
 ## **Disable JIT accounts from HaloPSA**
### **Overview**
Technicians can request Entra ID JIT accounts right from HaloPSA with our existing iFrame integration.
However, requested JIT accounts will be disabled after a certain period of time, by default it is `4 hours`. If you want to immediately disable these requested JIT accounts, you can leverage idemeum APIs.
### **Obtain API key**
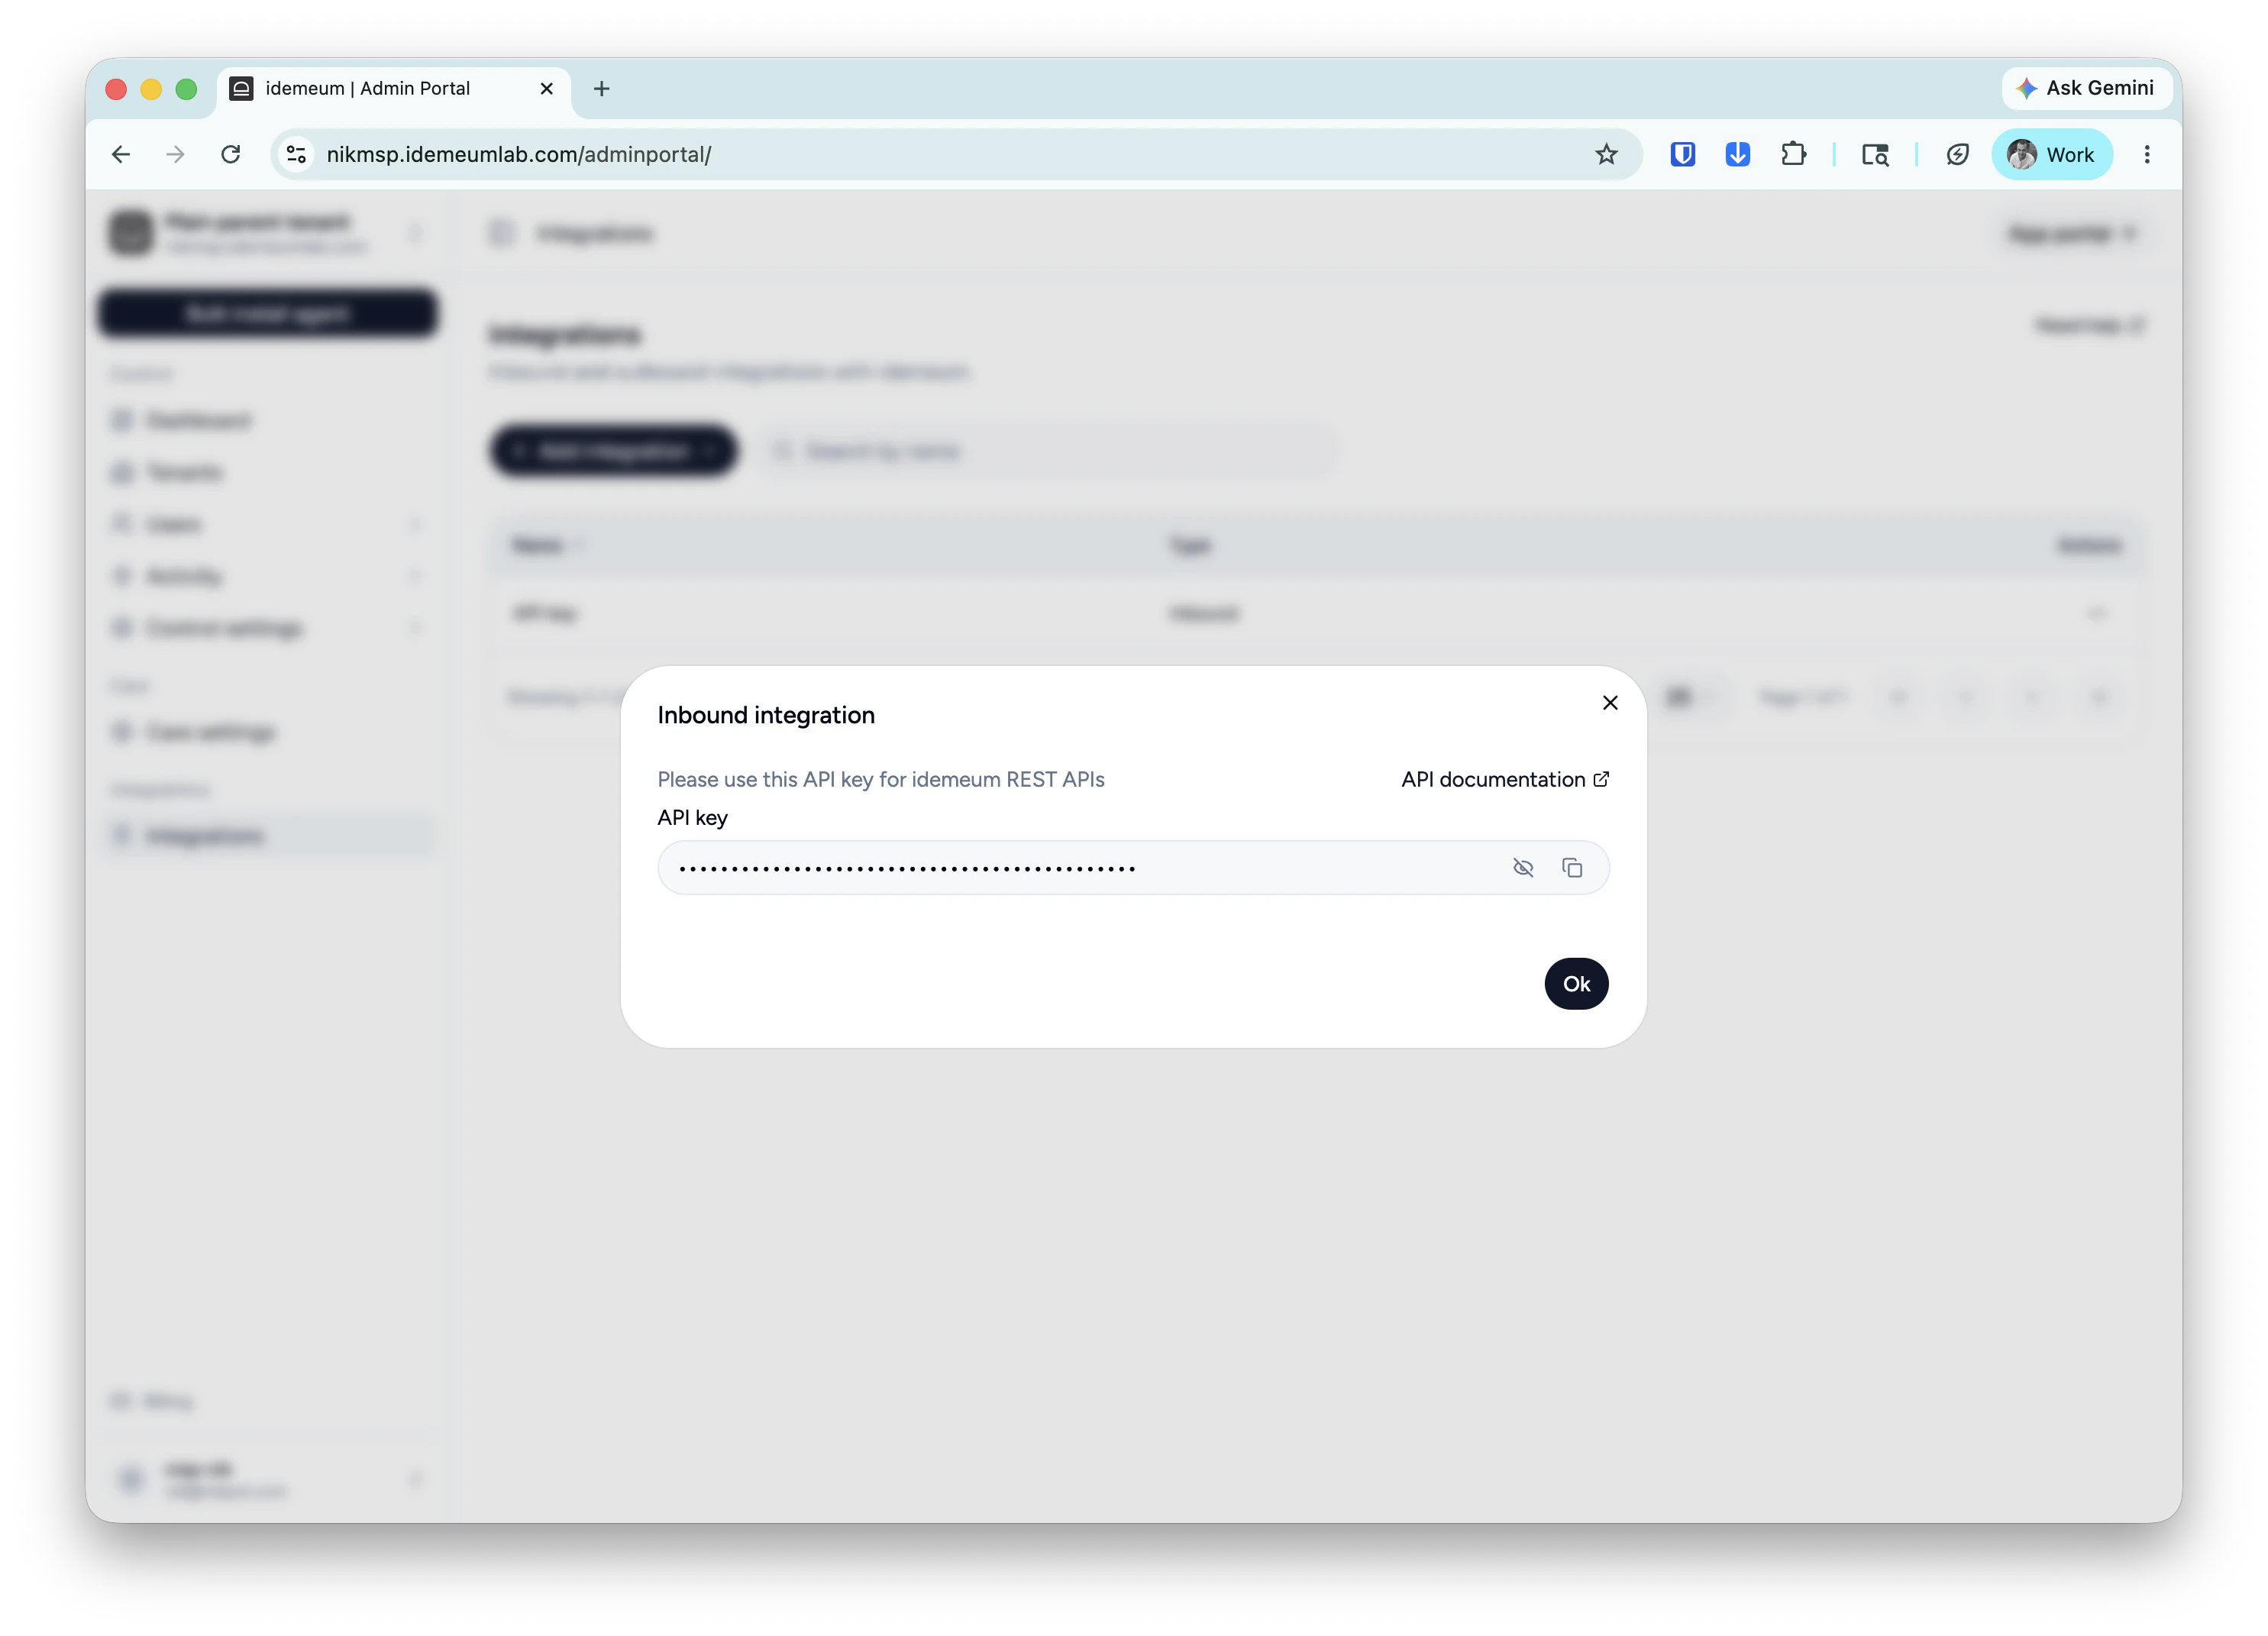
* Access your MSP portal admin dashboard
* Navigate to`Integrations` and make sure the API key is present
* Copy the API key
## **Disable JIT accounts from HaloPSA**
### **Overview**
Technicians can request Entra ID JIT accounts right from HaloPSA with our existing iFrame integration.
However, requested JIT accounts will be disabled after a certain period of time, by default it is `4 hours`. If you want to immediately disable these requested JIT accounts, you can leverage idemeum APIs.
### **Obtain API key**
* Access your MSP portal admin dashboard
* Navigate to`Integrations` and make sure the API key is present
* Copy the API key
 ### **Configure HaloPSA**
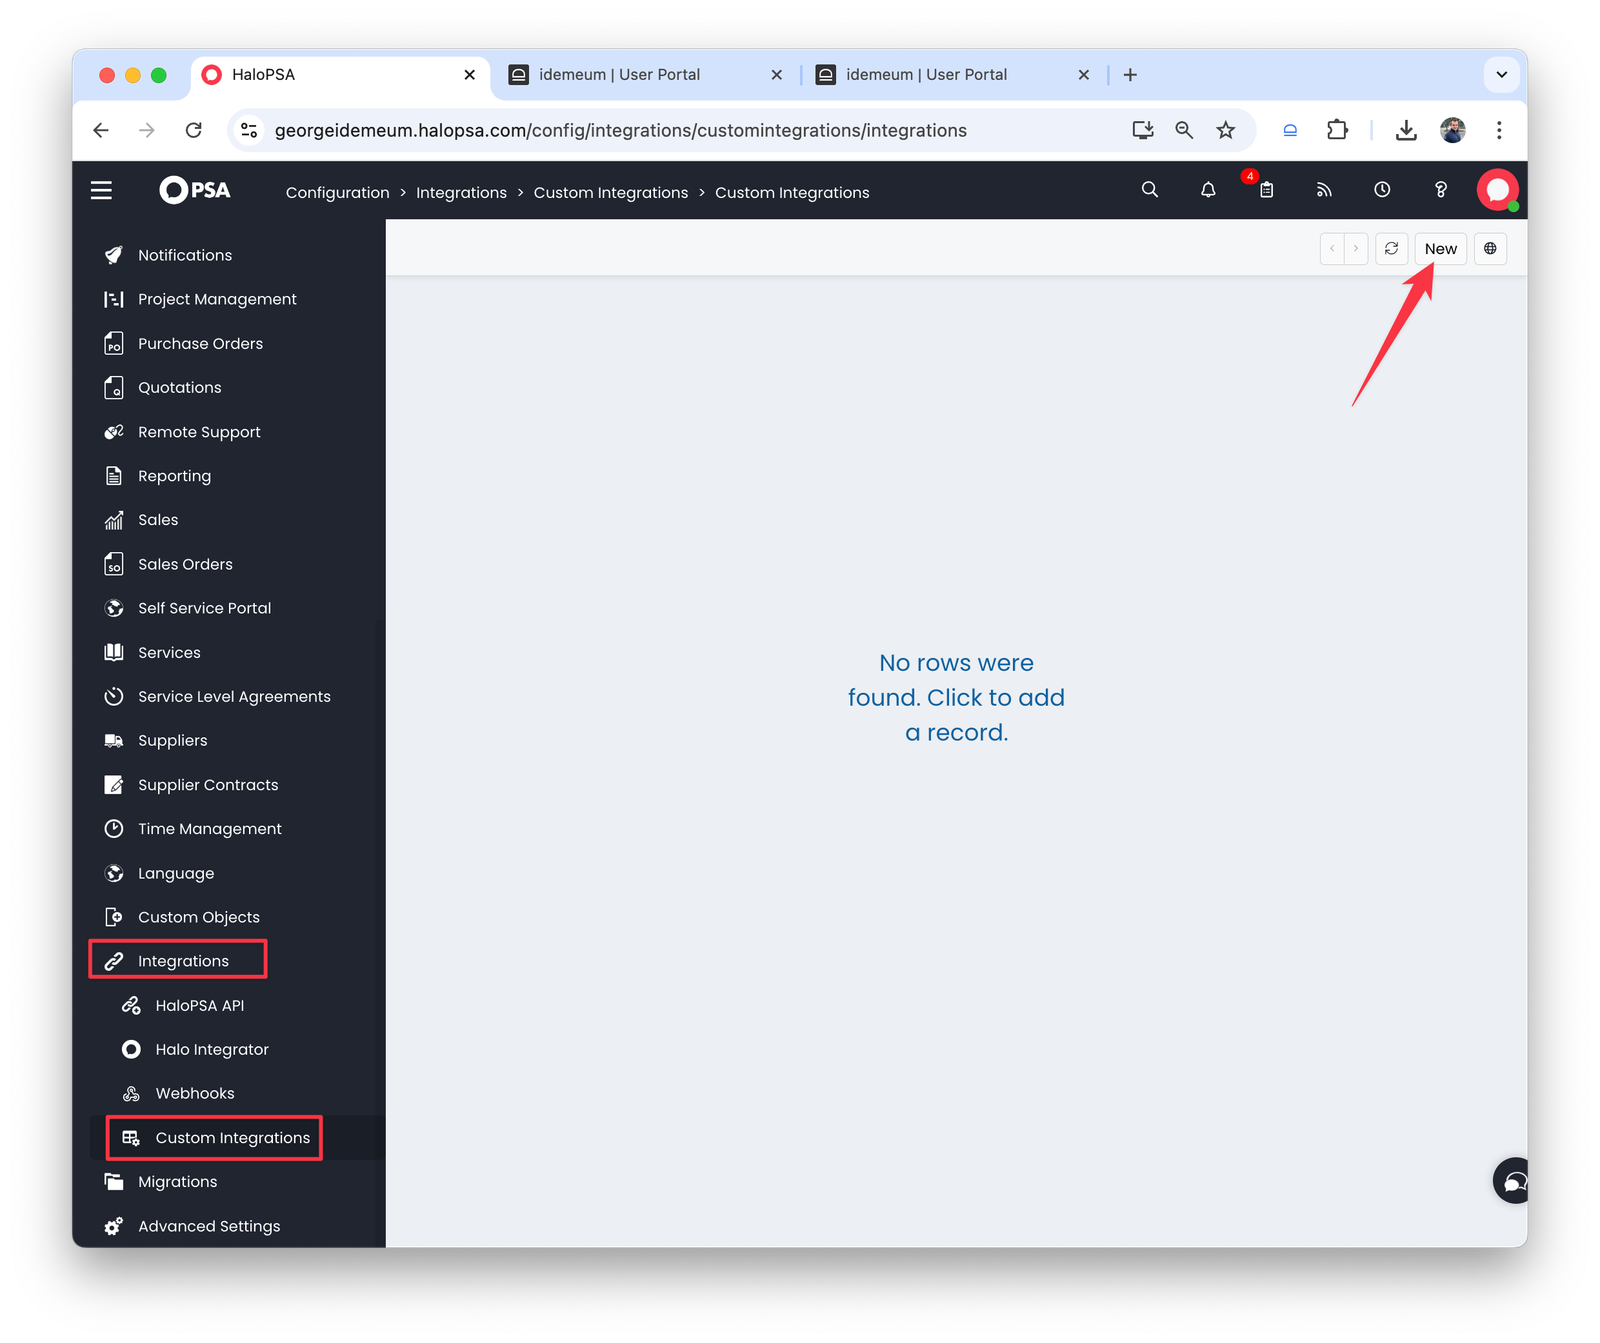
* In HaloPSA navigate to `Configuration` → `Integrations` → `Custom integrations`
* Click `New`
### **Configure HaloPSA**
* In HaloPSA navigate to `Configuration` → `Integrations` → `Custom integrations`
* Click `New`
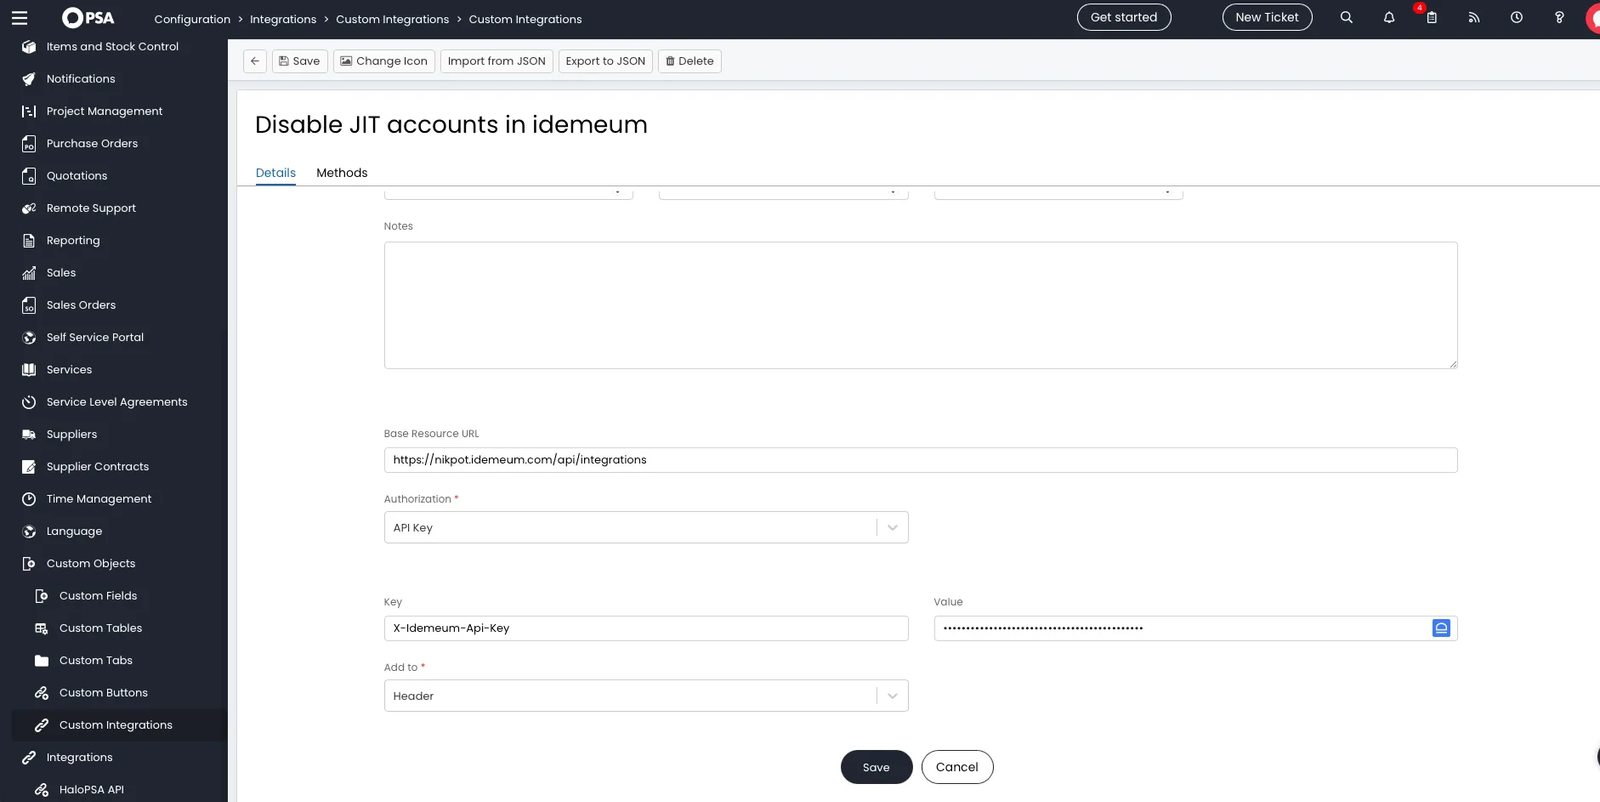
 * Create an integration and provide the following details:
* Base resource: `https://.idemeum.com/api/integrations`
* Authorization: `API key`
* Key: `X-Idemeum-Api-Key`
* Value: ``
* Add to: `Header`
* Create an integration and provide the following details:
* Base resource: `https://.idemeum.com/api/integrations`
* Authorization: `API key`
* Key: `X-Idemeum-Api-Key`
* Value: ``
* Add to: `Header`
 * Save the configuration
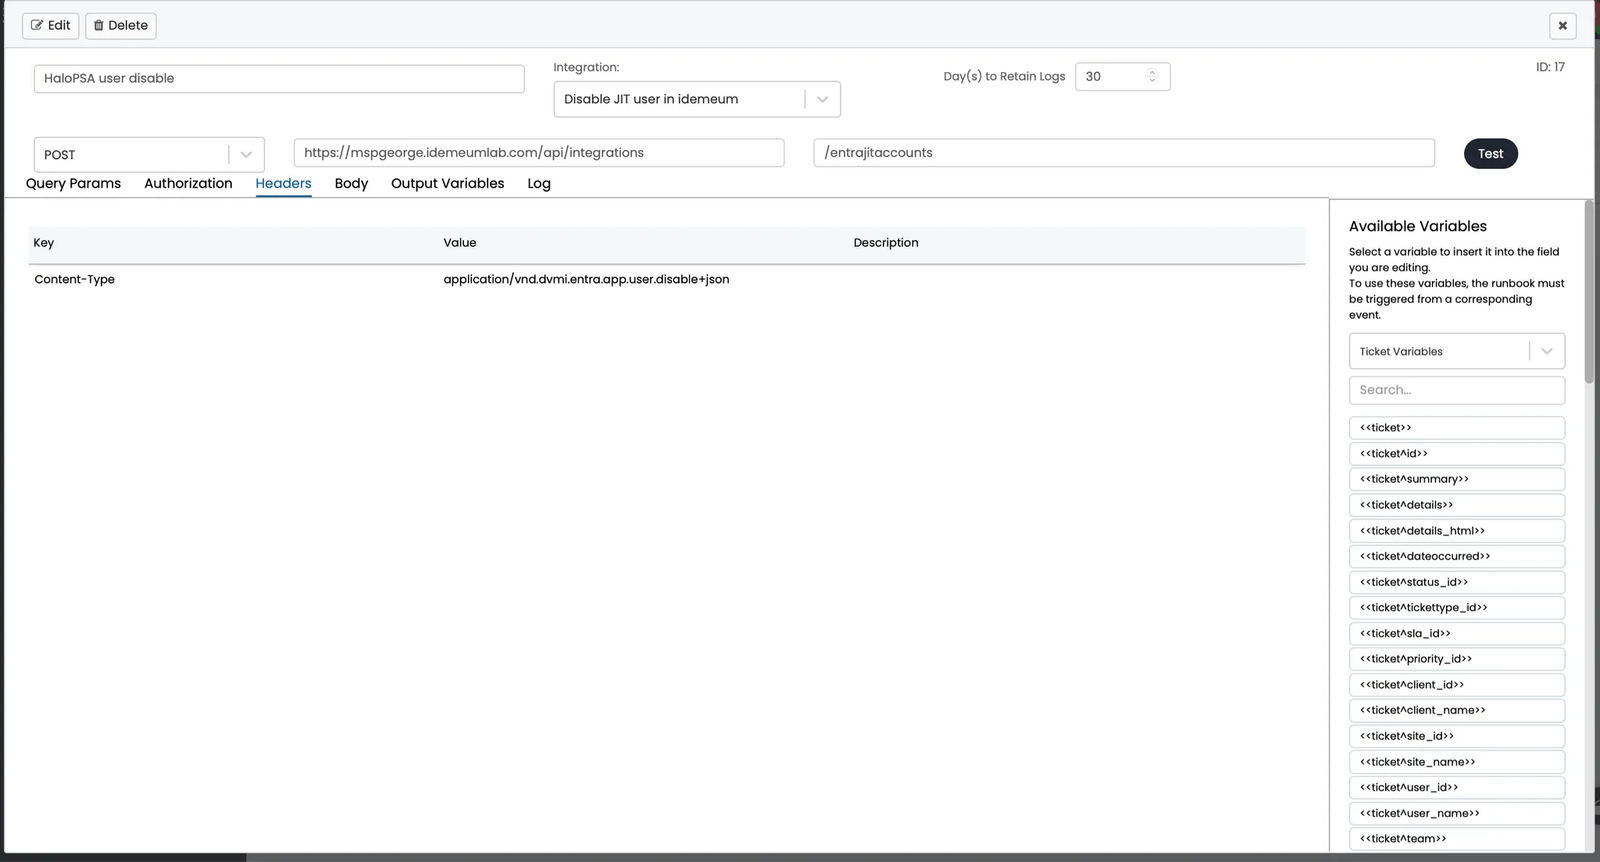
* Now in the same tab click on `Methods` to create an HTTP POST method
* Configure the following:
* Provide method name
* HTTP method → `POST`
* Path → `/entrajitaccounts`
* Headers:
* `Content-Type: application/vnd.dvmi.entra.app.user.disable+json`
* Body provided below
```json theme={null}
{
"customerDisplayName" : "",
"technicianEmailAddress" : ""
}
```
As an example here is what we used:
```json theme={null}
{
"customerDisplayName" : "Demo PAM tenant",
"technicianEmailAddress" : "nik@nikpot.com"
}
```
* Save the configuration
* Now in the same tab click on `Methods` to create an HTTP POST method
* Configure the following:
* Provide method name
* HTTP method → `POST`
* Path → `/entrajitaccounts`
* Headers:
* `Content-Type: application/vnd.dvmi.entra.app.user.disable+json`
* Body provided below
```json theme={null}
{
"customerDisplayName" : "",
"technicianEmailAddress" : ""
}
```
As an example here is what we used:
```json theme={null}
{
"customerDisplayName" : "Demo PAM tenant",
"technicianEmailAddress" : "nik@nikpot.com"
}
```
 * Once you `Save` the configuration you can test the API call for this integration. You should see the success response.
* Now you can navigate to `Integrations` → `Custom integrations` → `Integration runbooks` and create a run-book to call idemeum API when the ticket is closed.
* Once you `Save` the configuration you can test the API call for this integration. You should see the success response.
* Now you can navigate to `Integrations` → `Custom integrations` → `Integration runbooks` and create a run-book to call idemeum API when the ticket is closed.